Use System Managed Identity for authentication against Microsoft Graph API
Use system-assigned managed identity for authentication against Microsoft Graph API
This guide shows how to use a Prerequisites:system-assigned managed identity Youto mustcall haveMicrosoft ApplicationGraph Administratorfrom roleAzure-hosted automation.
This is usually the preferred approach for Azure Automation, Azure Functions, and other Azure-native workloads because it removes the need to store secrets.
Why use managed identity
Benefits:
Typical use cases
Prerequisites
Step 1: Enable the system-assigned managed identity
For Azure Automation:
Azure creates a service principal in Microsoft Entra ID (Bearerfor tokenthis must contain scope Applications.ReadWrite.All). Automation Account must be available. You have to be permitted to activate the System Managed Identity.resource.
Managing
Step authentication2: securely in Azure can be challenging, but leveraging System-Managed Identities simplifies access management while enhancing security. This guide walks you through the process of using a System-Managed Identity within an Azure Automation Account to authenticate againstAssign Microsoft Graph API.
Known limitations
System Managed Identities
First you need to decide if System Managed Identities are suitable for your needs. There are also User Managed Identities which serve a more dynamic approach (In short: Lifecycle of Identity object is not tied to the Azure Resource). Here you can see a comparison of the two options and some more explanation: Best practice recommendations for managed system identities - Managed identities for Azure resources | Microsoft Learn
If you want to have a deep understanding of the Service Principal architecture behind it, watch this deep dive session: Microsoft Azure Managed Identity Deep Dive - YouTube
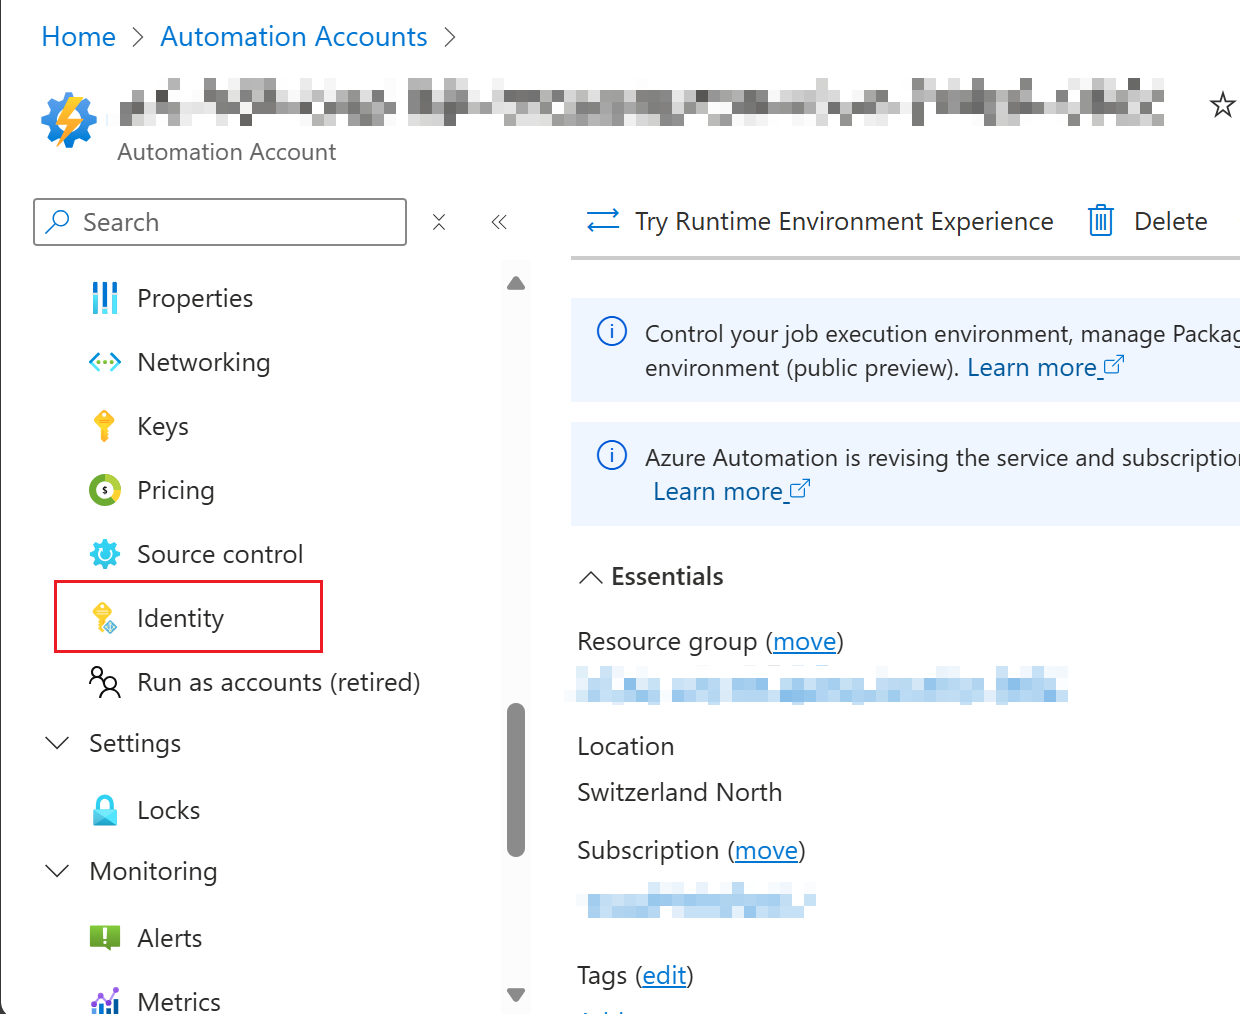
Enable Identity on Azure Automation Account
First open Azure Automation Account in Azure Portal (List all accounts: Automation Accounts - Microsoft Azure). Open the one you want to activate the managed identity.
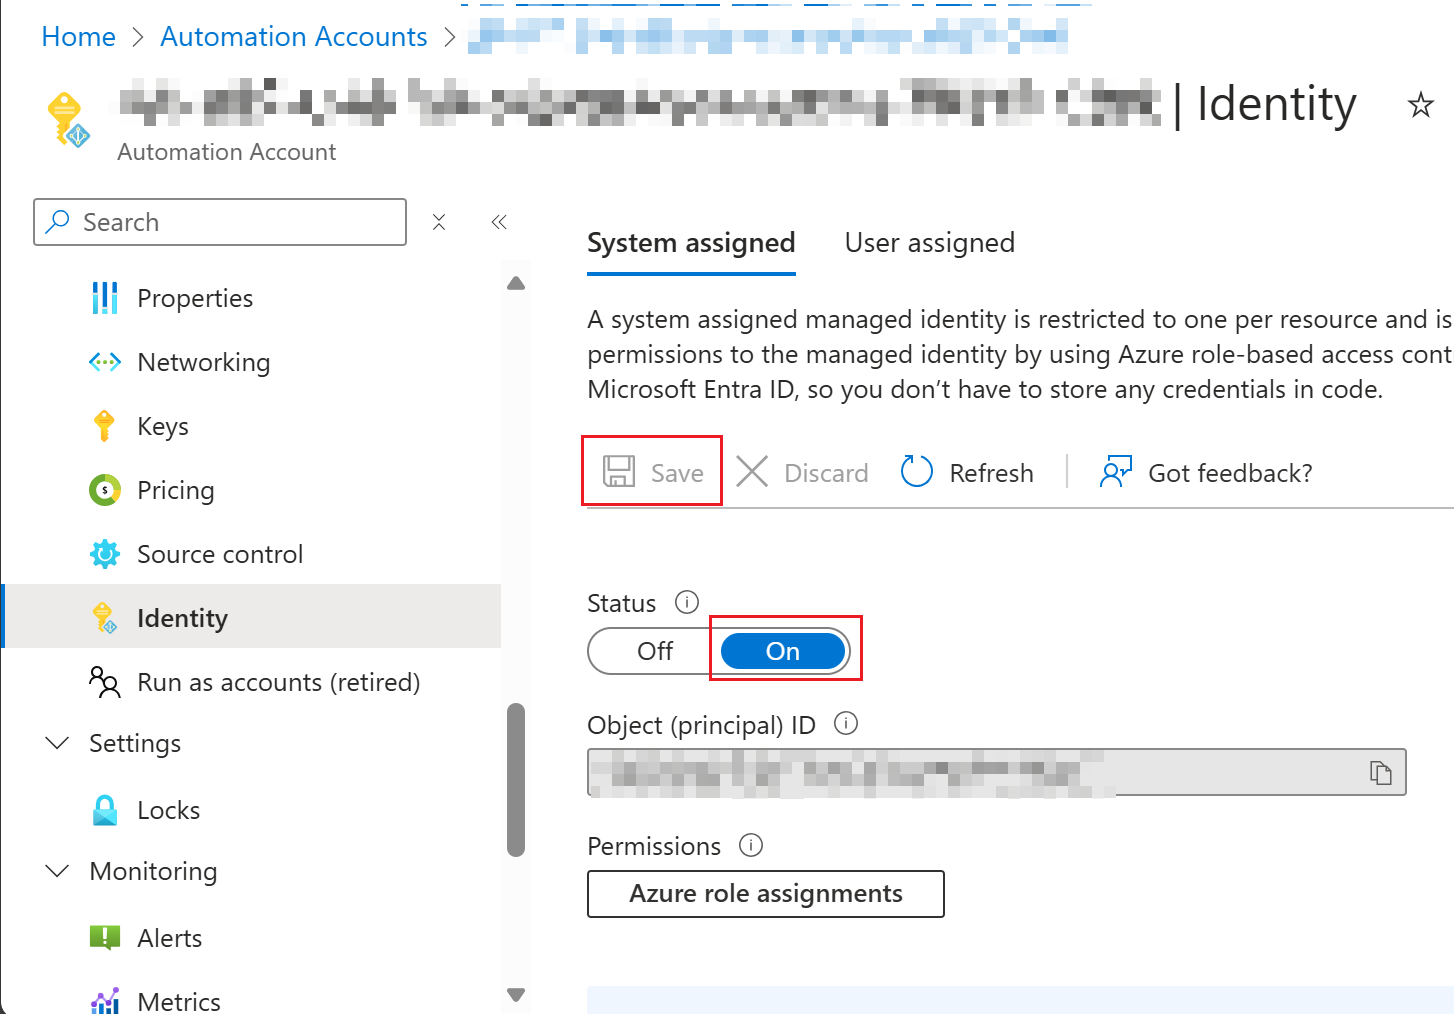
Switch to tab "Identity" on the Automation Account page.
Switch Status to "On" and click "Save".
Verify System Managed Identity in Microsoft Entra ID
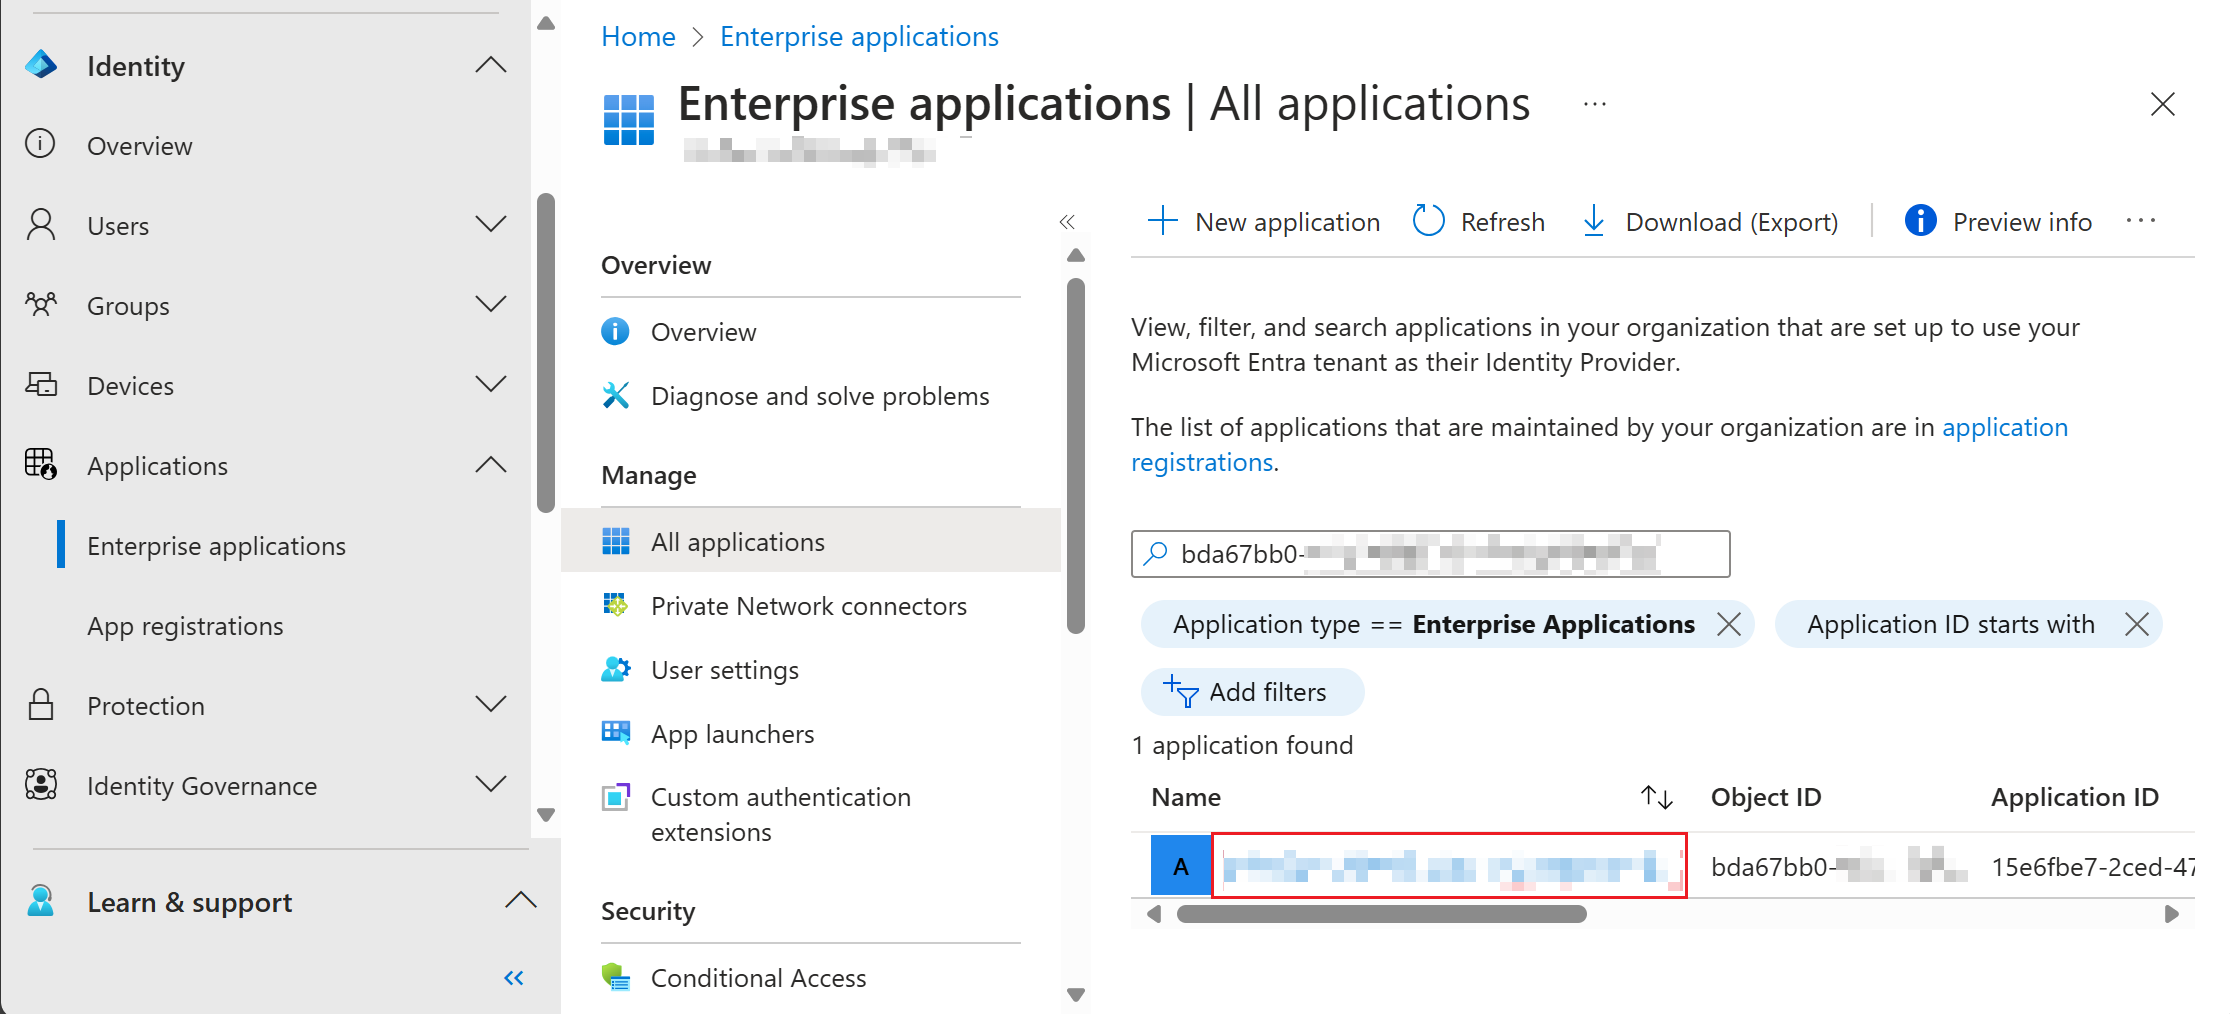
To verify if the System Managed Identity is successfully deployed, you can verify if the Service Principal of the Azure Resource is deployed correctly. Copy the Object ID of the created Service Principal (in view of screenshot above). Afterwards, open Microsoft Entra admin center and navigate to Enterprise Application (or use theapplication direct link: Enterprise applications - Microsoft Entra admin center).
Search the Object ID of the Service Principal or search for the name of the Azure Resource. If found, click on the appropriate resource.
If the Service Principal ispermissions, not yet displayed, wait a few minutes and try to refresh the view a bunch of times.
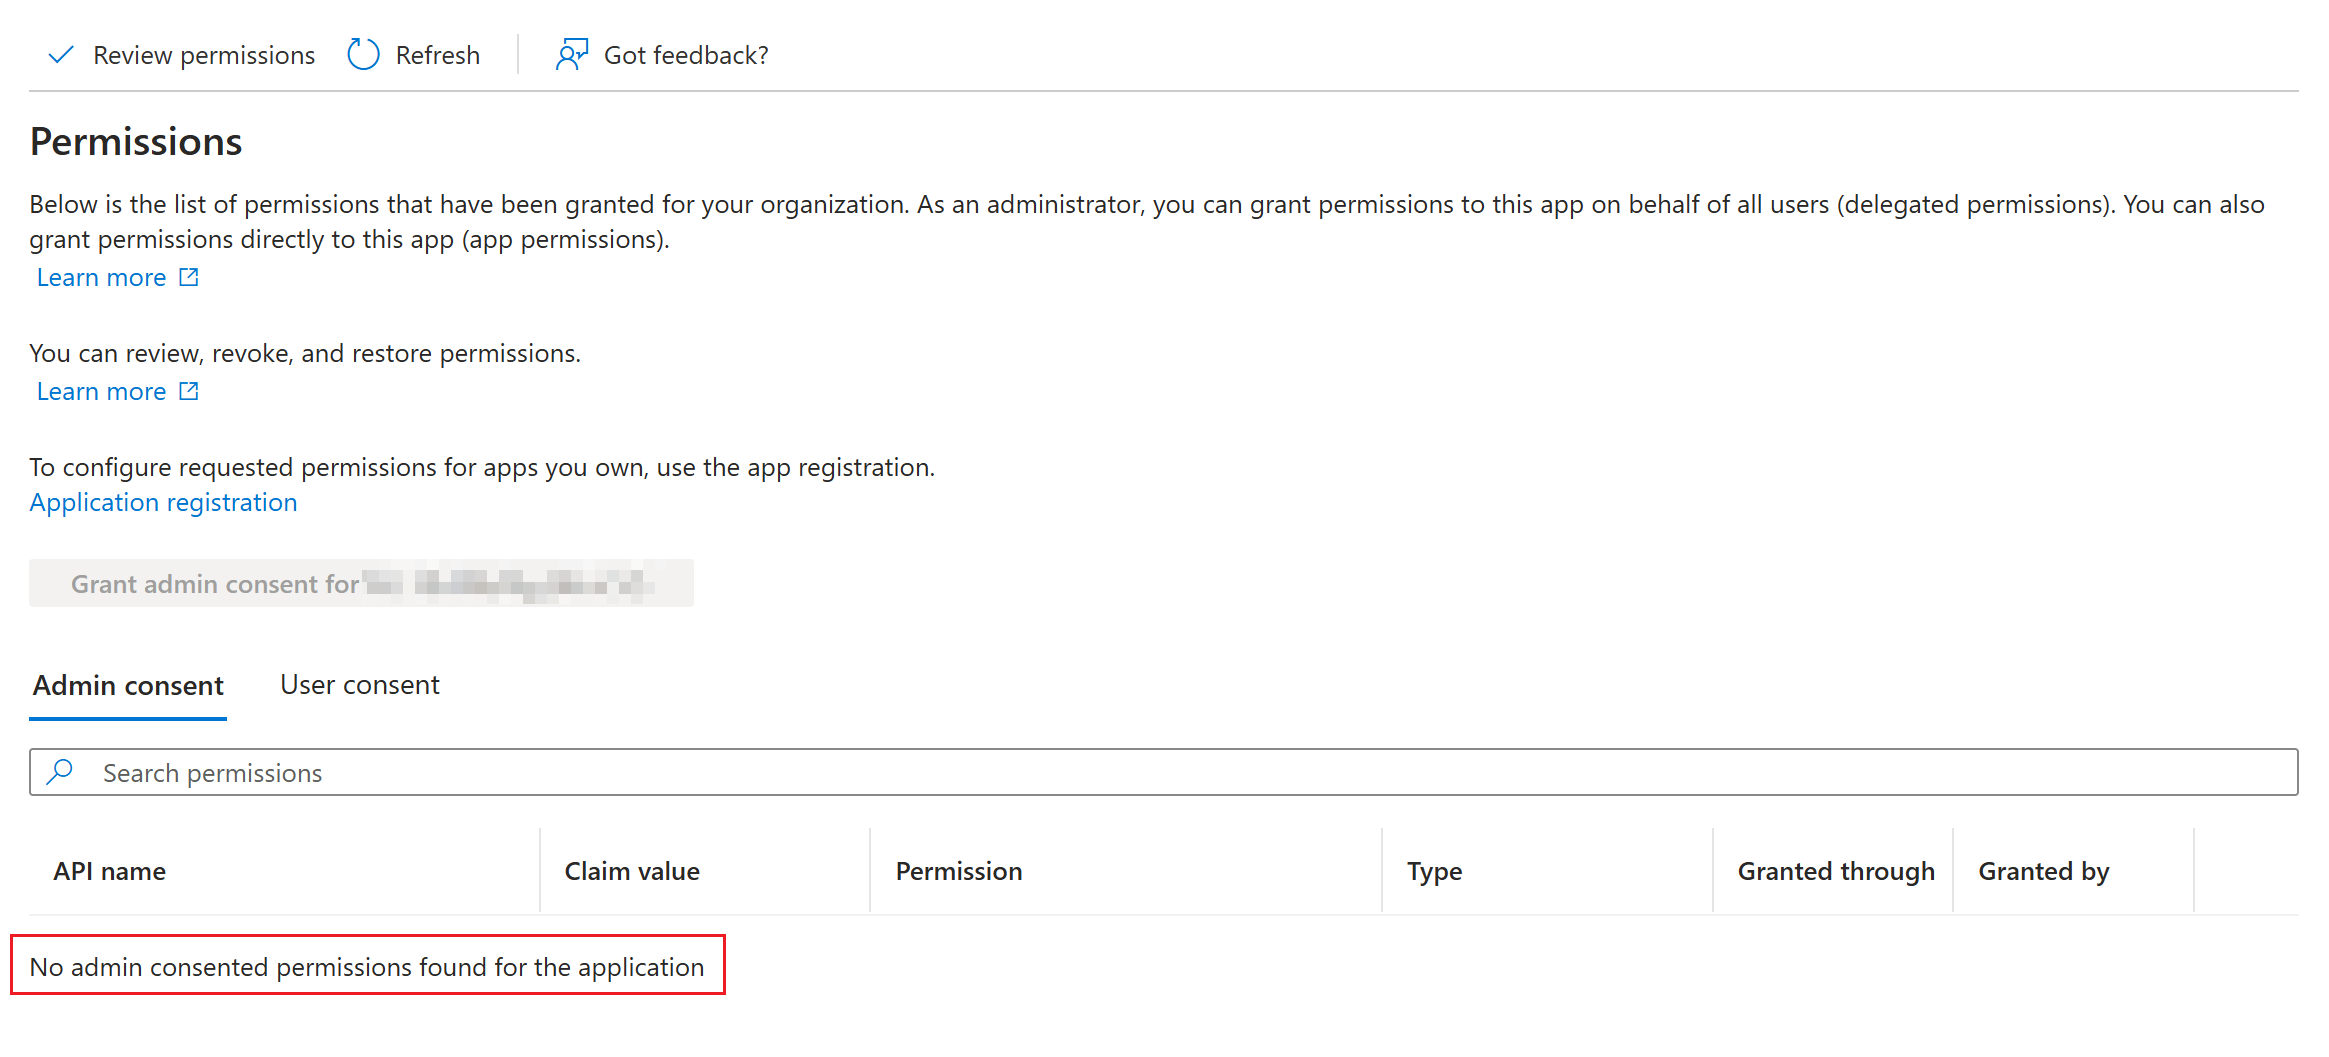
Scroll down in the menu and switch to the "Permissions" tab. Here are all Graph API permissions displayed. System Managed Identities only support permissions in "Admin consent" / Application context (no delegated permissions supported as there are no sign interactive sign ins by user objects).
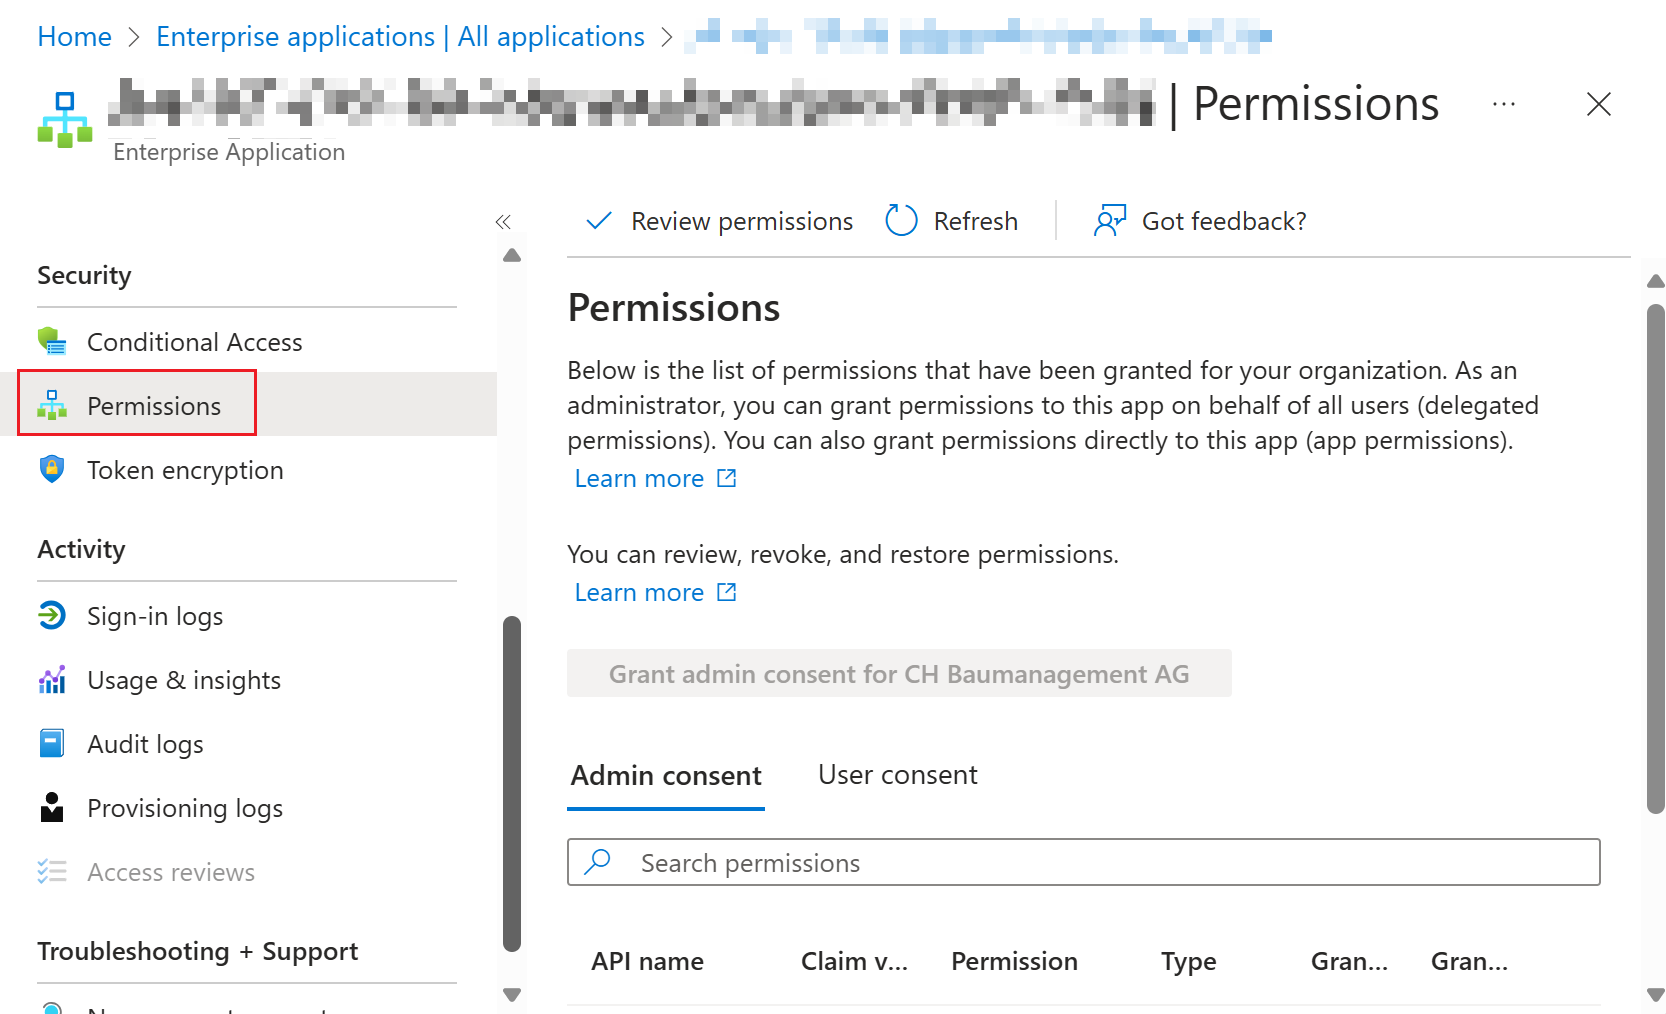
Here you can review the permissions of the Managed Identity. If previously created, this list will be empty by default.
Go to next chapter to assign Graph API permissions.
Assign Graph API Permissions
Unfortunately the assignment of permissions to the System Managed Identity is not available via the Entra admin center. Therefore we have to use a PowerShell script to leverage the Graph API to assign the desired permissions.
YouExamples:
User.Read.All
Group.Read.All
Device.Read.All
AuditLog.Read.All
Grant andonly then run it via ".\<yourscriptfilename>.ps1" or copy/pastewhat the desiredworkload codereally blocksneeds.
Step a3: terminal.Authenticate If you want to grant specific permissions toinside the Serviceworkload
With youMicrosoft canGraph adjust the list in $GrantGraphPermissions.PowerShell
[CmdletBinding()]
param (
    [Parameter(Mandatory = $true)]
    [string]$AutomationAccountName,
    [Parameter(Mandatory = $true)]
    [string]$TenantID,
    [Parameter(Mandatory = $true)]
    [string]$SubscriptionID
)

Import-Module Microsoft.Graph.Authentication
Import-Module Az.Resources
Import-Module Az.Accounts

$GRAPH_APP_ID = "00000003-0000-0000-c000-000000000000"
$GrantGraphPermissions = @(
    "User.ReadBasic.All",
    "<addotherpermissions>"
)

$EntraIDRequiredPermissions = @(
    "AppRoleAssignment.ReadWrite.All",
    "Application.ReadWrite.All"
)

Update-AzConfig -EnableLoginByWam $false
Connect-AzAccount -TenantId $TenantID -Subscription $SubscriptionID
Connect-MgGraph -Scopes $($EntraIDRequiredPermissions -join ', ') -NoWelcome -ErrorAction Stop

Get-AzContext | Format-List
Get-MgContext | Format-List

$AutomationMSI = (Get-AzADServicePrincipal -Filter "displayName eq '$AutomationAccountName'")
Write-Host "Assigning permissions to $AutomationAccountName ($($AutomationMSI.Id))"

$GraphServicePrincipal = Get-AzADServicePrincipal -Filter "appId eq '$GRAPH_APP_ID'"
$GraphAppRoles = $GraphServicePrincipal.AppRole | Where-Object { $_.Value -in $GrantGraphPermissions -and $_.AllowedMemberType -contains "Application" }

if ($GraphAppRoles.Count -ne $GrantGraphPermissions.Count) {
    Write-Warning "App roles found: $($GraphAppRoles)"
    throw "Some App Roles are not found on Graph API service principal"
}

foreach ($AppRole in $GraphAppRoles) {
    Write-Host "Assigning $($AppRole.Value) to $($AutomationMSI.DisplayName)"
    New-MgServicePrincipalAppRoleAssignment -ServicePrincipalId $AutomationMSI.Id -PrincipalId $AutomationMSI.Id -ResourceId $GraphServicePrincipal.Id -AppRoleId $AppRole.Id | Out-Null
}
Add Graph Module to Automation Account
Open the Azure Portal and navigate to your Automation Account (List all accounts: Automation Accounts - Microsoft Azure).
PowerShell 7.4
PowerShell 7.4 requires a Runtime Environment in your Automation Account. Here is a guide on how to migrate to Runtime Environments: Azure Automation Runtime Environments Preview - Icewolf Blog
If you are already working with Runtime Environments on your Automation Account you can simply import the PowerShell module "Microsoft.Graph.Authentication" from PowerShellGallery and let it update automatically. Since PowerShell 7.4 is based on dotnet 8.0, the module version must be at least 2.26.0.
PowerShell 7.2
This is a workaround for Powershell Module "Microsoft.Graph.Authentication" for PowerShell 7.2 in version 2.25.0.
Open PowerShell 7 on your Mac or Windows Device. Run this command to export the Module to a file:
Save-Module -Name Microsoft.Graph.Authentication -Path .\ -Repository PSGallery -MaximumVersion 2.25.0
Compress the created folder to a zip archive.

Switch to tab "Module" on the Automation Account page and click "Add a module".
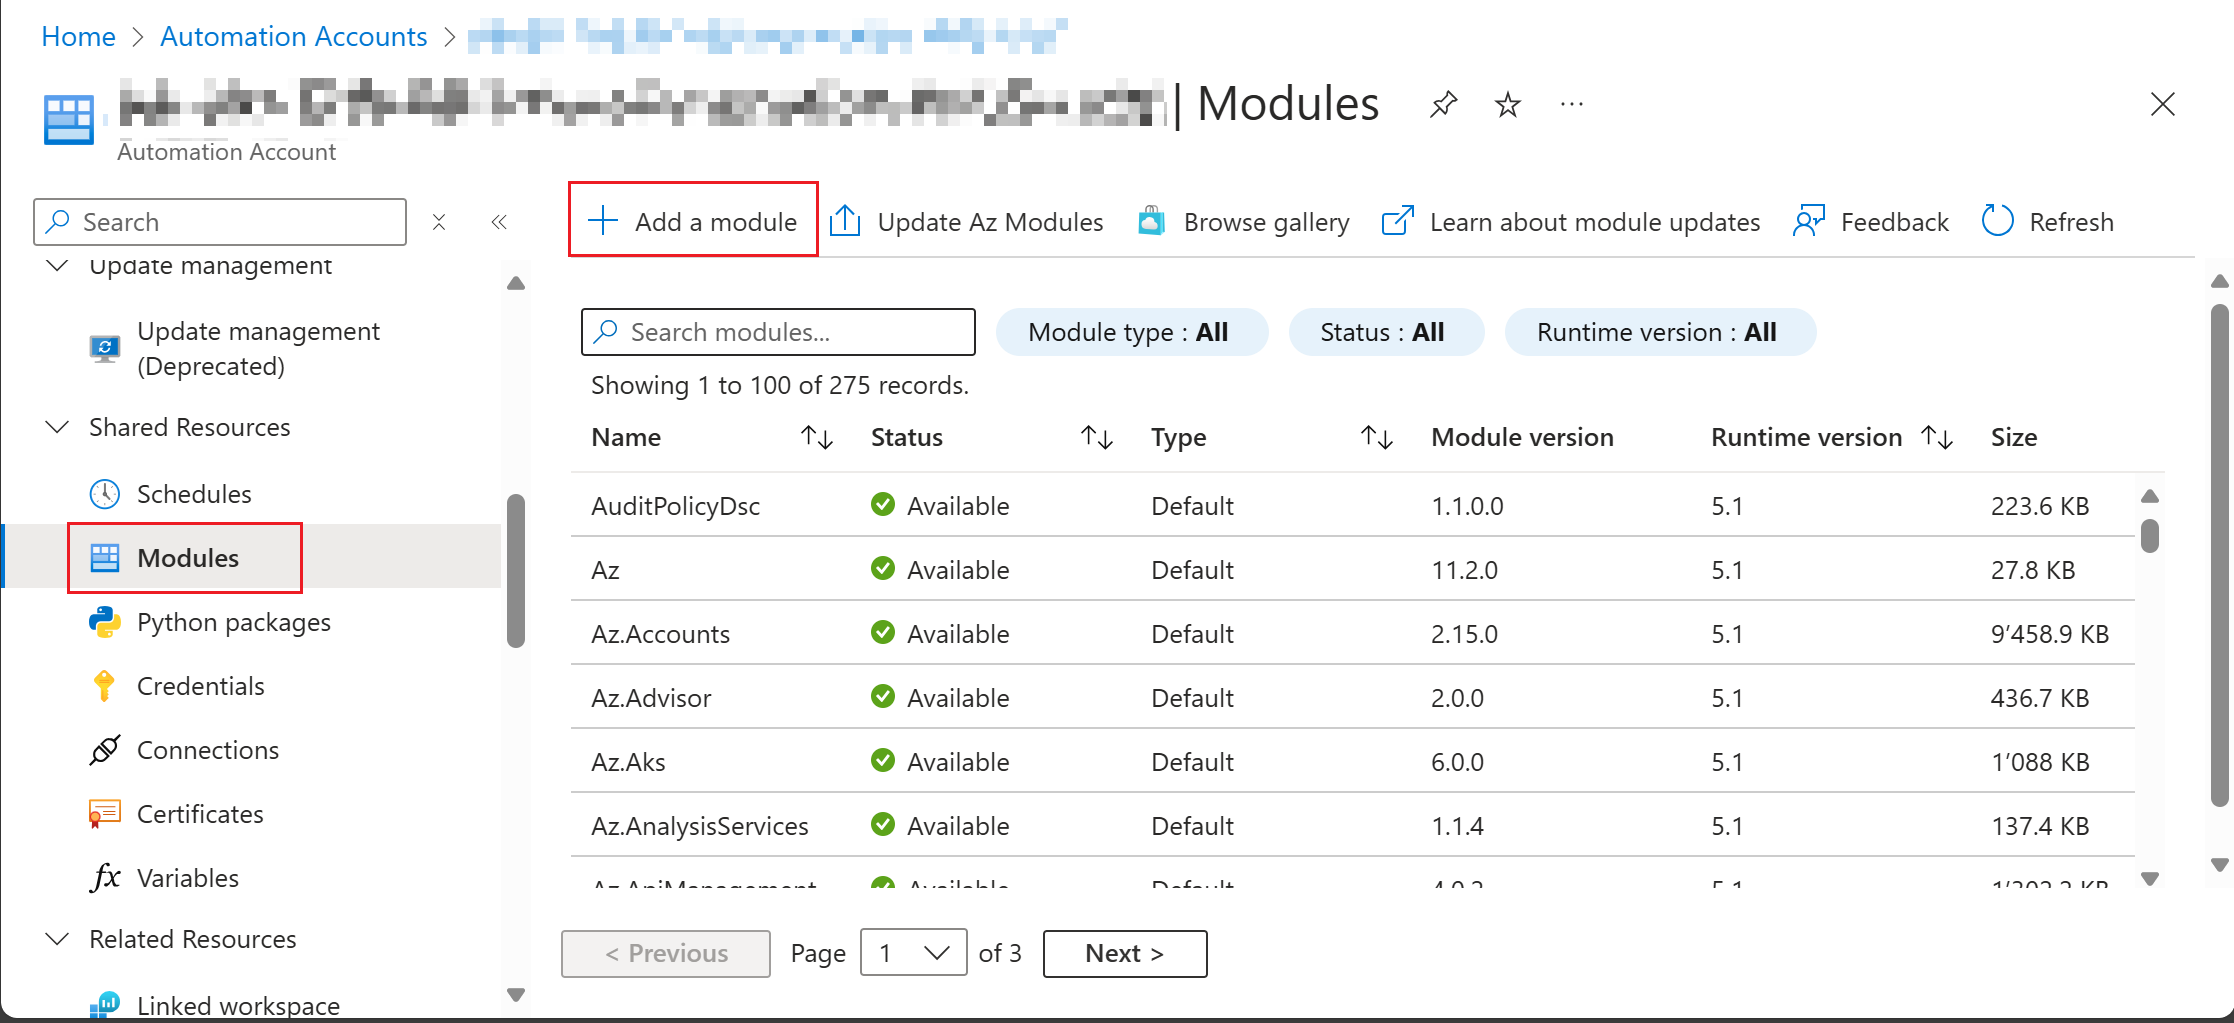
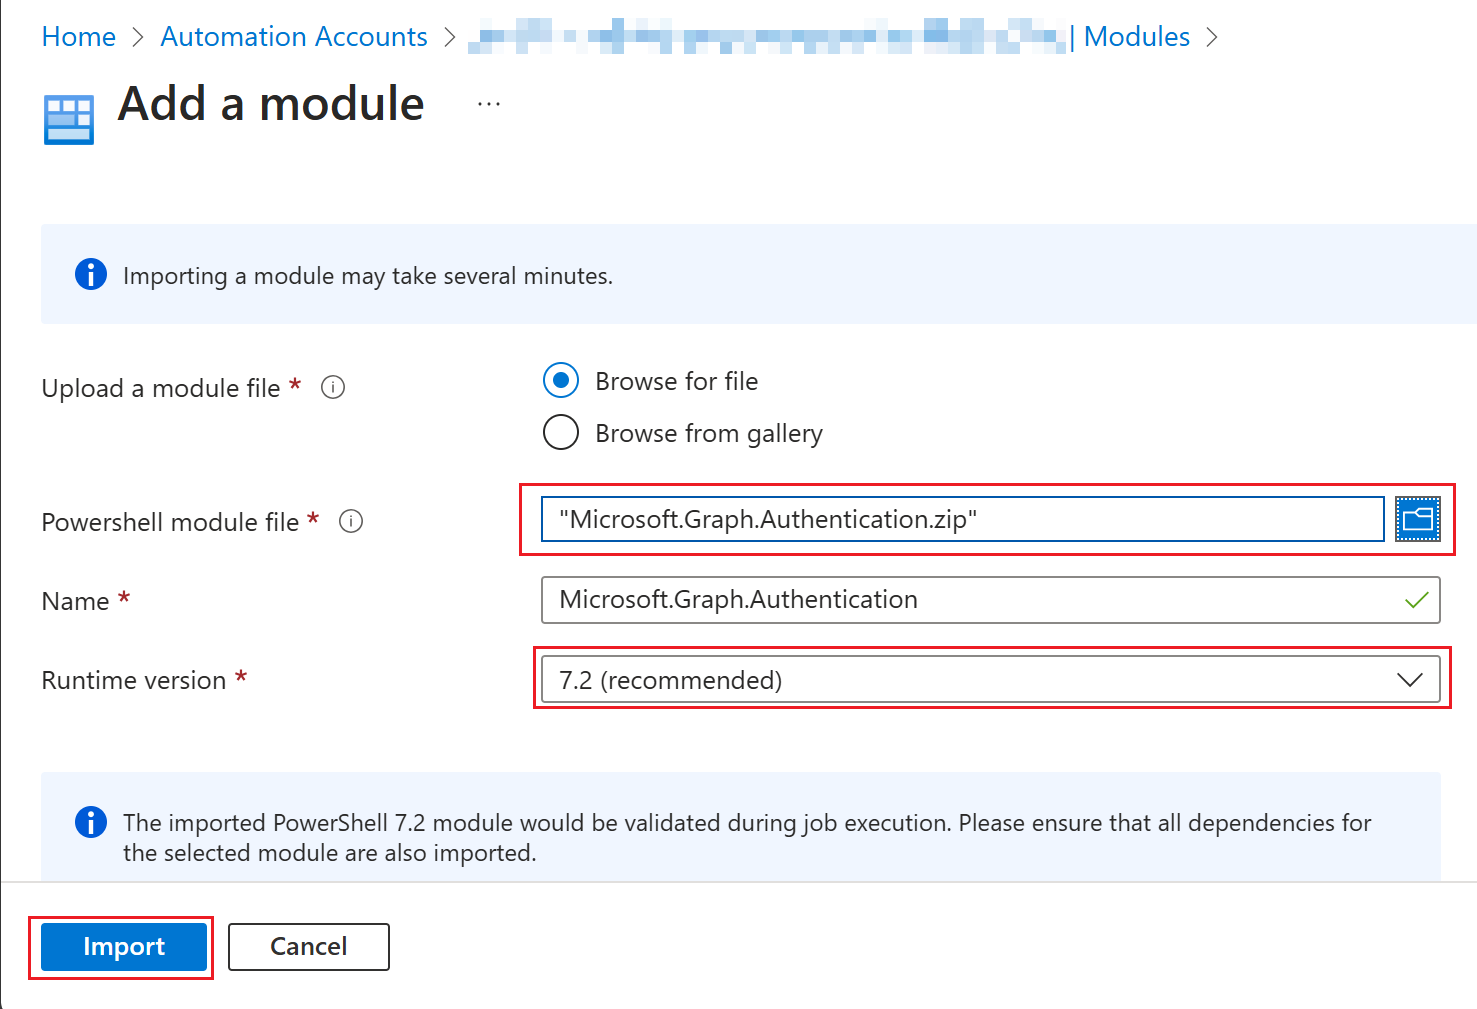
Choose "Browse for file" and select the file you have created earlier. Select a name and a runtime version (Powershell 7.2) and klick on "Import".
Use System Managed Identity with Graph module
After the permissions are set you have to create a Runbook. Inside the Runbook you can develop some PowerShell code. Use the following snipped to authenticate against the Graph API using the Microsoft.Graph.Authentication PowerShell module. The Connect-MgGraph method uses the System Managed Identity with -Identity parameter. If no Client ID is specified, it will always try to use the System Managed Identity for authentication. If you want to use User Assigned Managed Identity, use -ClientID parameter.
# Connect using the Managed Identity
Connect-MgGraph -Identity
Get-MgContext
Example Graph call
Get-MgUser -NoWelcomeTop #10
Get
Operational recommendations
Summary
System-assigned managed identity is the preferred authentication model for Azure-hosted Microsoft Graph automation because it is more secure than secrets and easier to operate.