Pipelines
- Upload files automatically to SFTP server
- Build and deploy node.js app automatically using CI/CD
- Proxmox VM Creation using Terraform and Gitlab Pipelines
Upload files automatically to SFTP server
Prerequisite: A Gitlab Runner must be available in the project or group. You also need to know the information on how access to your (S)FTP server.
This article describes how to automatically upload files to an (S)FTP server. We will create a pipeline in the Gitlab project that runs on a runner and uploads the files. The intended use could be to publish a static website on a web server or to keep information on the Internet up to date.
We will use an (S)FTP Linux client for the upload, which is executed on the command line.
Store credentials as a variable
To ensure that the credentials for your (S)FTP server can be managed centrally and are not stored as plain text in your repo, it is strongly recommended to use the variable function. To do this, variables can be created in the project or at group level, which can then be used in the pipeline using $VARIABLE.
Go to your group or project in your Gitlab instance or in the cloud. You can choose Settings -> CI/CD to open the variable secion.
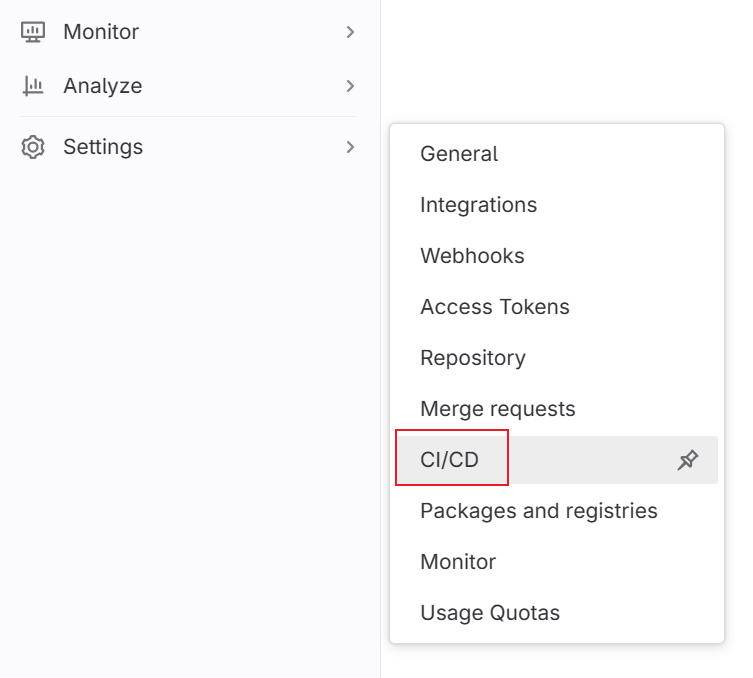
You can then enter your access data under "Variables". Make sure you use the correct name in the code. For credential data, it is recommended to deactivate the "Protected" setting and to active"Expand".
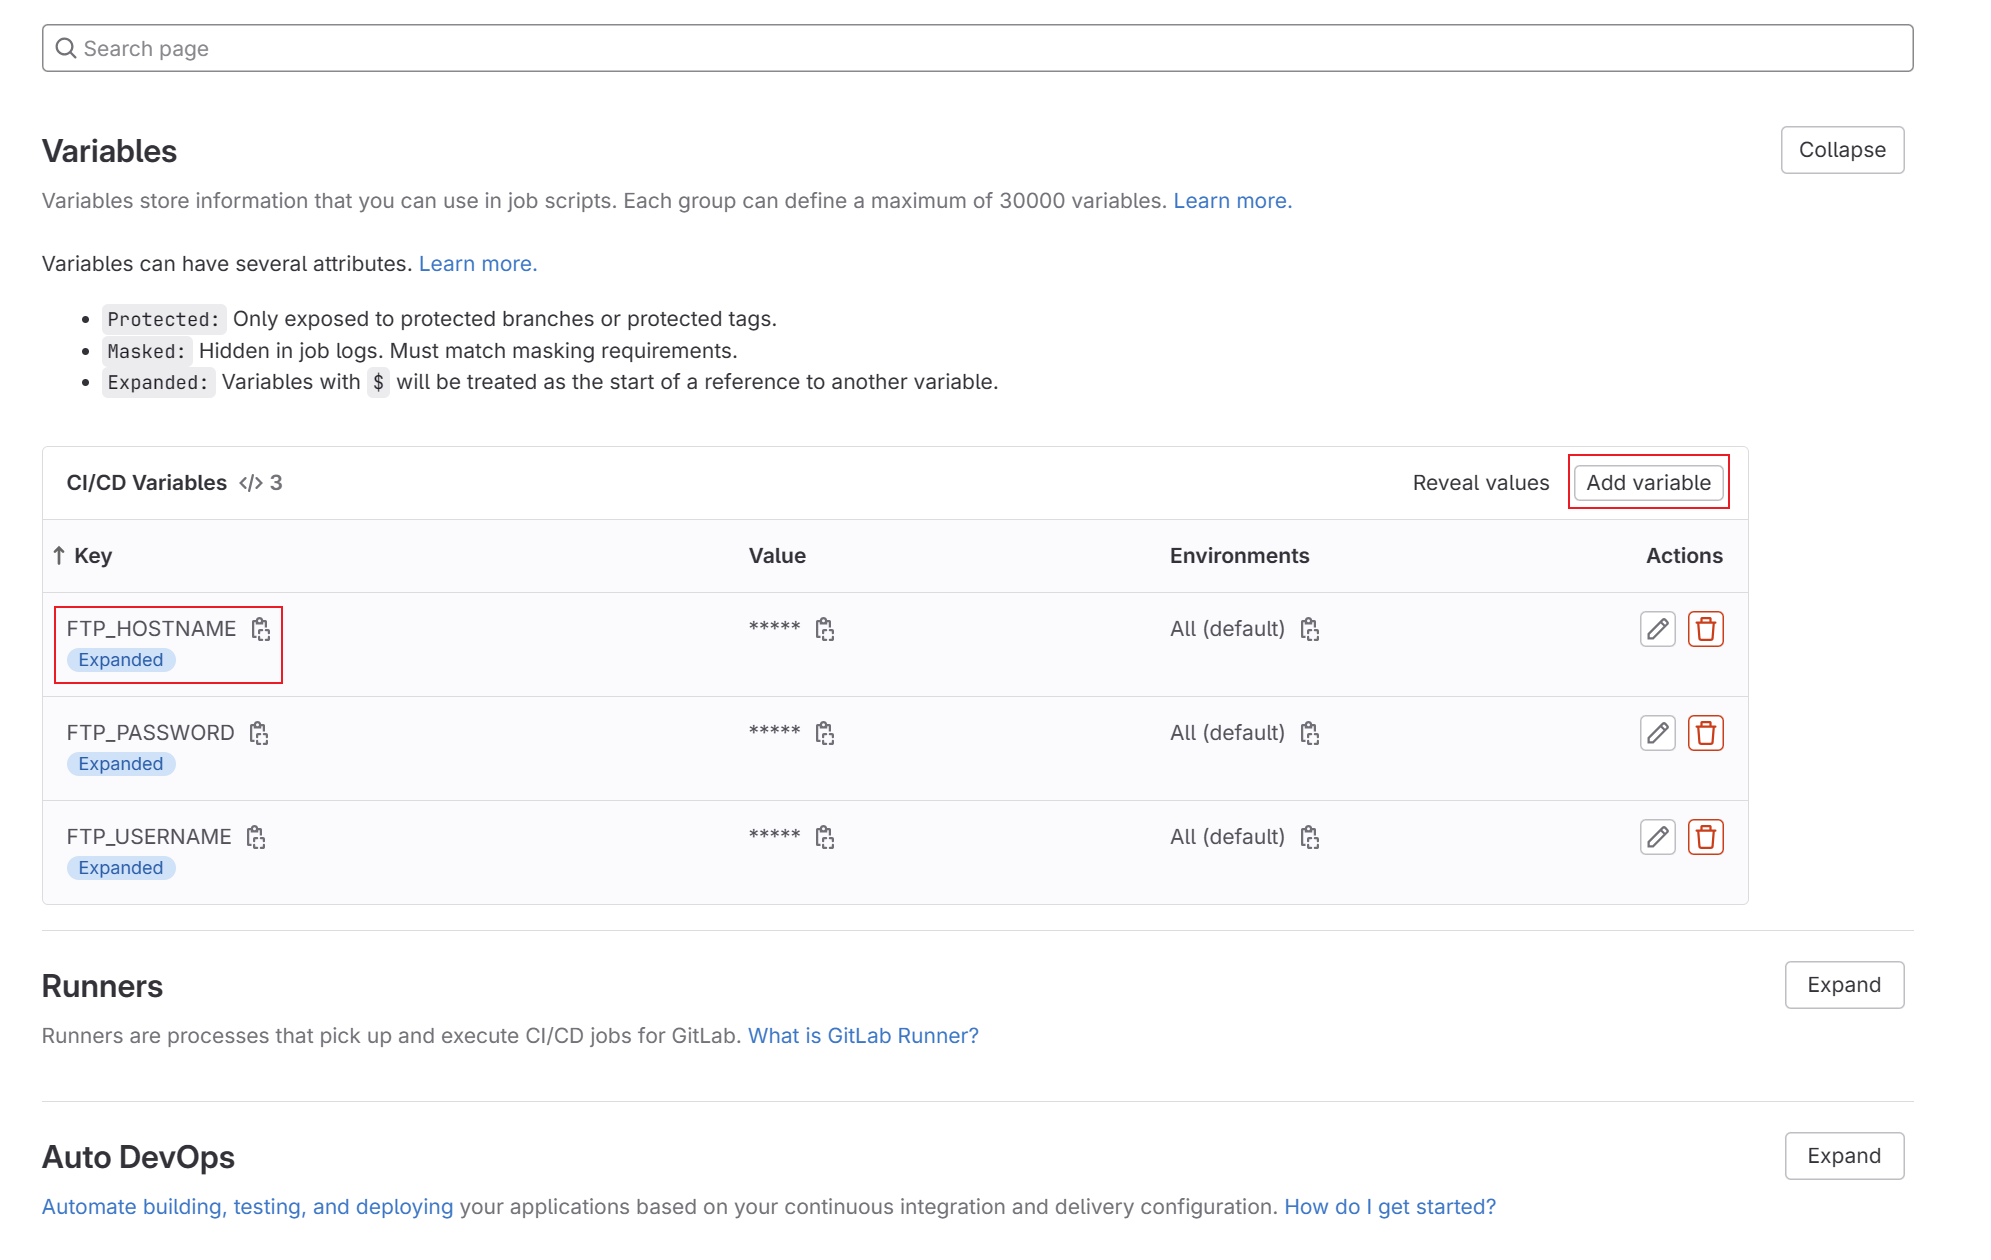
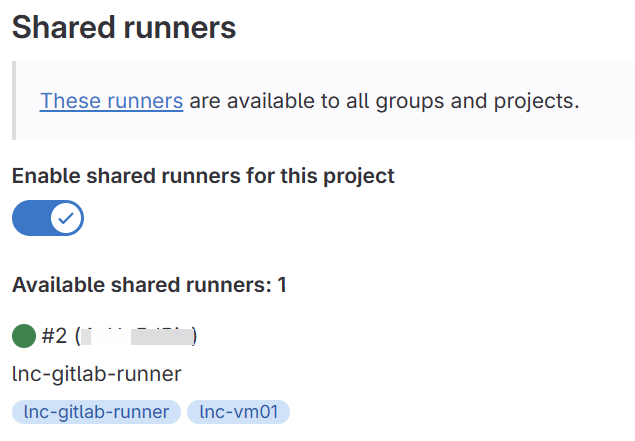
In the same view, you can check that a Gitlab Runner is available for the project or group. The view should look like this:
Create pipeline
In the project that you want to upload to the server, you must create a .gitlab-ci.yml file. You can then copy the following code into it.
image: ubuntu:22.04

stages:
  - before_script
  - deploy

before_script:
  - apt update -qy
  - apt install -y lftp

deploy:
  stage: deploy
  script:
    - lftp -e "set ssl:verify-certificate no; open $FTP_HOSTNAME; user $FTP_USERNAME $FTP_PASSWORD; mirror -X .* -X .*/ --reverse --verbose --delete . ./<yourdestinationfolder>; bye"
  only:
    - master
    - main
Make sure that you set the target path correctly and you may want to add other parameters so that it works with your FTP setup. If you have created the file correctly, you can commit the code to your GIT repo and push it to the Gitlab remote repository. The code is then executed and your repo files are uploaded to the (S)FTP server.
The Pipeline now only executes this configuration if it is pushed into the Master or Main branch. However, you can change this relatively quickly by removing the code block.
Build and deploy node.js app automatically using CI/CD
Prerequisites: A Gitlab Runner must be available in the project or group. Your code must be in the repo on Gitlab instance or cloud.
This guide enables automation in the build and deployment process. Tested frameworks with this solution are: SvelteKit, Express.JS, Next.JS.
Use case
If a node.js application has regular feature updates or bug fixes, it can be tedious to deploy them manually.
Here you can find an example pipeline of how building and deploying the website using Docker containers could work.
However, if you only want to upload the files to your web server via (S)FTP, you can combine this guide and the following one: Upload files automatic... | LNC DOCS (lucanoahcaprez.ch)
Architecture
The building and deploying steps should be possible via a pipeline. First, a container is created via the Gitlab Runner, which builds the code. This container is then finalized and uploaded to a registry.
Once the Docker image has arrived in the registry, the building container is destroyed. The next step is then to use docker-compose and the corresponding image that we created previously on the production server.
Pipeline
The following code could be an example pipeline that first builds and containerizes the application and then deploys it using docker-compose. Save the following code as a ".gitlab-ci.yml" document in the main level of your GIT project.
Note that you need to specify the Docker hosts for the build process and for the production release. In addition, you must provide the following variables correctly in the project or in the group.
- $REGISTRY_URL
- $REGISTRY_USERNAME
- $REGISTRY_PASSWORD
More on Gitlabs CI/CD variables can be found here: Upload files automatic... | LNC DOCS (lucanoahcaprez.ch)
stages:
  - containerize
  - deploy

containerize:
  variables:
      DOCKER_HOST: tcp://<yourdockerbuildmachine>:2375
  image: docker
  stage: containerize
  services:
    - docker:dind
  script:
    - apk add --update nodejs npm
    - npm i
    - npm run build
    - docker build -t $REGISTRY_URL/<yourprojectname> .
    - echo $REGISTRY_PASSWORD | docker login https://$REGISTRY_URL -u $REGISTRY_USERNAME --password-stdin
    - docker push $REGISTRY_URL/<yourprojectname>
    - ls -la .
  only:
    - master
    - main

deploy:
  variables:
    DOCKER_HOST: tcp://<yourdockerhostingmachine>:2375
  image: docker
  stage: deploy
  script:
    - docker-compose up -d
  only:
    - master
    - main
Deployment configuration
Save these files in addition to the .gitlab-ci.yml configuration at the top level.
docker-compose.yml
When publishing, docker-compose uses a configuration file. This must be located in the top directory of the GIT repo. This configuration can be extended as required and only serves as a basis for publishing.
version: '3'
services:
  node:
    image: '<yourregistryurl>/<yourprojectname>:latest'
    container_name: <yourprefereddockername>
    restart: unless-stopped
    ports:
      - '<hostport>:3000'
Dockerfile
The last file that is required is the Dockerfile. This file tells the build process what the docker container should ultimately look like. Here is a generic Dockerfile that builds a node app and makes it available on port 3000.
FROM node:18-alpine

RUN mkdir -p /usr/app/
WORKDIR /usr/app/

COPY ./ ./

RUN npm install
RUN npm run build

EXPOSE 3000
CMD ["node", "build/index.js"]
Proxmox VM Creation using Terraform and Gitlab Pipelines
Overview
This documentation describes how to build and manage virtual machines (VMs) on a Proxmox Virtual Environment (PVE) cluster using Terraform and GitLab CI/CD pipelines. The goal is to provide a reusable, cloud-agnostic, and environment-independent approach suitable for organizations who want to automate VM provisioning and lifecycle management.
This guide explains:
- The key concepts behind Terraform-based VM automation
- The goal and architecture of a GitOps-style workflow
- How to structure your Terraform project
- How to run and automate provisioning using GitLab pipelines
- How to adapt the solution to your own infrastructure
Prerequisites
Before implementing this Terraform–Proxmox automation stack, ensure the following requirements are met:
1. Proxmox Environment
- A running Proxmox VE node or cluster (version 6.4 or later recommended)
- A cloud-init enabled VM template (e.g., Ubuntu 24.04)
- A configured network bridge (e.g.,
vmbr0) and optional VLAN setup - Storage available for VM disks (local-lvm, ZFS, Ceph, NFS, etc.)
- A Proxmox API token with permissions to clone templates and manage VMs
2. Terraform Requirements
- Terraform v0.13+ (v1.0+ recommended)
- Installed locally or executed through GitLab CI/CD
- Access to the required Terraform provider (
Telmate/proxmox)
3. GitLab Requirements
- A GitLab project to host:
- Terraform code
- CI/CD pipeline (
.gitlab-ci.yml) - HTTP backend Terraform state (GitLab Terraform state storage)
- A GitLab access token for remote state access
4. Secret Management
All secrets must be stored in GitLab CI/CD variables or a secure secret store:
PROXMOX_API_URLPROXMOX_API_TOKEN_IDPROXMOX_API_TOKEN_SECRETVM_USER_PASSWORDVM_USER_SSHKEYGITLAB_TERRAFORM_TOKEN
5. Local Machine (Optional)
If running Terraform locally:
- SSH keypair available (
~/.ssh/id_rsa.pub) - Exported environment variables (
TF_VAR_*) - Network access to the Proxmox API endpoint
These prerequisites ensure the infrastructure is ready for automated provisioning and GitOps-driven VM lifecycle management.
Goals
The solution aims to:
- Provide Infrastructure-as-Code (IaC) for consistent, repeatable Proxmox VM creation.
- Enable GitOps workflows, where all VM configurations live in git and are changed via merge requests.
- Support environment-independent reuse, allowing teams to manage Proxmox VMs in test, staging, or production environments.
- Automate cloud-init based VM provisioning using Proxmox templates.
- Use GitLab CI/CD to plan, review, and apply changes with auditability and access control.
Key Concepts
1. Proxmox Provider for Terraform
The Terraform provider (commonly Telmate/proxmox) communicates with the PVE API using an API token. Terraform can then create, update, or destroy VMs.
2. Cloud-Init Templates
VMs are provisioned by cloning from a cloud-init enabled template. This ensures:
- Automated initial user creation
- SSH key injection
- Network configuration
- Custom startup scripts
3. Remote State Backend
Storing Terraform state in a GitLab HTTP backend ensures:
4. GitOps Workflow
Using GitLab pipelines adds structure:
- Create MR → Run validation → Review plan → Apply after approval
- Automated, controlled infrastructure changes
Architecture
Local Machine / GitLab Runner
      |
      | Terraform Commands
      v
GitLab CI/CD Pipeline
      |
      | uses HTTP Remote State
      v
   GitLab Terraform State Storage
      |
      | PVE API Calls
      v
Proxmox Cluster → Clone cloud-init template → Provision VM → Configure network/user
Components
- Terraform project: Holds the VM definitions, provider config, variables, and modules.
- Cloud-init VM template: Pre-created in Proxmox, used as master image.
- GitLab CI pipeline: Runs
validate,plan, andapplysteps. - HTTP backend: Stores Terraform state in GitLab.
- Secret management: API tokens and SSH keys are stored as secure CI/CD variables.
Project Layout
A typical structure:
proxmox-terraform/
│
├── provider.tf              # Provider configuration and backend
├── variables.tf             # Input variables
├── vm-ubuntu01.tf           # VM definition (example)
├── vm-ubuntu02.tf           # Additional VM(s)
├── gitops-prod.yml          # GitLab CI pipeline
└── .terraform.lock.hcl      # Provider lock file
What belongs where?
- provider.tf: Sets Proxmox provider and remote state backend.
- vm-*.tf files: Define CPU, RAM, disk, network, and cloud-init settings per VM.
- gitops-prod.yml: Automation pipeline for GitOps workflow.
- variables.tf: Define required variables such as API tokens, SSH keys, VM sizes, etc.
Example provider.tf
Below is a generalized example of a provider.tf that configures:
- Terraform version
- HTTP backend (e.g., GitLab Terraform state)
- Proxmox provider
- Variables for API access and VM credentials
terraform {

  required_version = ">= 0.13.0"

  backend "http" {
  }

  required_providers {
    proxmox = {
      source  = "Telmate/proxmox"
      version = "3.0.2-rc04"
    }
  }
}

variable "PROXMOX_API_URL" {
  type = string
}

variable "PROXMOX_API_TOKEN_ID" {
  type = string
}

variable "PROXMOX_API_TOKEN_SECRET" {
  type = string
}

variable "VM_USER_PASSWORD" {
  type = string
}

variable "VM_USER_SSHKEY" {
  type = string
}

provider "proxmox" {
  pm_api_url          = var.PROXMOX_API_URL
  pm_api_token_id     = var.PROXMOX_API_TOKEN_ID
  pm_api_token_secret = var.PROXMOX_API_TOKEN_SECRET
  pm_tls_insecure     = false
}
You can supply the variables either via terraform.tfvars, environment variables (TF_VAR_*), or your CI/CD system. In this example we use the Gitlab CI/CD variables for centralized secret management capability.
Defining VMs with Terraform
A generalized VM definition looks like this:
resource "proxmox_vm_qemu" "example" {
  name        = var.vm_name
  target_node = var.proxmox_node

  clone       = var.template
  full_clone  = false
  onboot      = true

  cores       = var.cpu
  memory      = var.memory

  disks {
    scsi { scsi0 = "local-lvm:${var.disk_size}G" }
  }

  network {
    model  = "virtio"
    bridge = "vmbr0"
  }

  ipconfig0 = "ip=${var.ip}/24,gw=${var.gateway}"

  ciuser     = var.vm_user
  cipassword = var.vm_user_password
  sshkeys    = var.vm_user_sshkey
}
Running Terraform Locally
export TF_VAR_PROXMOX_API_URL="https://proxmox.example.com:8006/api2/json"
export TF_VAR_PROXMOX_API_TOKEN_ID="user@pve!token-name"
export TF_VAR_PROXMOX_API_TOKEN_SECRET="***"
export TF_VAR_VM_USER_PASSWORD="***"
export TF_VAR_VM_USER_SSHKEY="$(cat ~/.ssh/id_rsa.pub)"

terraform init -reconfigure
terraform plan -out plan.tfplan
terraform apply plan.tfplan
GitLab CI/CD Pipeline
Below is an example GitLab pipeline (.gitlab-ci.yml or gitops-prod.yml) that:
- Validates the Terraform configuration
- Creates a plan and publishes it as an artifact
- Applies the plan manually on merge-request or main branch
- Make sure to set the variables inside these brackets ${} for it to work properly
stages:
  - validate
  - plan
  - apply
  - deploy

image:
  name: hashicorp/terraform:latest
  entrypoint:
    - "/usr/bin/env"
    - "PATH=/usr/local/sbin:/usr/local/bin:/usr/sbin:/usr/bin:/sbin:/bin"

variables:
  # prevent interactive prompts
  TF_INPUT: "false"

before_script:
  # pass provider / VM variables from CI/CD settings
  - export TF_VAR_PROXMOX_API_URL="${PROXMOX_API_URL}"
  - export TF_VAR_PROXMOX_API_TOKEN_ID="${PROXMOX_API_TOKEN_ID}"
  - export TF_VAR_PROXMOX_API_TOKEN_SECRET="${PROXMOX_API_TOKEN_SECRET}"
  - export TF_VAR_VM_USER_PASSWORD="${VM_USER_PASSWORD}"
  - export TF_VAR_VM_USER_SSHKEY="${VM_USER_SSHKEY}"

  # configure Terraform HTTP backend via TF_HTTP_* env vars (use GITLAB_TERRAFORM_TOKEN)
  - export TF_HTTP_ADDRESS="https://gitlab.example.com/api/v4/projects/xx/terraform/state/default"
  - export TF_HTTP_LOCK_ADDRESS="https://gitlab.example.com/api/v4/projects/xx/terraform/state/default/lock"
  - export TF_HTTP_UNLOCK_ADDRESS="https://gitlab.example.com/api/v4/projects/xx/terraform/state/default/lock"
  - export TF_HTTP_USERNAME="luca"
  - export TF_HTTP_PASSWORD="${GITLAB_TERRAFORM_TOKEN}"
  - export TF_HTTP_LOCK_METHOD="POST"
  - export TF_HTTP_UNLOCK_METHOD="DELETE"
  - export TF_HTTP_RETRY_WAIT_MIN="5"

  - export TF_LOG=TRACE

validate:
  stage: validate
  rules:
    - changes:
        - "**/*.tf"
      when: always
  script:
    - terraform --version
    - terraform init -input=false -reconfigure
    - terraform validate

plan:
  stage: plan
  rules:
    - changes:
        - "**/*.tf"
      when: always
  needs: [validate]
  script:
    - terraform init -input=false -reconfigure
    - terraform plan -input=false -out=plan.tfplan
    - terraform show -no-color plan.tfplan > plan.txt
  artifacts:
    paths:
      - plan.tfplan
      - plan.txt
    expire_in: 1 hour
    when: always
  cache:
    key: "${CI_COMMIT_REF_SLUG}"
    paths:
      - .terraform/

apply:
  stage: apply
  needs:
    - job: plan
      optional: true
  rules:
    - if: '$CI_PIPELINE_SOURCE == "merge_request_event"'
      when: manual
    - if: '$CI_COMMIT_BRANCH == "main"'
      when: manual
    - when: never
  script:
    - terraform init -input=false -reconfigure
    - terraform apply -input=false -auto-approve plan.tfplan
  allow_failure: false
Replace
gitlab.example.com, projectxx, and theTF_HTTP_USERNAMEvalue with your own GitLab instance, project ID, and service user.
Best Practices
- Never commit secrets into git; always use CI/CD variables or a secure secret store.
- Use one
.tffile per VM or per logical group of VMs for clarity. - Review every Terraform plan before applying it (either manually or via MR approvals).
- Protect the branch and/or
applyjob so only authorized operators can run it. - Keep your cloud-init base templates regularly updated with OS patches.
Conclusion
This blueprint can be adapted to any Proxmox infrastructure for reliable, automated VM provisioning. Combine the provider.tf, VM definitions, and GitLab pipeline to achieve a full GitOps workflow for your Proxmox-based virtual machines.