Microsoft Intune
- Experiences with Multi Admin Approval
- Export Intune device script content via Graph API
- Import enrollment devices via Graph API
- Create Win32 line of business app with file upload via Graph API
- Set primary user of Windows devices by last logged in users with automation
- Set scope tag by domain of primary user with automation
- Start Intune Device Sync via Graph API
- Interactively enroll Windows Device with Autopilot
- Evaluate installed app version from devices via Graph API
- Get duplicate Intune devices by serialnumber
- Download win32 intunewin content file via Graph API
- Windows Update during OOBE using Intune App
- Restrict app installation only during OOBE
- Troubleshooting Intune for macOS management
- Account Protection Local Group Membership Automation with Azure Function
- Intune Device BitLocker & LAPS Reporting using Microsoft Graph
Experiences with Multi Admin Approval
Multi Admin Approval is a feature in Intune, that require a second administrative account to approve a change before the change is applied.
With Multi Admin Approval (MAA), you configure access policies that protect specific configurations, like Apps or Scripts for devices. Access policies specify what is protected and which group of accounts are permitted to approve changes to those resources.
When any account in the Tenant is used to make a change to a resource that’s protected by an access policy, Intune won't apply the change until a different account explicitly approves it. Only administrators who are members of an approval group that’s assigned a protected resource in an access protection policy can approve changes. Approvers can also reject change requests.
Field report
- This feature is currently only applicable for Intune apps and Windows / MacOs scripts.
- To create or approve an approval request the account needs the role Intune Administrator even when in the account is in the approver group.
- The appropriately protected Intune resources (apps, scripts) cannot be restricted individually but are tenant wide protected for everyone via Multi Admin Approval.
- At the time of writing every request with scripts is only valid for one hour and then the status changes to expired. This does not apply to the Intune applications.
- Following entity actions need a separate approval request, whenever one of the actions is performed:.
- Edit
- Create
- Modify
- Delete
- Assign
Steps of approval requests
After doing a described action (create, modify, delete, etc.) on an Intune resource which is protected by an access policy, will create an approval request in the Intune Admin Center. To submit the change you can use the normal Intune Admin Center.
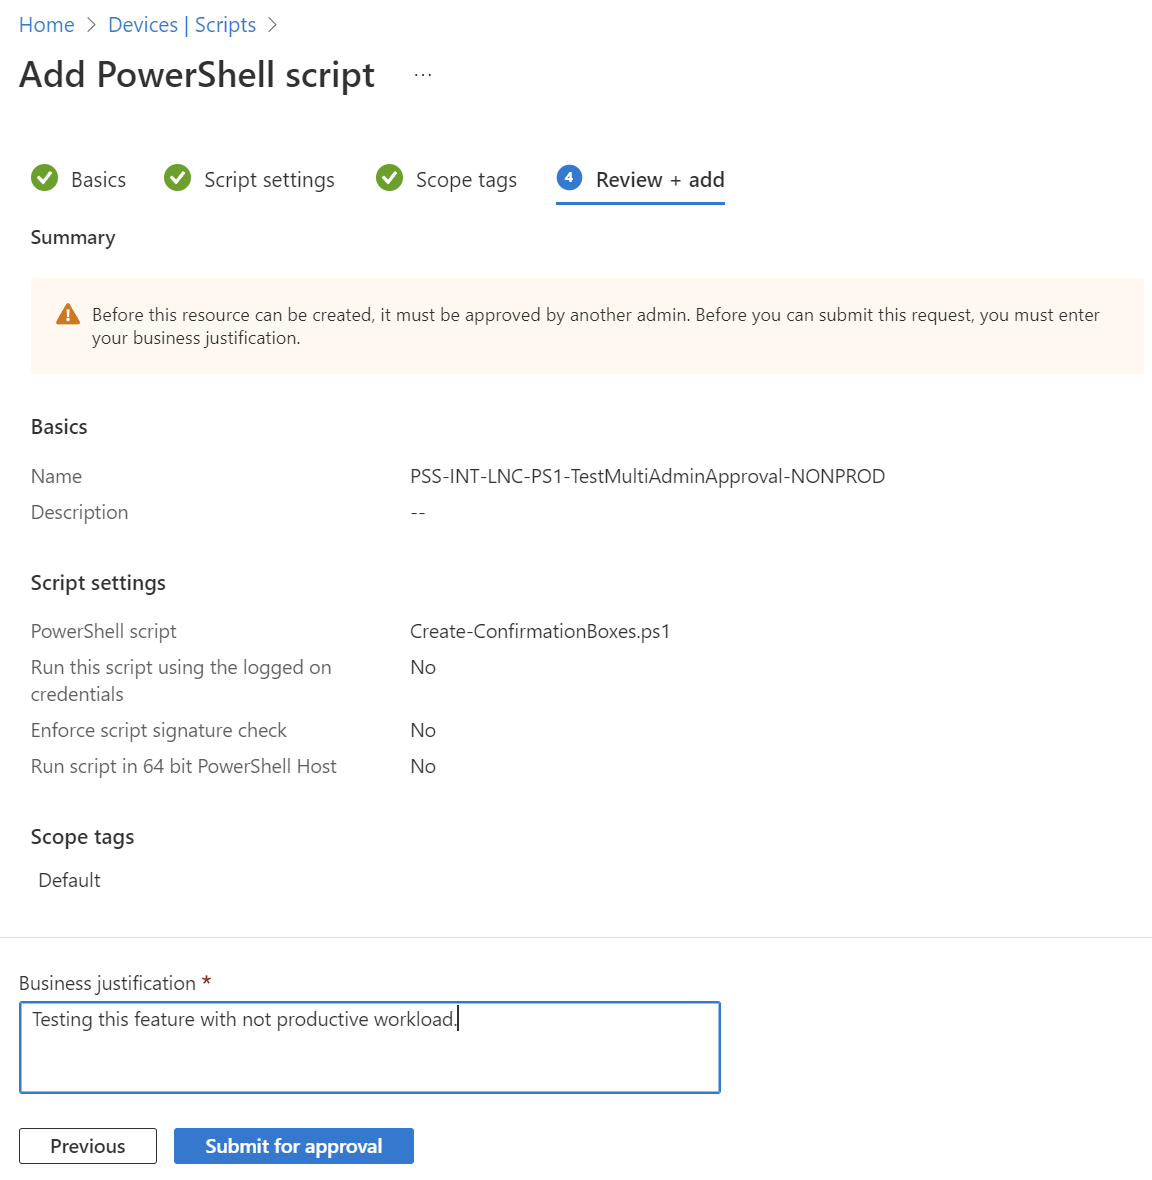
Needs approval
After that submission a new approval request is created in the Intune Admin Center which needs to be approved or rejected from an other administrator account.
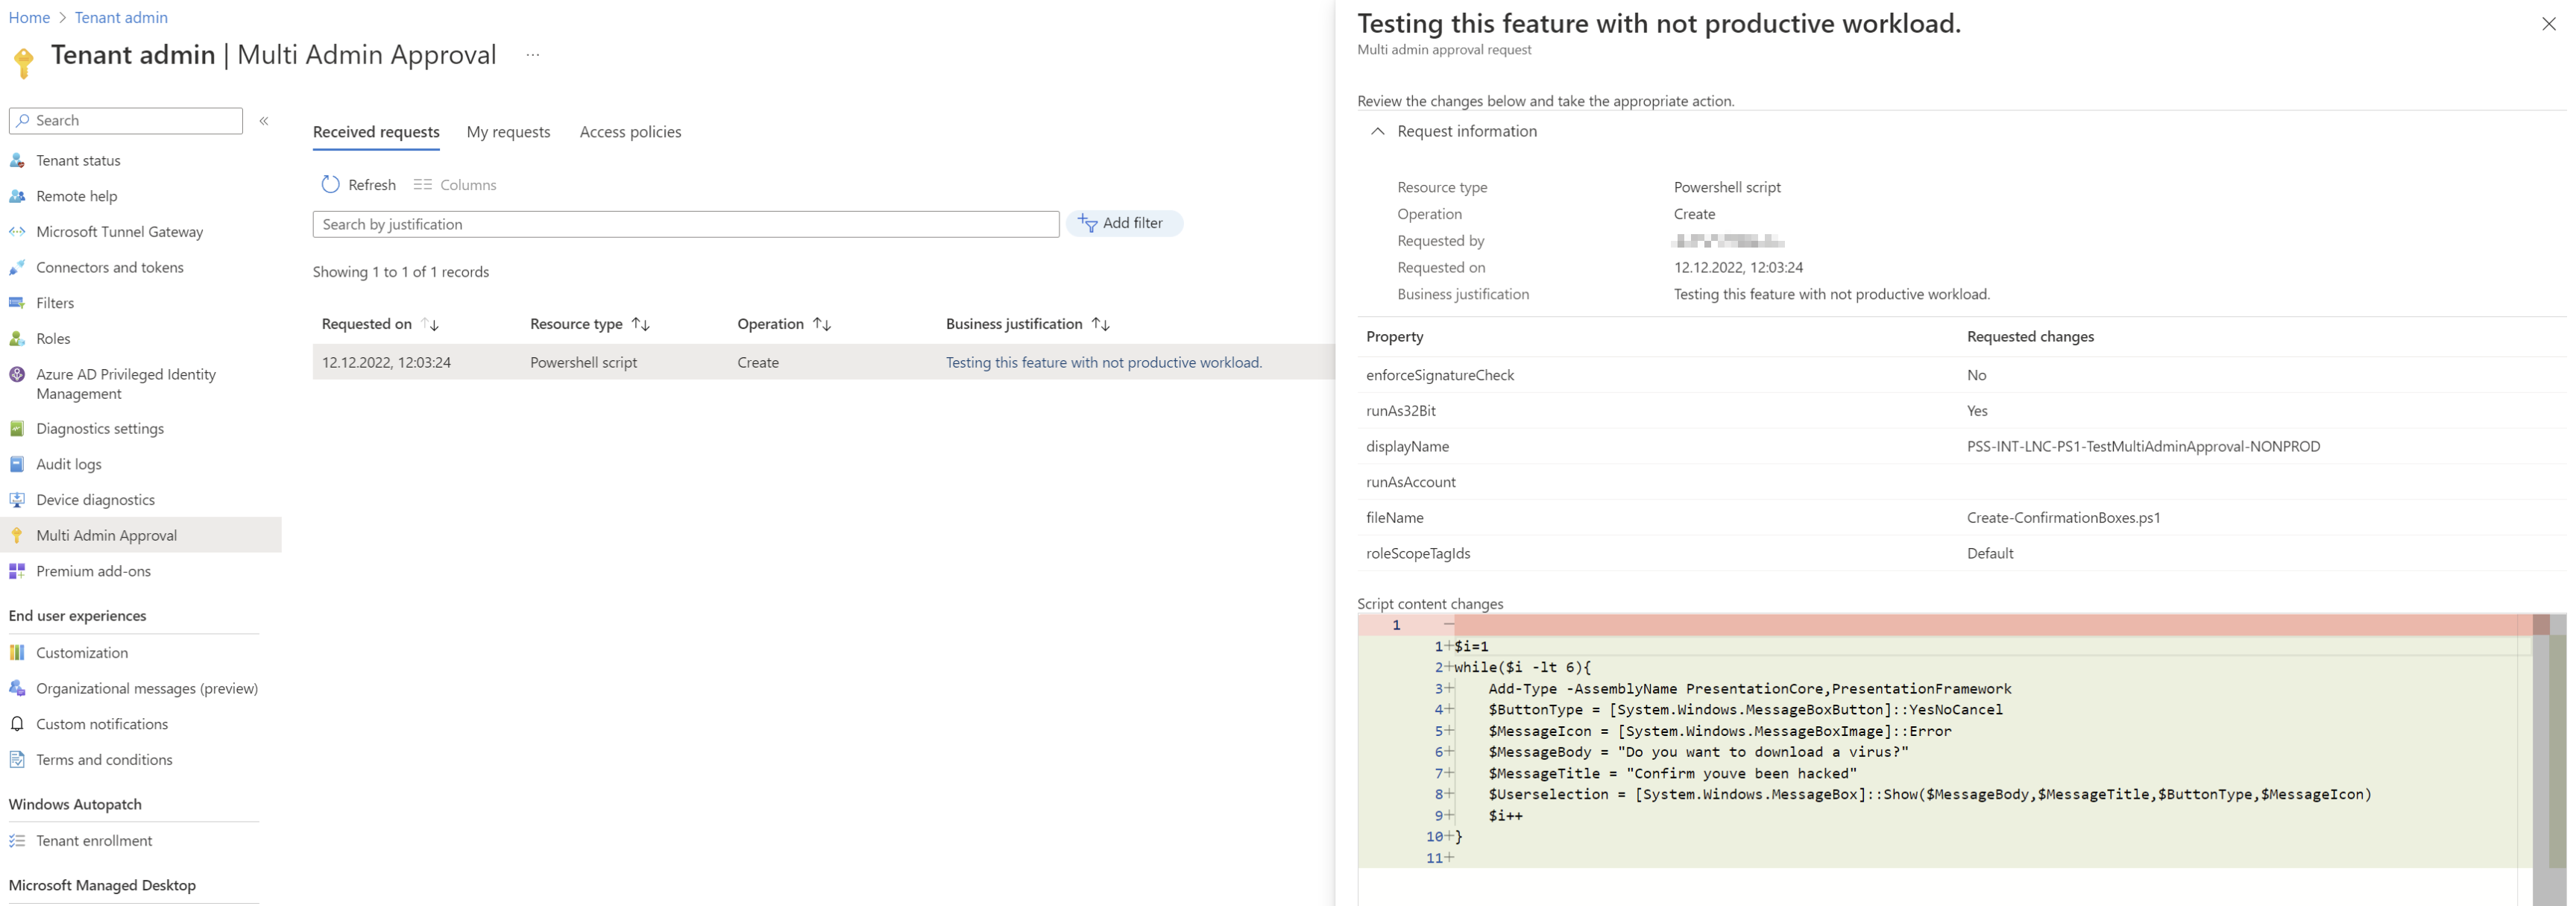
This approval is then moved to approved or rejected status according to the selection made.
Rejected
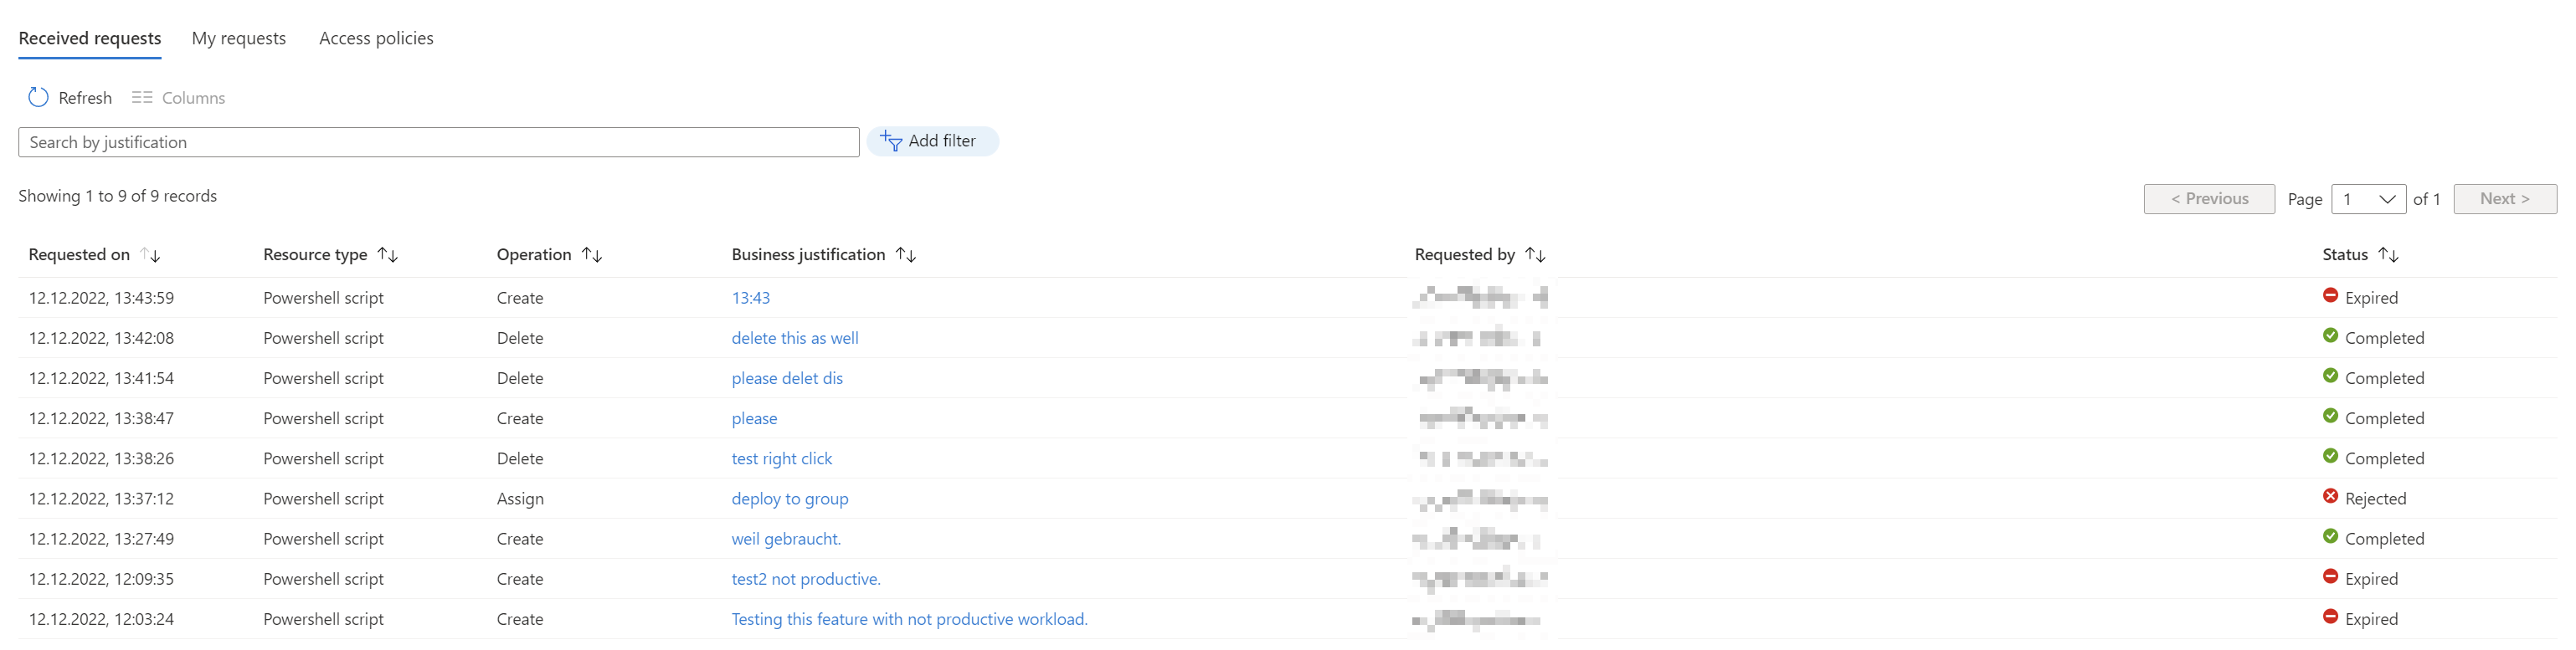
Rejected means that no further actions have to be made. The entity is archived and the status is set to rejected.
Approved
When approved by a different administrator your entity is then forwarded back to you so you can deploy the change at a time when it suits the creating person. The apps are implemented directly, without this following steps. This was tested with the scripts.
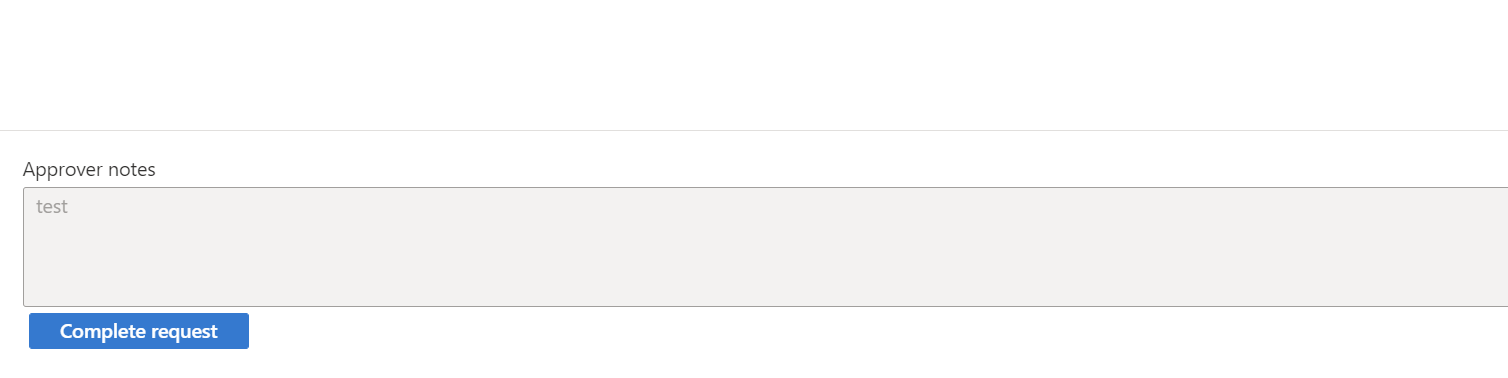
When "Complete request" is pressed by the owner of the approval request, the deployment of the change starts and gets implemented accordingly. The request then changes to the state of "Completed".
Completed
Completed are all requests which where approved by a different administrator and deployed by the owner. These changes were effectively made to the environment.
The Multi Administrator Approval is also very practical to trace changes.
Expired
All requests which are not applied in one hour will get the status "Expired".
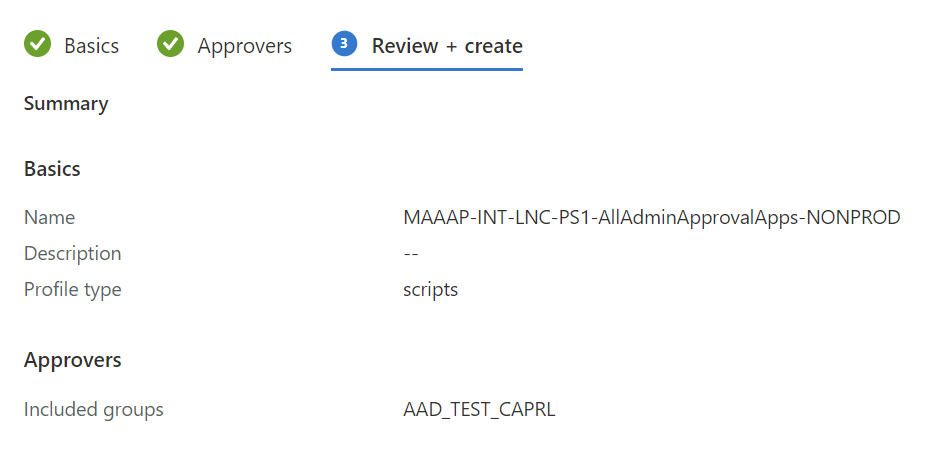
Create access policy
To create an access policy, you can change to "Multi Admin Approval" under "Tenant administration". There under "Access policies" you can create a new policy.
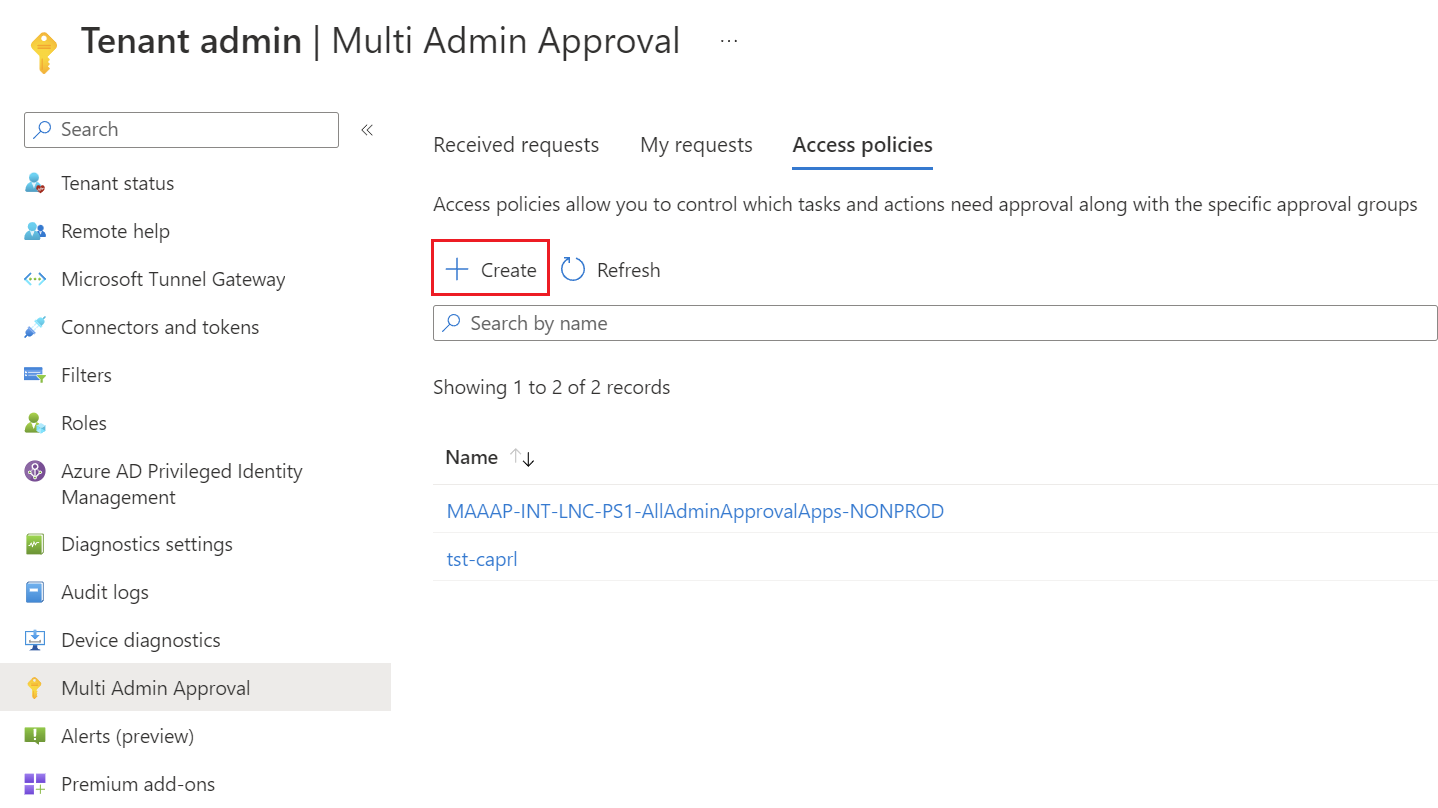
First you have to name the policy and choose the Profile type. Currently there are only two options; Scripts and Apps to select.

In addition, the approver group must be selected there. This group must contain the accounts which are authorized to approve or reject approval requests. These accounts must have to activate the "Intune Administrator" role.
Export Intune device script content via Graph API
Prerequisites: Graph API access token and the script id from Intune device script.
Since the content of the device scripts cannot be read in the Intune Admin Center (as is possible with remediation scripts), the Graph API must be used for this.
Use case
Sometimes you want to see what device scripts have for content. Often such device scripts are only looked at again after several months or years and the documentation may no longer match. Then the solution is to export the content of the script so that the functions can be reverse engineered.
PowerShell script
This PowerShell script exports the contents of an Intune device script by id.
$FolderPath = "C:\Users\$($env:username)\Downloads\"
$ScriptId = "<yourdevicescriptid>"
$Token = "<yourgraphapitoken>"

$Header = @{
    "Authorization" = "Bearer $Token"
}

$script = Invoke-Restmethod -uri "https://graph.microsoft.com/beta/deviceManagement/deviceManagementScripts" -Method GET -Header $Header

[System.Text.Encoding]::ASCII.GetString([System.Convert]::FromBase64String($($script.scriptContent))) | Out-File -Encoding ASCII -FilePath $(Join-Path $FolderPath $($script.fileName))
Import enrollment devices via Graph API
Prerequisites: Graph API authorization header and the serial number & hardware identifier from the device. To read out the information such as serial number and hardware identifier from the device you can use the Get-WindowsAutopilotInfo tool provided by Microsoft.
To import devices directly via Graph API you can send a body to an API endpoint that contains the serial number and the hardware identifier.
Use case
To make an automation which imports devices automatically into Intune enrollment devices you can create an Azure Function that will then import the device id automatically to Intune without any user interaction or permission management. This action will be performed in the context of an app registration.
PowerShell script
This PowerShell script needs the GroupTag which should be set on the device. This value must be provided in clear text. In addition, the serial number must also be passed to the API as a string and the hardware ID as a binary.
$GroupTag = "<yourgrouptag>"
$SerialNumber = "<yourserialnumber>"
$HardwareIdentifier = "<yourcomputershashid>"

$Body = @"
{
  "groupTag": "$GroupTag",
  "serialNumber": "$SerialNumber",
  "hardwareIdentifier": "$HardwareIdentifier",
}
"@

$Response = Invoke-Restmethod -uri "https://graph.microsoft.com/v1.0/deviceManagement/importedWindowsAutopilotDeviceIdentities" -Method POST -Header $Header -Body $Body
Response: 201 Created
Corresponding Microsoft documentation
This documentation contains further information and optional values that can be transmitted to the following address so that the object can be enriched with more information.
Create importedWindowsAutopilotDeviceIdentity - Microsoft Graph v1.0 | Microsoft Learn
Create Win32 line of business app with file upload via Graph API
Here is a perfect manual:
Win32LOB intunewin file upload process explained for automation (rozemuller.com)
Set primary user of Windows devices by last logged in users with automation
This tutorial describes how an automation can be used to set the primary user according to the last signed in user. The Intune data is queried via an App Registration on Graph and modified accordingly. This automation is based on an Azure runbook and executes PowerShell code.
Prerequisites
First, an App Registration is used, which is used as an unattended authentication to the Graph API. This app registration requires "User.Read.All" and "DeviceManagementManagedDevies.ReadWrite.All". Create there the corresponding Client Secret and Client id as described here: Get app details and gr... | LNC DOCS (lucanoahcaprez.ch) Fill in the variables $tenantid, $clientid and $clientsecret with the corresponding values.
Subsequently, the $WebhookURI variable can be populated with a webhook from a team channel. Creating a webhook for notification in Microsoft Teams is described here: Teams webhook notification | LNC DOCS (lucanoahcaprez.ch)
The last function used is a LogCollection Function. You should copy the URL into the $FunctionURL variable. The instructions for a central log collection point can be found here: Centralize log collect... | LNC DOCS (lucanoahcaprez.ch)
PowerShell script
This is the PowerShell script that makes the automation possible. It is very important that you fill the variables correctly as described above or the unused parts are hidden. As written, this code is optimized to run in an Azure Runbook and also uses the variables from the Azure Automation account. Accordingly, these must be filled correctly.
#region Autorization Function
function Get-ApplicationOnlySourceAuthorization {

    param(
        $tenantId,
        $clientid,
        $clientSecret
    )


    $tokenBodySource = @{
        grant_type = "client_credentials"
        scope = "https://graph.microsoft.com/.default"
        client_id  = $clientid
        client_secret = "$clientSecret"
    }

    # Get OAuth Token
    while ([string]::IsNullOrEmpty($tokenRequestSource.access_token)) {

        $tokenRequestSource = try {
            Invoke-RestMethod -Method POST -Uri "https://login.microsoftonline.com/$tenantId/oauth2/v2.0/token" -Body $tokenBodySource

        }
        catch {

            $errorMessageSource = $_.ErrorDetails.Message | ConvertFrom-Json

            # If not waiting for auth, throw error
            if ($errorMessageSource.error -ne "authorization_pending") {

                throw

            }

        }

    }

    $global:tokensource = $tokenRequestSource.access_token

    if($global:tokenSource){
        Write-output "Source Authorization successful!"

    }else{
        Write-Error "Source Authorization not successful. Do not continue! Check your credentials first!"
    }

}

Function Send-Logs(){

    param (
        [String]$LogType,
        [Hashtable]$LogBodyList
    )


    $LogBodyJSON = @"
    {
        "logtype": "$LogType",
        "logbody": {}
    }
"@

    $LogBodyObject = ConvertFrom-JSON $LogBodyJSON
    Foreach($Log in $LogBodyList.GetEnumerator()){
        $LogBodyObject.logbody | Add-Member -MemberType NoteProperty -Name $log.key -Value $log.value
    }
    $Body = ConvertTo-JSON $LogBodyObject

    $Response = Invoke-Restmethod -uri $FunctionUrl -Body $Body -Method POST -ContentType "application/json"
    return $Response
}

function Send-ToTeams {
    $CurrentTime = Get-Date
    $Body = @{
"@context" = "https://schema.org/extensions"
"@type" = "MessageCard"
"themeColor" = "880808"
"title" = "RB-INT-ALL-PS1-ChangePrimaryUserByOwner-PROD ist durchgelaufen"
    "text" = @"
Parameter:
<ul><li>Successful primary user assignments in Intune: $($SuccessfulAssignmentDevices.Count)</li><li>Error with assignments in Intune: $($ErrorAssignmentDevices.Count)</li><li>Error no LastSignIn on Device: $($ErrorLastSignIn.count)</li></ul>
"@
}
$JsonBody = $Body | ConvertTo-JSON

Invoke-RestMethod -Method Post -Body $JsonBody -Uri $WebhookURI -Headers @{"content-type" = "application/x-www-form-urlencoded; application/json; charset=UTF-8"} | out-null

}
#endregion Functions

#Graph Authentication
$tenantId=Get-AutomationVariable -Name "<yourfunctionstenantidvariable>"
$ClientId=Get-AutomationVariable -Name "yourfunctionsclientidvariable"
$CredentialObject=Get-AutomationPSCredential -Name 'yourfunctionsclientsecretsecret'
$ClientSecret = $CredentialObject.GetNetworkcredential().password

$WebhookURI = Get-AutomationVariable -Name "<yourteamsnotificationchannelwebhook>"
$FunctionUrl= Get-AutomationVariable -Name "<yourlogcollectionfunction>"

# SourceAuthorization
Get-ApplicationOnlySourceAuthorization -tenantId $tenantId -clientid $clientid -clientSecret $clientSecret

$SuccessfulAssignmentDevices = @()
$ErrorAssignmentDevices = @()
$ErrorLastSignIn = @()
$ExcludedServiceAccounts = @(
    "<yourserviceaccountswhichshouldnotbesetasprimaryusers>"
)

#Get Intune managed devices
$uri = "https://graph.microsoft.com/v1.0/deviceManagement/managedDevices?`$filter=startswith(operatingSystem,'windows')"
$Results = Invoke-RestMethod -Method GET -Uri $uri -ContentType "application/json" -Headers @{Authorization = "Bearer $($Global:tokenSource)"; ConsistencyLevel = "eventual"}
$ResultsValue = $results.value
if ($results."@odata.nextLink" -ne $null) {
    $NextPageUri = $results."@odata.nextLink"
    ##While there is a next page, query it and loop, append results
    While ($NextPageUri -ne $null) {
        $NextPageRequest = (Invoke-RestMethod -Headers @{Authorization = "Bearer $($Global:tokenSource)"} -Uri $NextPageURI -Method Get)
        $NxtPageData = $NextPageRequest.Value
        $NextPageUri = $NextPageRequest."@odata.nextLink"
        $ResultsValue = $ResultsValue + $NxtPageData
    }
}
$IntuneDevices = $ResultsValue | where {($_.devicename -like "MW-*") -or ($_.devicename -like "CPC-*")}

foreach($IntuneDevice in $IntuneDevices){

    # get primary user if exists
    $uri = "https://graph.microsoft.com/beta/deviceManagement/managedDevices/$($IntuneDevice.id)/users"
    $UserObject = (Invoke-RestMethod -Method GET -Uri $uri -ContentType "application/json" -Headers @{Authorization = "Bearer $($Global:tokenSource)"}).value

    if(!$UserObject.userPrincipalName -or $ExcludedServiceAccounts -contains $UserObject.userPrincipalName){
        # get last signed in user of intune device
        $uri = "https://graph.microsoft.com/beta/deviceManagement/managedDevices/$($IntuneDevice.id)?`$select=usersLoggedOn"
        try{
            $Results = Invoke-RestMethod -Method GET -Uri $uri -ContentType "application/json" -Headers @{Authorization = "Bearer $($Global:tokenSource)"}
            $PrimaryUserId = $Results.UsersLoggedOn[0].userid
        }
        catch{
            Write-output "The intune device $($CurrentDevice.displayname) has no primary user!"
        }

        $PrimaryUser = ""
        if($PrimaryUserId){
            $uri = "https://graph.microsoft.com/v1.0/users/$PrimaryUserId"
            try{
                $PrimaryUser = Invoke-RestMethod -Method GET -Uri $uri -ContentType "application/json" -Headers @{Authorization = "Bearer $($Global:tokenSource)"}
            }
            catch{
                Write-Error "The user id $PrimaryUserId has no UPN!"
            }
        }
        else{
            Write-Warning "No last user found for device $($IntuneDevice.deviceName)"
            $ErrorLastSignIn += $IntuneDevice.id
        }

        #configure primary owner
        if($PrimaryUser -and !($ExcludedServiceAccounts -contains $PrimaryUser.userPrincipalName)){
            $BodyPrimaryUser = @"
{
    "@odata.id": "https://graph.microsoft.com/beta/users/$($PrimaryUser.id)"
}
"@

            $uri = "https://graph.microsoft.com/beta/deviceManagement/managedDevices('$($IntuneDevice.id)')/users/`$ref"
            try{
                $Results = Invoke-RestMethod -Method POST -Body $BodyPrimaryUser -Uri $uri -ContentType "application/json" -Headers @{Authorization = "Bearer $($Global:tokenSource)"}
                Write-Output "Set intune primary user $($PrimaryUser.userPrincipalName) for device $($IntuneDevice.deviceName)"
                $SuccessfulAssignmentDevices += $IntuneDevice.id
            }catch{
                Write-Error "Failed setting primary user $($PrimaryUser.userPrincipalName) for device $($IntuneDevice.deviceName)"
                $ErrorAssignmentDevices += $IntuneDevice.id
            }
        }
    }
}

$Logs = @{
    "successassignment"="$($SuccessfulAssignmentDevices.count)"
    "errorassignment"="$($ErrorAssignmentDevices.count)"
    "errorlastsignnotfound"="$($ErrorLastSignIn.count)"
}

Send-Logs -LogType "ChangePrimaryUserByOwnerExecutions" -LogBodyList $Logs

Send-ToTeams
Set scope tag by domain of primary user with automation
This automation solves a very small specific use case. As soon as the mobile devices (IOS, Android) are registered in Intune and are not set up via enrollment type profiles, no more scope tags can be set based on device parameters. This is where this automation comes into play.
The script runs regularly and goes through all IOS & Android devices in Intune. There it takes the primary user of the device and resolves the domain to the scope tag via an API. Then the script sets the scope tag in Intune via the API.
Prerequisites
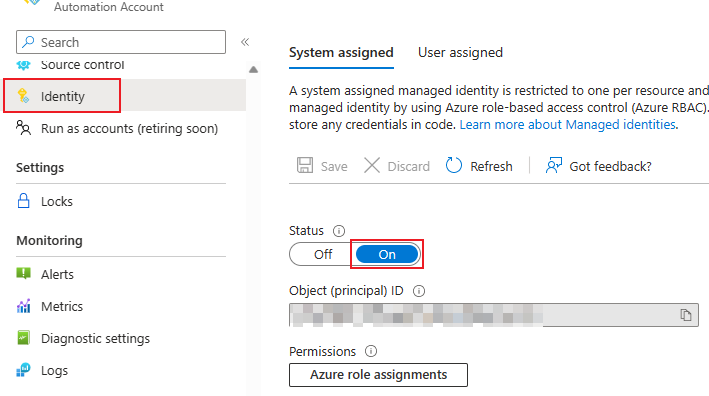
Managed Identity
On the Automation Account you must activate the managed identity. This can be achieved in the settings under "Identity":
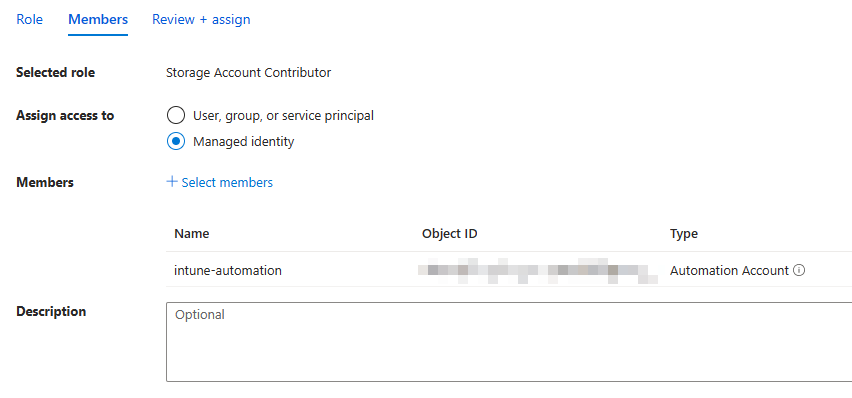
Then you can add the managed identity of the Azure Automation Account to the Storage Account with the permissions of "Storage Account Contributor":
App Registration
After that you have to create an App Registration. The process to create and how the variables can be found out, you will find in this tutorial: Get app details and gr... | LNC DOCS (lucanoahcaprez.ch)
The permissions on the App Registration that are necessary for this automation are as follows:
- Device.ReadWrite.All
- User.Read.All
- DeviceManagementConfiguration.ReadWrite.All,
- DeviceManagementRBAC.ReadWrite.All
- DeviceManagementManagedDevices.ReadWrite.All
PowerShell Script
With the following script this automation can be achieved. This is intended to be executed in a runbook. Accordingly, it is important that the variables are added to the runbook and automation account.
Param(
    $Device,
    $Domain
)

$Success = @()
$NoPM = @()
$NoScopeTag = @()
$NoShortName = @()
$NoOwner = @()
$NoDevice = @()

#Azure Login with Identity
try
{
    # "Logging in to Azure..."
    Connect-AzAccount -Identity
}
catch {
    Write-Error -Message $_.Exception
    throw $_.Exception
}

$resourcegroupname = "<yourresourcegroupname>"
$storageaccountname = "<yourstorageaccountname>"
$storagetablename = "<yourstoragetablename>"

#storage account/table connection
$storageaccountkey = (Get-AzStorageAccountKey -ResourceGroupName $resourcegroupname -AccountName $storageaccountname | where {$_.keyname -eq "key1"}).value
$storageContext = New-AzStorageContext -StorageAccountName $storageaccountname -StorageAccountKey $storageaccountkey
$table = Get-AzStorageTable -name $storagetablename -context $storageContext
$hostnames = get-AzTableRow -table $table.CloudTable

#Collect Credential Data for Graph API
$tenantId = Get-AutomationVariable -Name "<yourunbooktenantidvariable>"
$ClientId = Get-AutomationVariable -Name "<yourunbookclientidvariable>"
$CredentialObject = Get-AutomationPSCredential -Name "<yourrunbookclientsecretsecret>"
$ClientSecret = $CredentialObject.GetNetworkcredential().password
$WebhookURI = Get-AutomationVariable -Name "<yourteamswebhookuri>"
$FunctionURL = Get-AutomationVariable -Name "<yourfunctionapiurl>"

$Body = @{
    "tenant" = $TenantId
    "client_id" = $ClientId
    "scope" = "https://graph.microsoft.com/.default"
    "client_secret" = $ClientSecret
    "grant_type" = "client_credentials"
}

$Params = @{
    "Uri" = "https://login.microsoftonline.com/$TenantId/oauth2/v2.0/token"
    "Method" = "Post"
    "Body" = $Body
    "ContentType" = "application/x-www-form-urlencoded"
}
$AuthResponse = Invoke-RestMethod @Params

$Header = @{
    "Authorization" = "Bearer $($AuthResponse.access_token)"
    #"ConsistencyLevel" = "eventual"
}

Function Send-Logs(){

    param (
        [String]$LogType,
        [Hashtable]$LogBodyList
    )


    $LogBodyJSON = @"
    {
        "logtype": "$LogType",
        "logbody": {}
    }
"@

    $LogBodyObject = ConvertFrom-JSON $LogBodyJSON
    Foreach($Log in $LogBodyList.GetEnumerator()){
        $LogBodyObject.logbody | Add-Member -MemberType NoteProperty -Name $log.key -Value $log.value
    }
    $Body = ConvertTo-JSON $LogBodyObject

    $Response = Invoke-Restmethod -uri $FunctionURL -Body $Body -Method POST -ContentType "application/json"
    return $Response
}

function Send-ToTeams {
    $CurrentTime = Get-Date
    $Body = @{
"@context" = "https://schema.org/extensions"
"@type" = "MessageCard"
"themeColor" = "880808"
"title" = "Automation completed:"
    "text" = @"
Parameter:
<ul><li>Successful assignments in Intune: $($SuccessChanged.Count)</li><li>Already correct assignment in Intune: $($SuccessAlready.Count)</li><li>Scope tag not found in Intune: $($NoScopeTag.Count)</li><li>Shortname by domain not found in storage table: $($NoShortName.Count)</li><li>Owner not found in Intune: $($NoOwner.Count)</li></ul>
"@
}

    $JsonBody = $Body | ConvertTo-JSON

    Invoke-RestMethod -Method Post -Body $JsonBody -Uri $WebhookURI -Headers @{"content-type" = "application/json; charset=UTF-8"} | out-null
}

#get all Scope Tags
$uri = "https://graph.microsoft.com/beta/deviceManagement/roleScopeTags"
$Results = Invoke-RestMethod -Method GET -Uri $uri -ContentType "application/json" -Headers $header
$scopeTags = $results.value

if($device){

    $Results = Invoke-RestMethod -Method GET -Uri "https://graph.microsoft.com/v1.0/deviceManagement/managedDevices/$($device)" -ContentType "Application/Json" -Header $Header
    $managedDevices += $Results
    # $managedDevices
}elseif($Domain){
    Add-Type -AssemblyName System.Web

    $encodedURL = [System.Web.HttpUtility]::UrlEncode($Domain)

    #get android and ios managed devices
    $Results = Invoke-RestMethod -Method GET -Uri "https://graph.microsoft.com/v1.0/deviceManagement/managedDevices?`$filter=(contains(activationlockbypasscode,%20%27$encodedURL%27))%20and%20startswith(operatingSystem,'ios')" -ContentType "Application/Json" -Header $Header
    $ResultsValue = $Results.value
    if ($results."@odata.nextLink" -ne $null) {
        $NextPageUri = $results."@odata.nextLink"
        ##While there is a next page, query it and loop, append results
        While ($NextPageUri -ne $null) {
            $NextPageRequest = (Invoke-RestMethod -Headers $Header -Uri $NextPageURI -Method Get)
            $NxtPageData = $NextPageRequest.Value
            $NextPageUri = $NextPageRequest."@odata.nextLink"
            $ResultsValue = $ResultsValue + $NxtPageData
        }
    }
    $managedDevices += $ResultsValue


    $Results = Invoke-RestMethod -Method GET -Uri "https://graph.microsoft.com/v1.0/deviceManagement/managedDevices?`$filter=(contains(activationlockbypasscode,%20%27$encodedURL%27))%20and%20startswith(operatingSystem,'android')" -ContentType "Application/Json" -Header $Header
    $ResultsValue = $Results.value
    if ($results."@odata.nextLink" -ne $null) {
        $NextPageUri = $results."@odata.nextLink"
        ##While there is a next page, query it and loop, append results
        While ($NextPageUri -ne $null) {
            $NextPageRequest = (Invoke-RestMethod -Headers $Header -Uri $NextPageURI -Method Get)
            $NxtPageData = $NextPageRequest.Value
            $NextPageUri = $NextPageRequest."@odata.nextLink"
            $ResultsValue = $ResultsValue + $NxtPageData
        }
    }

    $managedDevices += $ResultsValue

    $Results = Invoke-RestMethod -Method GET -Uri "https://graph.microsoft.com/v1.0/deviceManagement/managedDevices/$($device)" -ContentType "Application/Json" -Header $Header
    $managedDevices += $Results
    # $managedDevices

}else{
    #get android and ios managed devices
    $Results = Invoke-RestMethod -Method GET -Uri "https://graph.microsoft.com/v1.0/deviceManagement/managedDevices?`$filter=startswith(operatingSystem,'ios')" -ContentType "Application/Json" -Header $Header
    $ResultsValue = $Results.value
    if ($results."@odata.nextLink" -ne $null) {
        $NextPageUri = $results."@odata.nextLink"
        ##While there is a next page, query it and loop, append results
        While ($NextPageUri -ne $null) {
            $NextPageRequest = (Invoke-RestMethod -Headers $Header -Uri $NextPageURI -Method Get)
            $NxtPageData = $NextPageRequest.Value
            $NextPageUri = $NextPageRequest."@odata.nextLink"
            $ResultsValue = $ResultsValue + $NxtPageData
        }
    }
    $managedDevices += $ResultsValue


    $Results = Invoke-RestMethod -Method GET -Uri "https://graph.microsoft.com/v1.0/deviceManagement/managedDevices?`$filter=startswith(operatingSystem,'android')" -ContentType "Application/Json" -Header $Header
    $ResultsValue = $Results.value
    if ($results."@odata.nextLink" -ne $null) {
        $NextPageUri = $results."@odata.nextLink"
        ##While there is a next page, query it and loop, append results
        While ($NextPageUri -ne $null) {
            $NextPageRequest = (Invoke-RestMethod -Headers $Header -Uri $NextPageURI -Method Get)
            $NxtPageData = $NextPageRequest.Value
            $NextPageUri = $NextPageRequest."@odata.nextLink"
            $ResultsValue = $ResultsValue + $NxtPageData
        }
    }

    $managedDevices += $ResultsValue
}

write-output "Intune Devices: $($managedDevices.count)"

#compare and collect MEID devices, which are managed by intune
foreach($managedDevice in $managedDevices){
        #configure hostname if device has an owner
        if($managedDevice.userPrincipalName){
            #get domainname of user
            $dn = ($managedDevice.userprincipalname -split "@")[1]
            $shortname = ($hostnames | where {$_.dn -eq $dn}).shortname
            if($shortname.count -gt 1){
                $shortname = $shortname[0]
            }
            if($shortname){
                #check if scope tag exists based on azure table
                $scopeTagName = "SCT-INT-$shortname-INTUNE-*-PROD"
                $scopeTag = $scopeTags | where {$_.displayName -like $scopeTagName}
                if($scopeTag){

                    $uri = "https://graph.microsoft.com/beta/deviceManagement/managedDevices('$($managedDevice.id)')"
                    $DeviceObject = Invoke-RestMethod -Uri $uri -Headers $header -Method GET -ContentType "application/json"
                    if($DeviceObject.roleScopeTagIds -contains $scopeTag.id){
                        $SuccessAlready += $managedDevice.id
                    }
                    else{
                        $assignBody = @{
                            roleScopeTagIds = @("$($scopeTag.id)")
                        }

                        $JSON = $assignBody | ConvertTo-Json
                        Invoke-RestMethod -Uri $uri -Headers $header -Method Patch -Body $JSON -ContentType "application/json"
                        $SuccessChanged += $managedDevice.id
                    }

                } else {
                    write-warning "$($managedDevice.id) - Scope Tag $scopeTagName does not exist!"
                    $NoScopeTag += $managedDevice.id
                }
            } else {
                write-warning "$($managedDevice.id) - Domain $dn not in Storage Table!"
                $NoShortName += $managedDevice.id
            }
        } else {
            write-warning "$($managedDevice.id) - Device has no Owners"
            $NoOwner += $managedDevice.id
        }
}

$Logs = @{
    "successchangedassignment"="$($SuccessChanged.count)"
    "successalreadyassigned"="$($SuccessAlready.count)"
    "errornoscopetag"="$($NoScopeTag.count)"
    "errornoshortname"="$($NoShortName.count)"
    "errornoowner"="$($NoOwner.count)"
}

Send-Logs -LogType "MobileDeviceScopingByPrimaryUserExecutions" -LogBodyList $Logs

Send-ToTeams
Start Intune Device Sync via Graph API
Requirements: Microsoft Entra ID Authentication token is needed to use this script and the Graph API.
This tool allows you to initiate Intune Sync on multiple or all devices. The Graph API is accessed via PowerShell and triggers the sync on the devices.
Permissions
This script uses Graph API and authenticates with an App Registration or User based access token. The App Registration or the user context needs the following Microsoft Graph permission:
DeviceManagementManagedDevices.PrivilegedOperations.All
This permission can be set either as application permission or as delegated permission.
PowerShell Script
In preparation, the Microsoft Entra ID access token from the previous step must be stored in this variable: $Global:AzureADAccessToken
Then this script can be executed. Here, the sync of all Windows devices in Intune is triggered.
$uri = "https://graph.microsoft.com/v1.0/deviceManagement/managedDevices?`$filter=startswith(operatingSystem,'windows')"
$Results = Invoke-RestMethod -Method GET -Uri $uri -ContentType "application/json" -Headers @{Authorization = "Bearer $($Global:MicrosoftEntraIDAccessToken)"; ConsistencyLevel = "eventual"}
$ResultsValue = $results.value
if ($results."@odata.nextLink" -ne $null) {
    $NextPageUri = $results."@odata.nextLink"
    ##While there is a next page, query it and loop, append results
    While ($NextPageUri -ne $null) {
        $NextPageRequest = (Invoke-RestMethod -Headers @{Authorization = "Bearer $($Global:MicrosoftEntraIDAccessToken)"} -Uri $NextPageURI -Method Get)
        $NxtPageData = $NextPageRequest.Value
        $NextPageUri = $NextPageRequest."@odata.nextLink"
        $ResultsValue = $ResultsValue + $NxtPageData
    }
}
$IntuneDevices = $ResultsValue | where {$_.devicename -like "MW-*"}

$SuccessDevices = @()
$ErrorDevices = @()

foreach($IntuneDevice in $IntuneDevices){
    try{
        $uri = "https://graph.microsoft.com/v1.0/deviceManagement/managedDevices('$($IntuneDevice.id)')/syncDevice"
        Invoke-RestMethod -uri $uri -Method POST -Headers @{Authorization = "$($Global:MicrosoftEntraIDAccessToken)"}
        Write-Output "Started Sync for " $IntuneDevice.devicename
        $SuccessDevices += $IntuneDevice
    }catch{
        Write-Output "Error while syncing " $IntuneDevice.devicename
        $ErrorDevices += $IntuneDevice
    }
}
Interactively enroll Windows Device with Autopilot
To enroll a Windows device into Intune via Windows Autopilot, it is needed to register the serial number and hardware id in the tenant via an interactive login. The user has to log in as "Intune Administrator" and upload the information via Graph API into Intune. A GroupTag can also be set in the same step.
Guide
Open CMD window with "SHIFT" + "F10".
Then enter the following commands in this order. Important: Change the values for your GroupTag and tenant name.
powershellSet-ExecutionPolicy RemoteSignedInstall-Script -Name "Get-WindowsAutopilotInfo" -ForceDirectly Upload Hash ID and Serial to Windows Autopilot
Get-WindowsAutopilotInfo.ps1 -Online -GroupTag "<yourgrouptagname>" -TenantId "<yourtenantname>.onmicrosoft.com”On the Browser Pop-Up sign in with an account that has Intune Administrator activated.
Restart-ComputerAfter the restart it will show you the welcome screen from your company there you can login with a normal account, if the person is authorized to enroll (device enrollment settings).
Write Output to CSV File
Alternatively you can export the information to a file which can be shared or copied using web tools or USB sticks.
Get-WindowsAutopilotInfo.ps1 -OutputFile C:\output.csvRestart-ComputerAfter the restart it will show you the welcome screen from your company there you can login with a normal account, if the person is authorized to enroll (device enrollment settings).
Troubleshooting
If the time is not set correctly or is not recognized, the install script may fail. The SSL certificate check requires a correct time.
Evaluate installed app version from devices via Graph API
Managing applications across a fleet of devices is a critical task for IT administrators. With this PowerShell script you can leverage the power of Microsoft Intune and the Microsoft Graph API to streamline application inventory management.
By using this script, you can efficiently track application installations and versions, aiding in license compliance, security updates, and software distribution planning. It empowers IT teams to make informed decisions about their application landscape, ultimately enhancing device management and security.
PowerShell Script
Add your own access token and app name in the corresponding PowerShell variables.
$Global:MicrosoftEntraIDAccessToken = "<youraccesstoken>"
$AppName = "<yourappname>"
$PlattformOS = "<yourplattform>" #possible values are windows, ios, macos, android
$AllDevicesWithAppVersion = @()

#Get Intune managed devices
$uri = "https://graph.microsoft.com/v1.0/deviceManagement/managedDevices?`$filter=startswith(operatingSystem,'$PlattformOs')"
$Results = Invoke-RestMethod -Method GET -Uri $uri -ContentType "application/json" -Headers @{Authorization = "Bearer $($Global:MicrosoftEntraIDAccessToken)"; ConsistencyLevel = "eventual" }
$IntuneDevices = $results.value
if ($results."@odata.nextLink" -ne $null) {
    $NextPageUri = $results."@odata.nextLink"
    # While there is a next page, query it and loop, append results
    While ($NextPageUri -ne $null) {
        $NextPageRequest = (Invoke-RestMethod -Headers @{Authorization = "Bearer $($Global:MicrosoftEntraIDAccessToken)" } -Uri $NextPageURI -Method Get)
        $NxtPageData = $NextPageRequest.Value
        $NextPageUri = $NextPageRequest."@odata.nextLink"
        $IntuneDevices += $NxtPageData
    }
}

# Get Apps when
foreach ($IntuneDevice in $IntuneDevices) {
    try {
        $AppsUri = "https://graph.microsoft.com/beta/deviceManagement/manageddevices('$($IntuneDevice.id)')/detectedApps?`$top=100&`$filter=contains(displayName,%20%27$($AppName)%27)&`$orderBy=displayName%20asc"
        $Apps = Invoke-RestMethod -Method GET -Uri $AppsUri -ContentType "application/json" -Headers @{Authorization = "Bearer $($Global:MicrosoftEntraIDAccessToken)"; ConsistencyLevel = "eventual" }
        $IntuneDevice | Add-Member -NotePropertyName "$AppName AppVersion" -NotePropertyValue $apps.value.version
        Write-Output "$($IntuneDevice.deviceName) -> $($apps.value.version)"
    }
    catch {
        Write-Output "Sleeping..."
        Start-Sleep 10
        $AppsUri = "https://graph.microsoft.com/beta/deviceManagement/manageddevices('$($IntuneDevice.id)')/detectedApps?`$top=100&`$filter=contains(displayName,%20%27$($AppName)%27)&`$orderBy=displayName%20asc"
        $Apps = Invoke-RestMethod -Method GET -Uri $AppsUri -ContentType "application/json" -Headers @{Authorization = "Bearer $($Global:MicrosoftEntraIDAccessToken)"; ConsistencyLevel = "eventual" }
        $IntuneDevice | Add-Member -NotePropertyName "$AppName AppVersion" -NotePropertyValue $apps.value.version
        Write-Output "$($IntuneDevice.deviceName) -> $($apps.value.version)"
    }
    $AllDevicesWithAppVersion += $IntuneDevice
}

$AllDevicesWithAppVersion | Export-CSV ".\$(Get-Date -Format yyMMdd) AllDevicesWithAppVersion.csv"
Get duplicate Intune devices by serialnumber
Sometimes it happens that there are several devices with the same serial number in Intune. This can happen for example when switching from AD/SCCM built clients to Intune only clients.
This script helps to find the duplicate entries. At the end a CSV is output, which can be cleaned manually or with another script.
This script fetches all Intune Devices and then goes through and, if there are multiple devices per serial number, stores the device information in an array.
PowerShell Script
Add your own access token and app name in the corresponding PowerShell variables.
$Global:MicrosoftEntraIDAccessToken = ""

# Get All Intune Windows Devices
$uri = "https://graph.microsoft.com/v1.0/deviceManagement/managedDevices?`$filter=startswith(operatingSystem,'windows')"
$Results = Invoke-RestMethod -Method GET -Uri $uri -ContentType "application/json" -Headers @{Authorization = "Bearer $($Global:MicrosoftEntraIDAccessToken)"; ConsistencyLevel = "eventual" }
$IntuneDevices = $results.value
if ($results."@odata.nextLink" -ne $null) {
    $NextPageUri = $results."@odata.nextLink"
    While ($NextPageUri -ne $null) {
        $NextPageRequest = (Invoke-RestMethod -Headers @{Authorization = "Bearer $($Global:MicrosoftEntraIDAccessToken)" } -Uri $NextPageURI -Method Get)
        $NxtPageData = $NextPageRequest.Value
        $NextPageUri = $NextPageRequest."@odata.nextLink"
        $IntuneDevices += $NxtPageData
    }
}

# Get all devices by SerialNumber
$DuplicateDevices = $IntuneDevices | Where-Object { -not [String]::IsNullOrWhiteSpace($_.serialNumber) -and ($_.serialNumber -ne "Defaultstring") } | Group-Object -Property serialNumber | Where-Object {$_.Count -gt 1 }

# Output all duplicate Devices
$DuplicateDevices.group | Export-CSV "<yourpathtocsv>" -NoTypeInformation
Download win32 intunewin content file via Graph API
This tutorial is about how to download intunewin content according to an Intune App ID. It is only about the file. The other configurations outside the file can be fetched via another endpoint as JSON.
The script first gets the file version and then the storage URL from the storage account that Microsoft uses for storing the intunewin file.
Authentication
This script relies only on REST Calls to the Microsoft Graph API. The authentication is based on OAuth 2.0 which relies on access tokens. How you can create an access token as a user or system identity is described here: Create user access tok... | LNC DOCS (lucanoahcaprez.ch)
Limitations (currently)
ATTENTION: The file is just downloaded. It will then be available in the specified folder. Unfortunately, it is currently not possible to upload the file again because the header is somehow cut off and the file size is therefore not the same.
PowerShell Script
This script requires an access token for Microsoft Entra ID, the Intune App ID and the output folder. Save the values into the corresponding PowerShell variables.
$Global:MicrosoftEntraIDAccessToken = "<youraccesstoken>"
$AppID = "<yourintuneappid>"
$Path = "<youroutputpathforfile>"

$Win32AppContentVersions = (Invoke-RestMethod -Uri "https://graph.microsoft.com/beta/deviceAppManagement/mobileApps/$($AppID)/microsoft.graph.win32LobApp/contentVersions" -Method "GET" -Headers @{Authorization = "$($Global:MicrosoftEntraIDAccessToken)" } -ContentType 'application/json').value
switch ($Win32AppContentVersions.Count) {
    0 {
        Write-Warning -Message "Unable to locate any contentVersions resources for specified Win32 app"
    }
    1 {
        Write-Verbose -Message "Located contentVersions resource with ID: $($Win32AppContentVersions.id)"
        $Win32AppContentVersionID = $Win32AppContentVersions.id
    }
    default {
        Write-Verbose -Message "Located '$($Win32AppContentVersions.Count)' contentVersions resources for specified Win32 app, attempting to determine the latest item"
        $Win32AppContentVersionID = $Win32AppContentVersions | Sort-Object -Property id -Descending | Select-Object -First 1 -ExpandProperty id
    }
}
if ($Win32AppContentVersions.Count -ge 1) {
    $Win32AppContentVersionsFiles = (Invoke-RestMethod -Uri "https://graph.microsoft.com/beta/deviceAppManagement/mobileApps/$($AppID)/microsoft.graph.win32LobApp/contentVersions/$($Win32AppContentVersionID)/files" -Method "GET" -Headers @{Authorization = "$($Global:MicrosoftEntraIDAccessToken)" } -ContentType 'application/json').value
    if ($Win32AppContentVersionsFiles -ne $null) {
        foreach ($Win32AppContentVersionsFile in $Win32AppContentVersionsFiles) {
            try {
                $Win32AppContentVersionsFileResource = Invoke-RestMethod -Uri "https://graph.microsoft.com/beta/deviceAppManagement/mobileApps/$($AppID)/microsoft.graph.win32LobApp/contentVersions/$($Win32AppContentVersionID)/files/$($Win32AppContentVersionsFile.id)" -Method "GET" -Headers @{Authorization = "$($Global:MicrosoftEntraIDAccessToken)" } -ContentType 'application/json'
            }
            catch {}
            if ($Win32AppContentVersionsFileResource -ne $null) {
                Invoke-RestMethod -Uri $Win32AppContentVersionsFileResource.azureStorageUri -Method "GET" -OutFile "$Path\$($Win32AppContentVersionsFiles.indexOf($Win32AppContentVersionsFile)).intunewin"
            }
        }
    }
}
Windows Update during OOBE using Intune App
Windows updates are not installed by default when the device is in the Autopilot phase. This guide helps you to omit some manual tasks during OOBE phase. In some cases the time until WufB takes care of the update process takes too long. If you want to install the latest Windows updates during Autopilot deployment, you've come to the right place.
Update OS solution by oofhours.com
First we have to create an Intune application. This app contains the script that will force to update the Windows OS. Its based on the PowerShell Module PSWindowsUpdate. So that we don't have to reinvent the wheel, here are instructions for providing the solution: Installing Windows updates during a Windows Autopilot deployment – Out of Office Hours (oofhours.com)
All scripts and sources are located in this Github repository: mtniehaus/UpdateOS: Sample app for installing Windows updates during an Autopilot deployment (github.com)
Since we only want this app to be deployed during OOBE, we can use this solution to restrict the installation to OOBE session: Restrict app installat... | LNC DOCS (lucanoahcaprez.ch)
Restrict app installation only during OOBE
Some application have the requirement to only be installed during the Autopilot provisioning.
Since Intune apps offers the possibility to run a PowerShell script before app installation, we are going to use this function to check whether the device is in OOBE mode or not. This feature is referred to as “Requirement rule” and can be configured the follows:
Instructions for replicating
Open or create an Intune app. Go to requirement rule and create a new rule with type “script”.
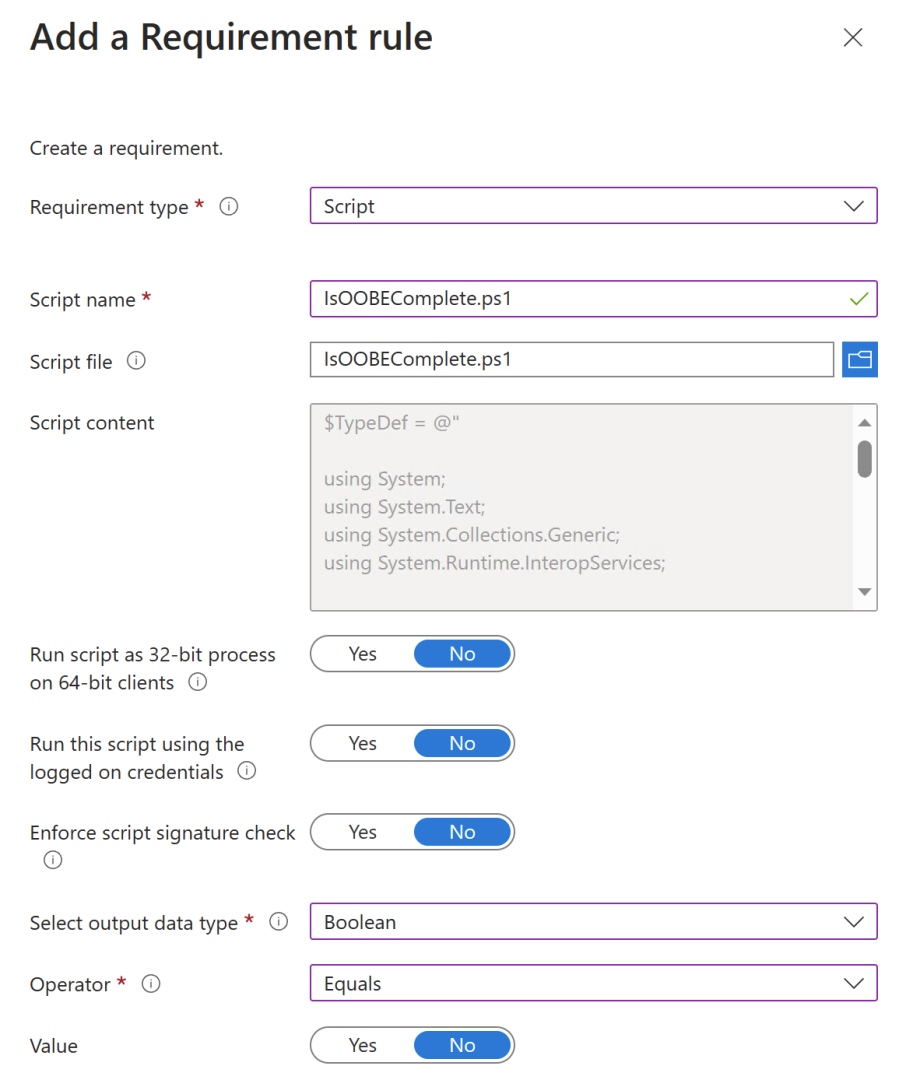
Then enter all the necessary steps and configure the rule as in the screenshot.
Script to report OOBE status
This script return if the device currently is in OOBE mode or not. Output "true" means the Autopilot mode is finished. Output "false" means, its currently in OOBE / Autopilot mode.
$TypeDef = @"

using System;
using System.Text;
using System.Collections.Generic;
using System.Runtime.InteropServices;

namespace Api
{
 public class Kernel32
 {
   [DllImport("kernel32.dll", CharSet = CharSet.Auto, SetLastError = true)]
   public static extern int OOBEComplete(ref int bIsOOBEComplete);
 }
}
"@

Add-Type -TypeDefinition $TypeDef -Language CSharp

$IsOOBEComplete = $false
$hr = [Api.Kernel32]::OOBEComplete([ref] $IsOOBEComplete)

$IsOOBEComplete
Original instructions and credits: Detecting when you are in OOBE – Out of Office Hours (oofhours.com)
Troubleshooting Intune for macOS management
This guide outlines key troubleshooting methods for managing macOS devices with Microsoft Intune. It covers common issues related to local group management, configuration profiles, compliance, and app deployment. Use these steps to identify, diagnose, and resolve problems efficiently during macOS device management.
Visit the following page for a summary of awesome community tools that support you in managing macOS on a greater scale:
Shell Commands
This section provides essential shell commands used in macOS Intune troubleshooting. These commands help verify system status, logs, profiles, and connectivity during device diagnostics.
Add User as Admin
In some troubleshooting or configuration scenarios, it's necessary to ensure that the local user account has administrative rights. This can be done manually or through scripting in a managed deployment.
dseditgroup -o edit -a "<username>" -t user adminRemove User as Admin
For security or compliance reasons, you may need to revoke administrative privileges from a user account on a managed macOS device. This can be done manually or via command line.
dseditgroup -o edit -d "<username>" -t user adminReview Group Membership
Use these commands to check if a user has admin rights and view current members of the admin group. Helpful for verifying permissions before making changes.
dscacheutil -q group -a name adminGet Current Active User
Use these commands to identify the currently logged-in user, useful for scripts and remote troubleshooting.
dscl . -list /Users | grep -v -e '_' -e root -e nobody -e daemonSearch Filelocation of Bundle ID
This command uses macOS Spotlight search (via mdfind) to locate the path of an app or bundle on the system by its bundle identifier.
In this case, it searches for the Microsoft Teams 2.0 app, whose bundle identifier is com.microsoft.teams2.
mdfind "kMDItemCFBundleIdentifier = 'com.microsoft.teams2'"Update Privacy Settings
macOS requires explicit user consent for apps to access sensitive system resources like Full Disk Access, Camera, Microphone, and automation controls. For managed devices, these permissions can be pre-approved using a configuration profile with the Privacy Preferences Policy Control (PPPC) payload.
PPPC settings are defined in a configuration profile (.mobileconfig) using the com.apple.TCC.configuration-profile-policy payload. This allows IT administrators to grant or deny specific permissions to apps without user interaction.
Jamf PPPC Utility is a free macOS tool that lets you build and export PPPC payloads through a user-friendly interface. It helps you:
-
Select an app and automatically extract its code signing information
-
Define specific services and permissions (e.g., Files and Folders, Automation, System Access)
-
Export the result as a
.mobileconfigfile ready for deployment via Intune or another MDM
This tool is especially useful when configuring permissions for third-party or custom apps.
Change Primary Kerberos TGT
On macOS the kswitch command is a Kerberos utility command that interactively shows all cached Kerberos identities (from your credential cache) and allows you to choose which identity should be set as the active one for authentication, such as when accessing network services or enterprise resources that use Kerberos.
kswitch -iTroubleshooting
Explore key diagnostic steps and resolution paths for frequent macOS management issues in Intune, helping you isolate causes and apply targeted fixes.
View live logs of Intune MDM Daemon
To monitor real-time activity from the Intune MDM agent, use the following command in Terminal:
tail -f /Library/Logs/Microsoft/Intune/*IntuneMDMDaemon*.log
Account Protection Local Group Membership Automation with Azure Function
This solution enables targeted, temporary local admin access on Windows devices managed through Intune. It uses an Azure Function (PowerShell) to dynamically create per-device account protection policies and group assignments based on a user-device pair. The design ensures that repeated requests with the same parameters do not produce duplicate configurations (idempotence), making it safe, reliable, and easy to integrate into workflows.
Use case
This automation is designed for longer-term scenarios, where users need local administrator rights for weeks or months on a specific device. It is particularly useful in cases where standard Intune assignments would otherwise affect too many devices, or where multiple tenants must be supported through a unified automation. Because the process creates and manages device-specific groups and policies, it ensures that repeated requests for the same user and device do not result in duplicate assignments.
For short-term or ad-hoc elevation (minutes or hours), other solutions are better suited, such as Intune Endpoint Privilege Management (EPM), MakeMeAdmin, or similar tools.
Prerequisites & Resources
Since this is an Intune automation it is very important that you already have some sort of Intune configuration and devices in place. This guide assumes that you already use Intune Account Protection for deploying permission management of local groups and accounts in Windows. This automation adds the capability of granularly controlling permissions on a per device level in addition to replacing the memberships of local groups for security and compliance view. However, this also requires a global Account Protection policy to be available for all/majority of devices. Since the global policy and device specific policies cannot be combined, an Entra ID exclusion group must be in place.
Azure Resources
This automation is deployed as an Azure Function. At minimum, you need the following resources:
- Resource Group – to contain all components.
- Function App (PowerShell) – hosts the scripts. Use Consumption or Premium plan.
- Storage Account – required for Function state and triggers. Is created automatically while deploying an Azure Function App.
- Application Insights – for telemetry and monitoring (not required but recommended).
- Managed Identity – for secure authentication to Microsoft Graph. For permissions view next chapter.
Graph API Permissions
Your Bearer access token for the Microsoft Graph API needs at least the following scopes. If you are deploying the solution with the recommended approach using a managed identity, then grant the following permissions:
- Device.Read.All
-
Group.ReadWrite.All
- Directory.ReadWrite.All
-
DeviceManagementManagedDevices.Read.All
-
DeviceManagementConfiguration.ReadWrite.All
When you want to use the solution with multiple tenants and/or delegated permissions, you can also use existing access tokens while calling the API endpoint. More on the authentication for that approach in this chapter: Authentication and token handling
Azure Functions
In an Azure Function app we have to deploy two Azure Functions. One PowerShell code is to create the groups, devices, assignments, exclusions, and policies (Automation-LocalAdminGrant.ps1). The second function is responsible for revoking the access and reverting the steps that the grant automation is doing (<a href="https://github.com/lucanoahcaprez/lnc-docs-resources/blob/main/microsoft-intune/Automation-LocalAdminRevoke.ps1">Automation-LocalAdminRevoke.ps1</a>). All the code is provided in the Github repository of LNC DOCS.
Automation-LocalAdminGrant.ps1: Automation for granting and creating the permission policies.Automation-LocalAdminRevoke.ps1: Second automation for reverting the steps (removing the permissions through policy change).
Workflow & Architecture
This chapter describes the workflow and architecture of the two parts (grant & revoke) of the solution. The automation enables per-device exceptions to a global account protection policy which handles local admin rights on Windows clients. It does so by creating device-specific Entra ID groups, updating Intune configuration policies, and managing membership in a global exclusion group.
Important: The automation is implemented in a way that it supports idempotence. This means that multiple requests with the same parameters (UserPrincipalName, DeviceName) will always result in the same outcome, preventing duplicate tasks or conflicting states.
Automation process
This is how the automation processes your request. Between "Grant" and "Revoke" part, the automation is almost similar. The main difference is, that the automation creates or deletes the objects/memberships according to existing environment and requests.
-
Input validation
- When the Function receives an HTTP request (POST) with parameters UserPrincipalName and DeviceName it validates the provided JSON object.
- If the validation is rejecting the input, the automation returns 400 codes.
-
Authentication (choose token source)
- If a parameter with the name
MicrosoftEntraIDAccessTokenis provided in the JSON body of the POST request, this token is used for authentication. - Another option is to optain a token from the Managed Identity via IMDS (Azure Instance Metadata Service). This needs to be configured correctly.
- If a parameter with the name
-
Resolve device
- Next the automation queries the Intune managed devices with a filter on DeviceName (prefix match).
- It ensures that there is an exact match. It aborts on zero or multiple responses.
-
Resolve Entra ID device
- Afterwards it queries the Microsoft Entra ID devices using the Intune device's AzureADDeviceId.
-
Prepare naming and resources
- Then it builds policy and group names from device serial (e.g. Windows-COPE-LUSRMGR- for Account Protection policy and MEID-INT-Windows-LUSRMGR- for Entra ID group).
- Resolves ExclusionGroupID for excluding the device from the global Account Protection policy.
-
Create/Ensure resources
- It creates a device-specific Entra ID security group if not present.
- Then it adds the device to the previously created/verified group.
- In the end it adds the device to the global exclusion group.
-
Create/Update account protection policy
- First it checks if a policy with the constructed name already exists.
- If not present, the automation creates a configuration policy that grants the specified user local admin (via AzureAD<UserPrincipalName> reference) on the target device group.
- If the policyname is already present, the policy members are updated if needed.
-
Final validation
- Last but not least it verifies that the device is in the correct groups and the policy is assigned.
- The Azure Function returns success (200) or a helpful error message describing which step failed.
-
Revoke path (Automation-LocalAdminRevoke)
- To reverse the actions you can call the "revoke" automation. It remove the user from the policy, removes the policy if empty, removes the device from the exclusion group and deletes the device-specific group if it is empty.
Authentication and token handling
Authentication is required for the function to call Microsoft Graph and apply changes on the Intune platform. The automation supports two flows: using a Managed Identity, which is the recommended production setup, or accepting a Microsoft Entra ID access token directly in the request body. Both methods provide secure access, but Managed Identity avoids handling tokens and simplifies permission management. For eighter method make sure to include the right permissions (see chapter "Graph API Permissions").
-
Preferred: Use a Managed Identity (system- or user-assigned) on the Function App.
- Make sure to enable and configure the managed identity correctly: Use of System Managed Identities
- Learn how to grant Microsoft Graph API permissions to a Managed Identity: Assign Graph API Permissions
- If everything is in place and the PowerShell gets executed, the code requests a token from Azure Instance Metadata Service (Learn more about IMDS):
GET http://169.254.169.254/metadata/identity/oauth2/token?api-version=2018-02-01&resource=https://graph.microsoft.com/-
Alternative: Provide an access token in the JSON request body with the name of
MicrosoftEntraIDAccessToken.- The function will then only use this token for calling the Microsoft Graph API endpoints.
- This method could come in handy, when using multiple tenants or while implementing or testing the automation.
- A lot of times the permissions for Managed Identities are granted by another internal team (needs Global Admin for initial grant) or they need to be verified by an identity and/or security team. In this case the option with access token enables you to check if the solution meets your needs.
- Note: Do not log or expose your access token in logs or external monitoring.
Usage & Implementation
This section guides you through deploying and using the automation. You’ll learn how to set up the Azure Function, configure authentication, and call its HTTP interface. Examples will show you how to format requests and interpret responses, enabling you to integrate the solution into your workflows easily.
Deployment steps
- Open Azure Portal and search your Function App. Create a new resource if needed.
- Deploy the Azure Function PowerShell code from GitHub (replace your function content or create new function).
- In the Function App -> Identity -> enable System assigned Managed Identity.
- For granting the permissions to the Managed Identity follow this guide: Assign Graph API Permissions. Currently it is not supported to add the permissions through the Entra ID admin center.
- Got to Entra ID admin center -> Enterprise applications -> find the Managed Identity (service principal) and confirm that the Graph API permissions are visible and consented.
- Run the function the first time using eighter PowerShell, a REST client (postman, Thunder Client, etc.) or from the Azure Portal.
HTTP API Usage
The Local Group Membership Automation exposes a simple HTTP API that can be called from other systems, scripts, or manual tools. Its main purpose is to grant and verify temporary local administrator rights for a user on an Intune-managed device. The API is lightweight and designed so that both technical and non-technical staff can trigger the operation with minimal input: just the user’s sign-in name and the device name.
Base URL (example): https://<your-function>.azurewebsites.net/api/Automation-LocalAdminGrant
Replace <your-function> with your Function App name.
Method: POST
Request body (JSON):
-
UserPrincipalName(string, required) – the user’s user principal name (e.g.,test@example.com). -
DeviceName(string, required) – the name of the Windows device (e.g.,Device-123). -
MicrosoftEntraIDAccessToken(string, optional) – Only include this if you already have an access token. Otherwise the Function uses its Managed Identity.
Successful response: HTTP 200 with body FINAL CHECK: SUCCESS
Errors: HTTP 400/401/500 depending on validation or token issues.
PowerShell Usage
# Replace with your function URL and details
$Url  = "https://<your-function>.azurewebsites.net/api/LocalGroupMembership?code=<function-key>"
$Body = '{"UserPrincipalName":"test@example.com","DeviceName":"Device-123"}'

Invoke-RestMethod -Method Post -Uri $Url -ContentType "application/json" -Body $Body
Results and verification
Successful run outcomes:
- A device-specific Entra ID security group created:
MEID-INT-Windows-LUSRMGR-<serial> - Device added to:
- The device-specific group
- The global exclusion group (
ExclusionGroupID)
- A device-targeted Account Protection configuration policy created or updated:
Windows-COPE-LUSRMGR-<serial> - The policy assigned to the device-specific group
- Function returns
FINAL CHECK: SUCCESSor a structured OK response
Verification steps:
- Verify the existence of the group via Graph API or Entra ID admin center .
- Check the device is member of both the device-specific group and the exclusion group.
- Inspect the configuration policy in Intune (Endpoint security -> Account protection) for the device-targeted policy and assigned targets.
- Use Graph API or Intune admin center to confirm policy settings include
AzureAD\<UserPrincipalName>membership. - Review Function App logs / Application Insights for detailed operation traces.
Cleanup / Revoke verification:
- When revoke-automation is triggered, confirm that this is done:
- The user is removed from the policy setting values.
- If the policy contains no other exception members, the policy is deleted.
- The device is removed from the exclusion group.
- The device-specific group is deleted if empty.
Error states, tips and tricks
- Common failures:
- Authentication errors (401): check managed identity and admin consent for Graph scopes.
- Device lookup errors: ensure
DeviceNameuniquely identifies a single managed device. - Graph
ResourceNotFoundwhen adding/removing members: ensure correct object IDs and that you use the right endpoint (/groups/{id}/members/$reffor add,/groups/{id}/members/{memberId}/$reffor delete).
- Idempotency:
- Functions perform existence checks before creating resources; repeated runs for same device/user pair should be safe.
- Observability:
- Enable Application Insights, log full request/flow errors (avoid logging tokens), and emit structured events for success/failure.
Intune Device BitLocker & LAPS Reporting using Microsoft Graph
Overview
This automation produces a consolidated report for Windows devices in Intune. It combines device compliance information with BitLocker recovery key metadata and Local Administrator Password Solution (LAPS) rotation data. The output is a PowerShell object list that is ready for export or further filtering in scripts and runbooks.
What It Does
The script first queries Intune for all managed Windows devices. For each device, it retrieves the most recent BitLocker recovery key backup timestamp and checks whether a recovery key exists. It then retrieves the last LAPS password rotation timestamp for the same Entra device ID. Finally, it merges these values with the device name, Intune device ID, and compliance state into a single per-device record.
How It Works
-
Managed device inventory
The script calls the Microsoft GraphdeviceManagement/managedDevicesendpoint with a Windows filter. It selects only the fields required to link the device to Entra and to report compliance. -
BitLocker recovery keys
For each device, the script queries the BitLocker recovery key collection using a device ID filter. It sorts bycreatedDateTimeand keeps the newest entry as the backup timestamp for that device. -
LAPS credentials
For each device, the script callsdirectory/deviceLocalCredentials/{deviceId}and readslastPasswordRotationDateTime. The lookup uses the Entra device ID to align with Graph directory objects. -
Report assembly
The script joins all values by Entra device ID and outputs a PowerShell object with consistent property names.
Requirements
You must run the script in PowerShell 5.1 or PowerShell 7+ and provide a valid Microsoft Graph access token in $Global:MicrosoftEntraIDAccessToken. The environment must be able to reach https://graph.microsoft.com.
Graph Permissions (minimum)
The access token must include delegated or app-only permissions that cover both Intune and directory data. The minimum set is:
Device.Read.AllDeviceManagementManagedDevices.Read.AllBitLockerKey.Read.All(orBitLockerKey.ReadBasic.Allif you do not need key material)DeviceLocalCredential.Read.All
If you are using delegated permissions, the signed-in user must also hold a directory role that allows reading these resources, such as Intune Administrator, Security Administrator, Helpdesk Administrator, or Global Administrator.
Usage
Set the access token, run the script, and capture the output if desired.
$Global:MicrosoftEntraIDAccessToken = "<GraphAccessToken>"
$results = .\Bitlocker&LAPSReporting.ps1
The script returns objects with the following properties:
DeviceNameIntuneDeviceIdComplianceStatusBitlockerRecoveryKeyStatusBitlockerRecoveryKeyBackupTimestampLocalAdminPasswordLastRotationTimestamp
Logging
The script writes progress messages to the host for each device. These messages include BitLocker processing, LAPS processing, and report assembly so you can trace the flow and identify any device that fails to return data.
Notes and Limitations
BitLocker recovery keys must be queried per device because the API requires a collection query with a device ID filter. LAPS data is retrieved from the Entra directory endpoint and therefore depends on the device being registered and the caller having directory permissions. The script only targets Windows devices by design and does not include macOS or mobile platforms. The REST client retries transient Graph failures and rate limits, but very large tenants may still need staggered runs.
Troubleshooting
Connection closed by remote host
This usually indicates a transient network or throttling issue. The script retries those errors, but you can also reduce request volume by adding delays or running during off-peak hours.
Files
The automation consists of the following files: