Microsoft Graph API
- Quick tools & links
- Microsoft Graph Explorer basics
- Things to consider & limitations
- Serverside data preperation to relieve clientside workload
- Find API route, method & body in Microsoft web portals
- Create application access token & authorization header
- Create user access token & authorization header
- Lookup external tenant id
- Send mail via Exchange Online
- Migrate Markdown files to OneNote Notebook
Quick tools & links
On this page you will find small helpful Graph API queries that can help you in operation or engineering. The topics will be added gradually and include any Microsoft Graph API products, such as Intune, Microsoft Entra ID, SharePoint and many more.
Microsoft Entra ID
Get Group by SID
This query can be used to resolve a group according to a SID. This can be helpful if a local group cannot be resolved by name in Intune managed Windows or only the SID is available in an output.
GET https://graph.microsoft.com/v1.0/groups?$filter=startsWith(securityIdentifier, '<yourgroupssid>')
Community Tools
CyberChef
CyberChef is a simple, intuitive web app for carrying out all manner of "cyber" operations within a web browser. These operations include simple encoding like XOR and Base64, more complex encryption like AES, DES and Blowfish, creating binary and hexdumps, compression and decompression of data, calculating hashes and checksums, IPv6 and X.509 parsing, changing character encodings, and much more.
https://github.com/gchq/cyberchef
Live demo of the tool:
https://gchq.github.io/CyberChef/
Microsoft Graph Explorer basics
Requirements: Basic knowledge of HTTP REST communication
Basics
Microsoft Graph Explorer is a web-based tool to learn and test specific Graph API queries.
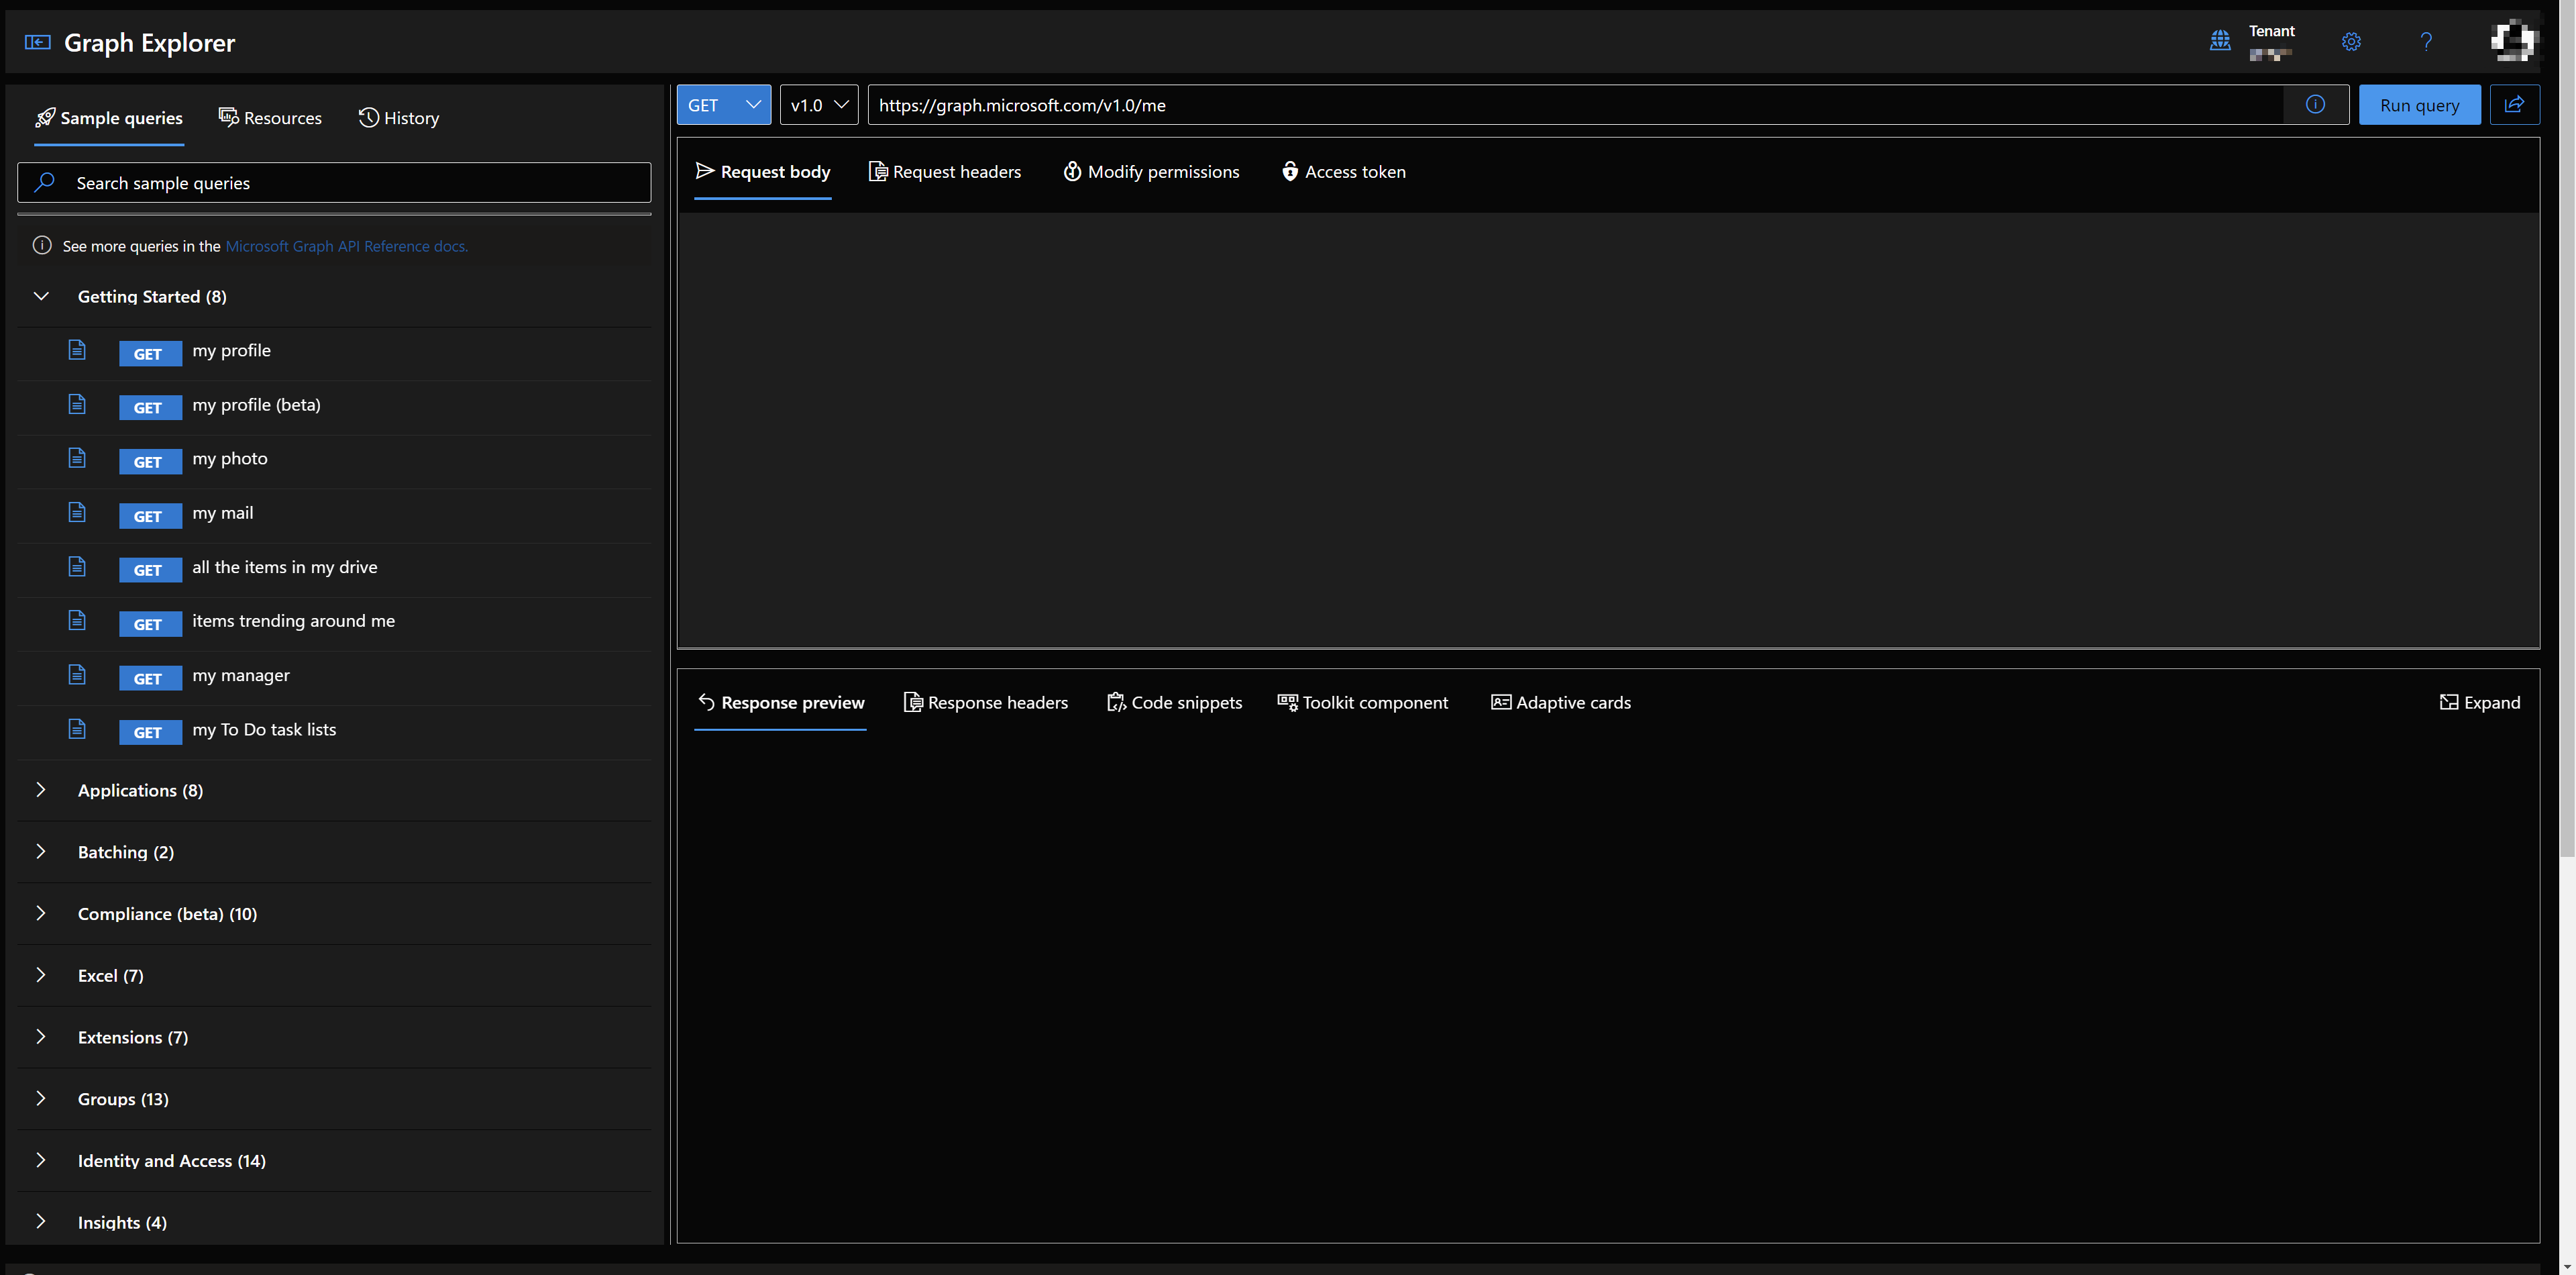
Resource Links
Microsoft Graph Documentation: https://learn.microsoft.com/en-us/graph/api/overview
Microsoft Graph Explorer: https://developer.microsoft.com/en-us/graph/graph-explorer
URL-Explanation
Protocol: The protocol defines on which Port the Request ist performed. Microsoft Graph only allows REST calls over HTTP with appropriate security (https:// over port 443).
Host: The Host sits between the protocol and the first slash ("/"). Hosts can be represented by IP Adress (e.g., 127.0.0.1) or Hostnames (graph.microsoft.com).
Route: API Routes are defined between the end of the top-level domain (e.g., .com) and the question mark ("?"). The route defines which path the program on the server should take and on which element it should perform the search or action.
Queries: URL queries are Located behind the question mark ("?") in the URL and are at the end of the whole URL.

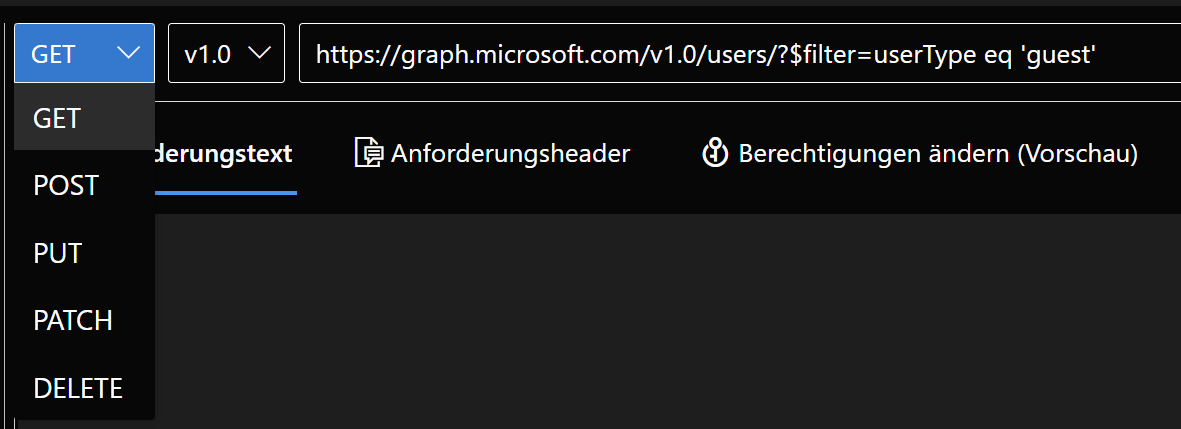
Method selection
GET: Get specific or general information via JSON output object(s).
POST: Submit some information via JSON, URL Encoded, XML, etc. and trigger some actions on the server. Returned values contains errors or success information and supports general information as well.
PATCH: Update some information on the server side from a client action. You must provide a object that gets updated and the content to which the object should be updated. (e.g., display name of some policy)
PUT: Submit informations to a backend and don't get a response back.
DELETE: Delete object on specific path. Provide object which needs to be deleted, ether in URL itself or via body.
Things to consider & limitations
These things have to be considered when building automations or applications which use the Microsoft Graph API.
Graph API limitations
This list documents the limitations of the Microsoft Graph API. The full limitations of the Microsoft Graph API can be seen here: Microsoft Graph service-specific throttling limits - Microsoft Graph | Microsoft Learn
- Tokens are only valid for 1h.
- General maximal limit is 2000 requests per second.
- 500 requests per 10 seconds.
- 15000 requests per 3600 seconds.
- 10,000 calls per month and 100 concurrent calls.
- 2000 meetings per user each month.
- 1500 presence requests per 30 second, per application per tenant
Serverside data preperation to relieve clientside workload
Requirements: Basic Knowledge of Rest APIs and Microsoft Graph API
Graph API Query Parameters
With query parameters you can specify custom queries that the answer of the Graph API returns the values you need. Therefore, you specify the API Route you want to take and on this value you perform a serverside data preperation.
$Filter
Example: Get MEID Group Properties by MEID Group SID
GET https://graph.microsoft.com/v1.0/groups?$filter=startswith(securityIdentifier,'S-1-12-1-234774239-1265421194-1318151825-3905263908')
$Select
Example: Get Intune Primary User by Intune Device ID
Find API route, method & body in Microsoft web portals
Use Graph X-Ray AddOn
Graph X-Ray – Microsoft Edge Addons
With this add on for Microsoft Edge or Google Chrome you can see what the corresponding website is doing in the background and display the user interface commands directly in your favorite programming language.
- Open Chrome or Edge DevTools (F12).
- Go to the Graph X-Ray tab.
- Do the corresponding action in the browser on the Microsoft platform that uses Microsoft Graph.
- Then you will see the queries and parameters that the website used for your action.
Find API route
The API route describes the URL on which the requests are executed.
- Open developer tools in your browser. -> (F12 in Edge & Chrome)
- Open tab network tracing.
- Run query in GUI (Intune Admin Center, Azure Portal, etc.).
- Find query in Network Tracing.
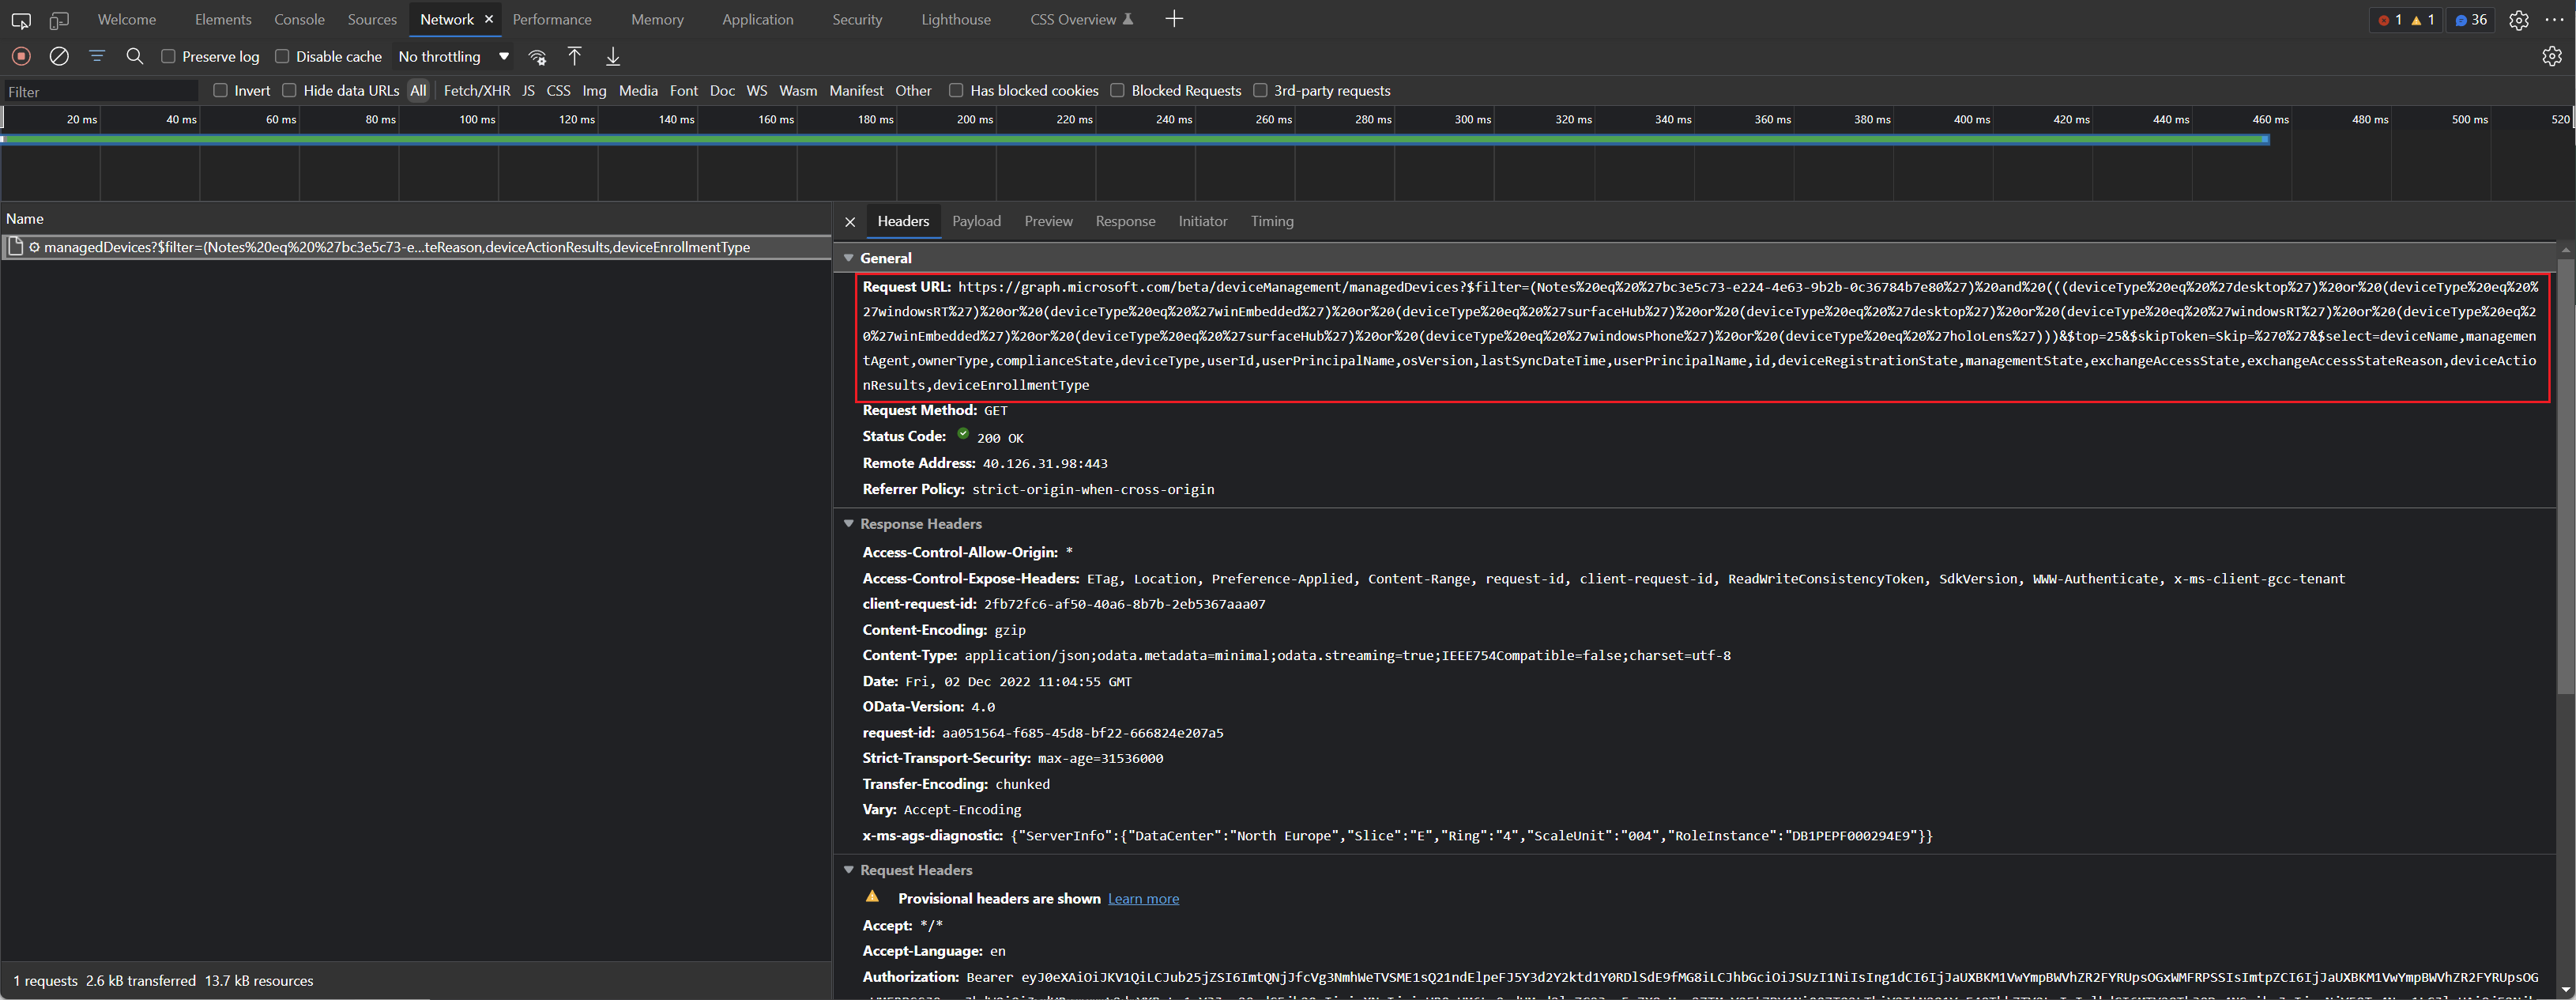
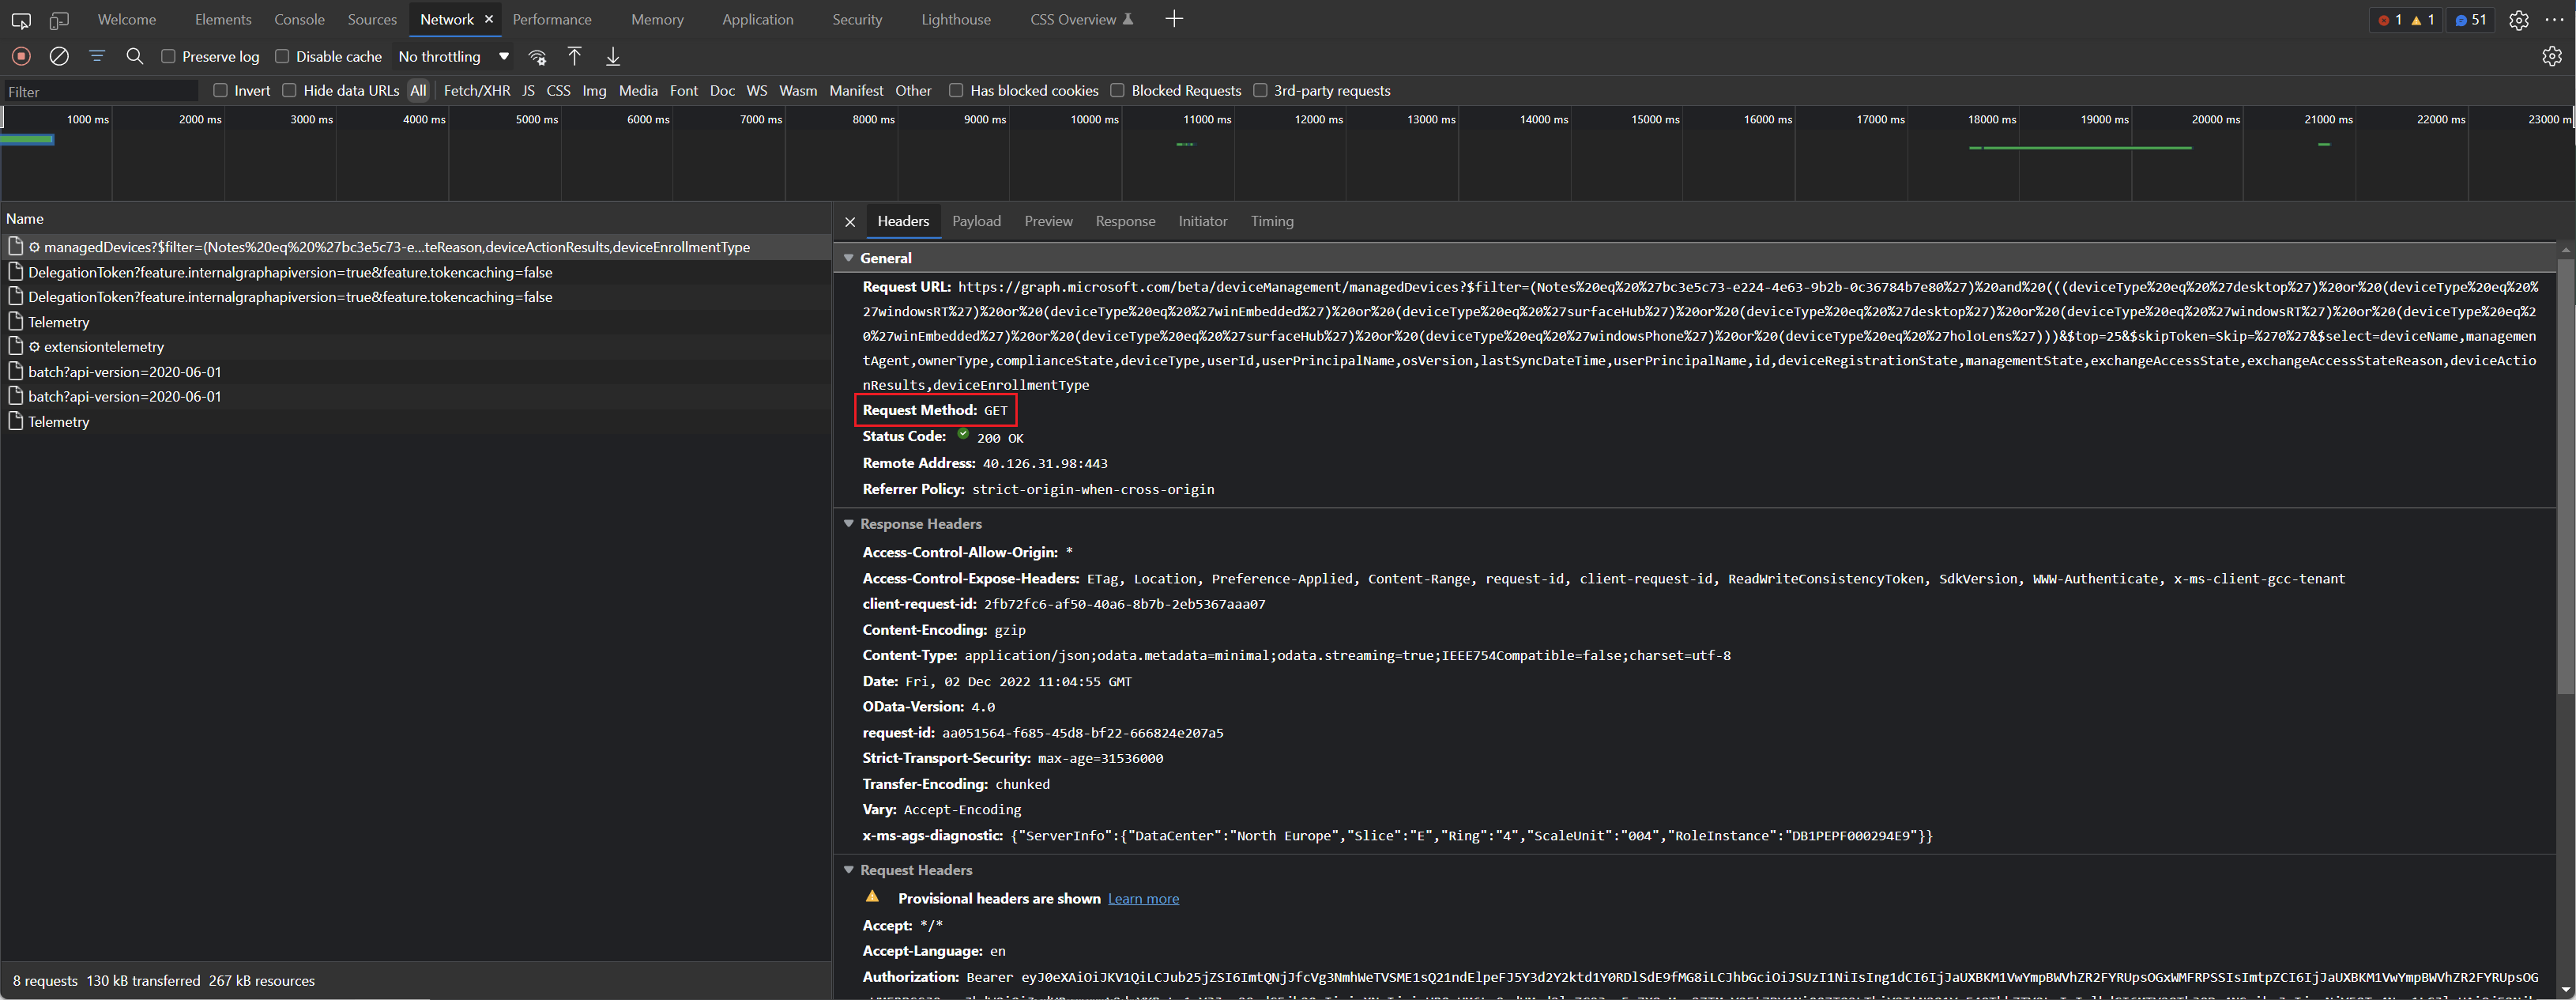
Under General -> Request URL you can see the API route which was called from the corresponding web portal.
Find API method
To find out the REST method used, you can open the Devtools in the same way as for finding the API route. The network blade will then show which REST method was used under Request Method.
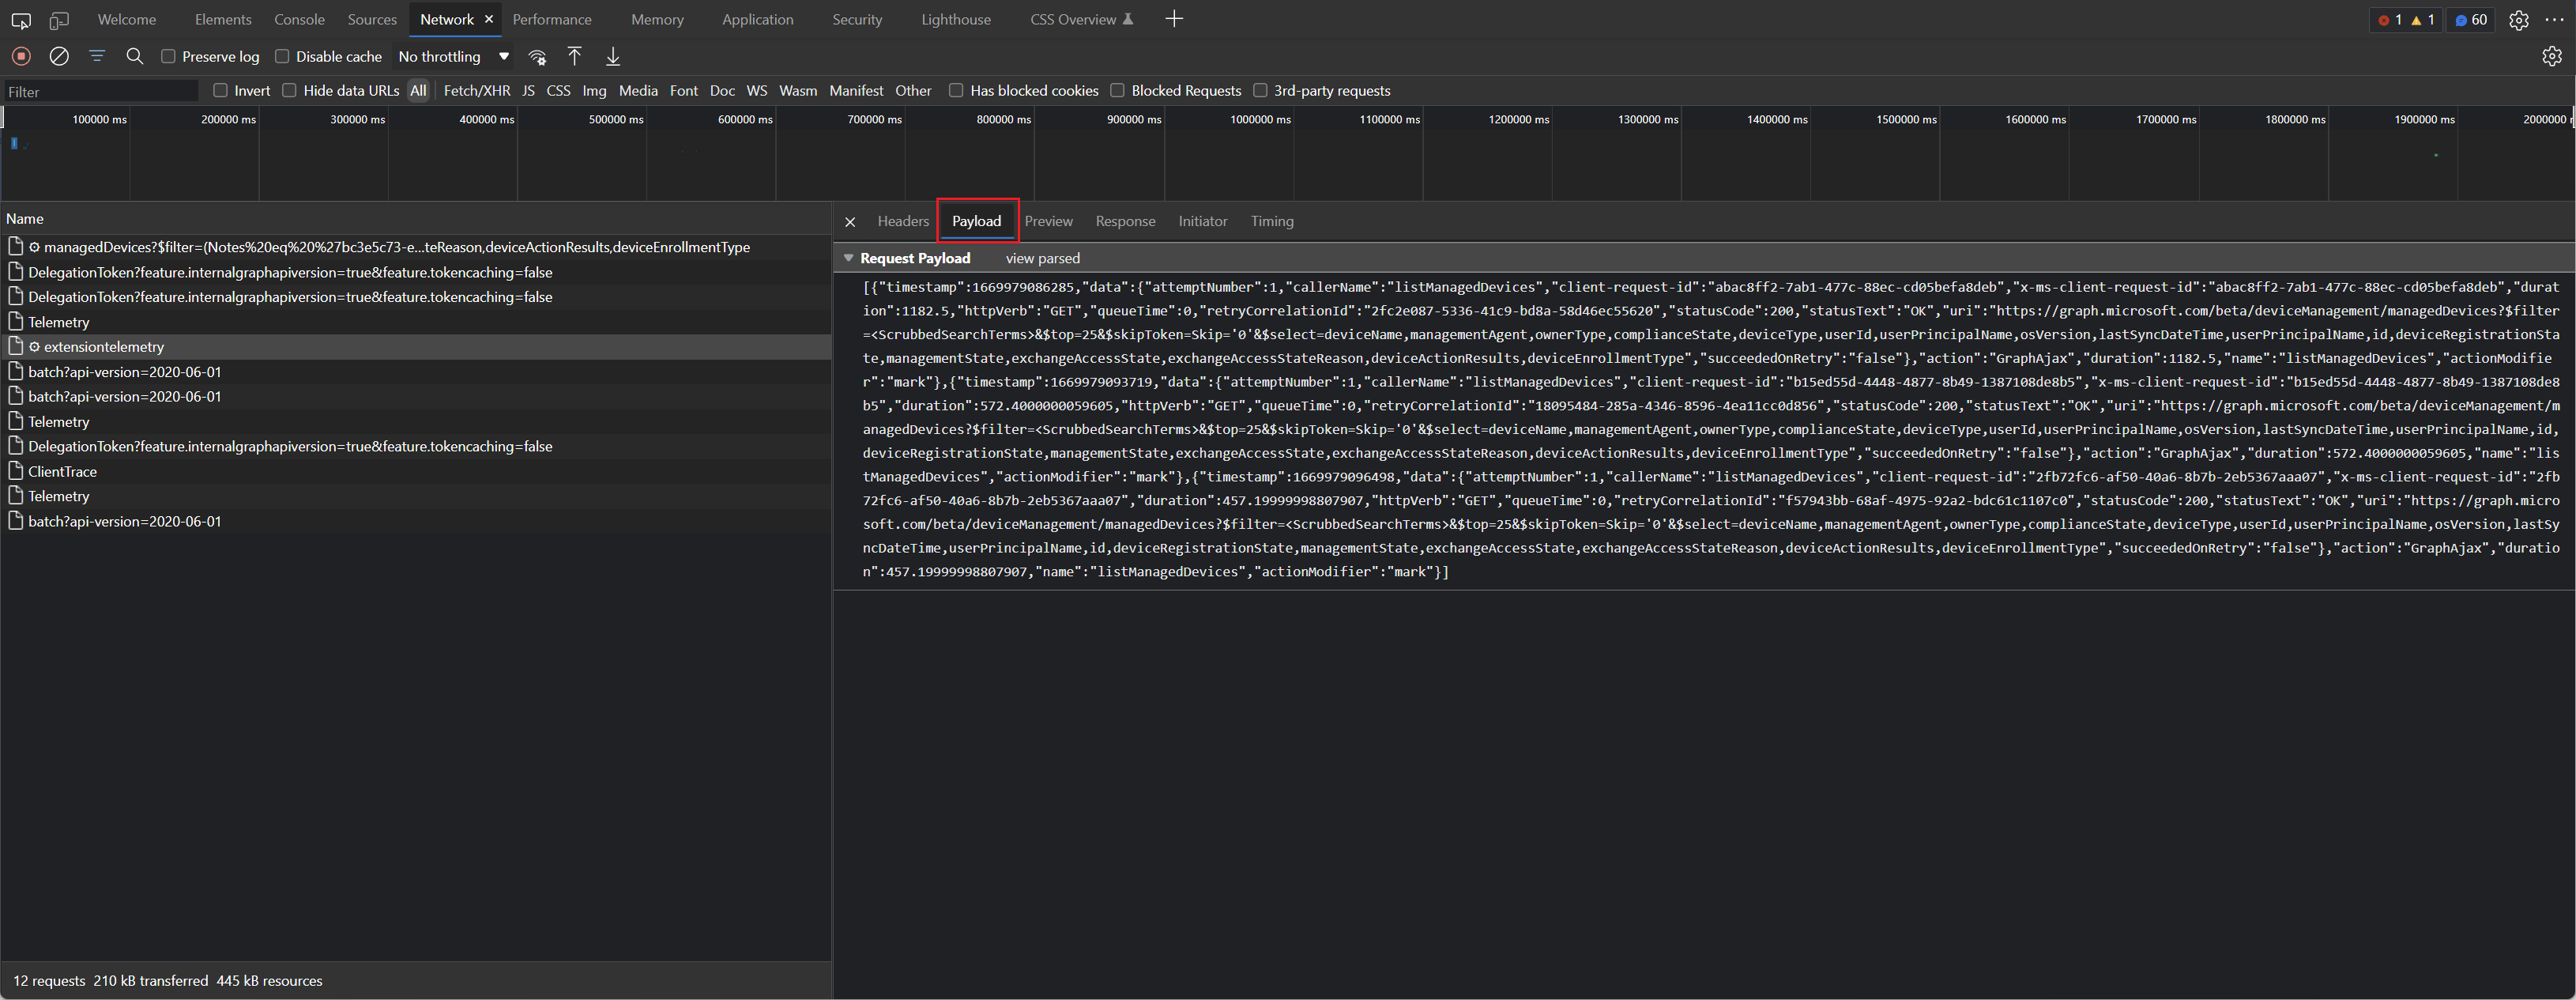
Find API body
Requirements: API route must be known (steps above)
When something is created, a JSON object must be passed to the API. Only the request method "POST" or "PUT" can be used.
- Open network tracing in browser.
- Perform query in GUI (Intune Admin Center, Azure Portal, etc.).
- Find query in network tracing.
- Switch to "Payload" and display JSON object.
Create application access token & authorization header
This article explains how to authenticate to Microsoft Graph using application permissions. Use this method for unattended automation where no signed-in user is involved.
When to use application authentication
Use app-only authentication when:
- the script runs unattended
- the process runs in Azure Automation, Functions, pipelines, or services
- no user interaction is possible
- the automation should act as the application itself
Preferred options in enterprise environments:
- Managed Identity for Azure-hosted workloads
- Certificate-based authentication
- Client secret only when the first two are not possible
Note The OAuth 2.0 client credentials flow does not return a refresh token. To get a new token, request a new access token again.
Prerequisites
- Microsoft Entra ID app registration
- Microsoft Graph application permissions
- admin consent granted
- tenant ID
- client ID
- client credential (certificate or secret)
Example: client secret flow
$TenantId     = "<tenant-id>"
$ClientId     = "<app-client-id>"
$ClientSecret = "<client-secret>"

$TokenBody = @{
    grant_type    = "client_credentials"
    scope         = "https://graph.microsoft.com/.default"
    client_id     = $ClientId
    client_secret = $ClientSecret
}

$TokenResponse = Invoke-RestMethod `
    -Method POST `
    -Uri "https://login.microsoftonline.com/$TenantId/oauth2/v2.0/token" `
    -Body $TokenBody `
    -ContentType "application/x-www-form-urlencoded"

$Header = @{
    Authorization = "Bearer $($TokenResponse.access_token)"
    "Content-Type" = "application/json"
}
Example: Managed Identity in Azure
Connect-MgGraph -Identity
Get-MgContext
Best practices
- use least privilege
- prefer Managed Identity over secrets
- prefer certificates over client secrets when Managed Identity is not possible
- store secrets in Key Vault
- review Graph app permissions regularly
Common mistakes
- expecting a refresh token in client credentials flow
- using app-only auth when a user context is actually required
- hardcoding secrets in scripts
- forgetting admin consent for Graph application permissions
Summary
For unattended Microsoft Graph automation, use application permissions and prefer Managed Identity whenever possible.
Create user access token & authorization header
This article explains how to authenticate to Microsoft Graph in delegated user context. Use this approach when an action must run on behalf of a signed-in user.
Important Avoid Resource Owner Password Credentials (ROPC) whenever possible. Microsoft does not recommend it for modern environments because it is incompatible with many MFA, Conditional Access, passwordless, and passkey-based sign-in scenarios.
When to use delegated authentication
Use delegated authentication when:
- a signed-in user triggers the action
- the API call must respect the user's permissions
- the action should be auditable as that user
- interactive consent or MFA may be required
Recommended options
Preferred approaches for delegated Graph access:
- Device code flow for scripts and terminals
- Interactive browser sign-in for desktop tools
- Authorization code flow with PKCE for web apps and SPAs
- MSAL instead of building raw OAuth requests manually
Example with MSAL.PS
Install-Module MSAL.PS -Scope CurrentUser

$TenantId = "<tenant-id>"
$ClientId = "<app-client-id>"
$Scopes   = @("User.Read", "Mail.Read")

Token=Get−MsalToken−TenantIdTenantId -ClientId ClientId−ScopesScopes

$Header = @{
    Authorization = "Bearer (Token.AccessToken)"
    "Content-Type" = "application/json"
}
Best practices
- prefer MSAL over custom username/password token requests
- request only the scopes you really need
- do not store user passwords in scripts
- expect MFA and Conditional Access challenges in enterprise tenants
- use app-only access only when there is no real user context
Summary
For modern Microsoft Graph delegated access, use MSAL plus interactive or device-based sign-in methods. Avoid ROPC unless you have a specific legacy exception and fully understand the risk.
Lookup external tenant id
Requirements: Authorization header and CrossTenantInformation.ReadBasic.All permission on App Registration.
With this API endpoint you can check if the domain is registered on Microsoft 65 products and get the tenant name and tenant id by a random domain name.
Use case
This API can be used to lookup a domain name to check if this company or domain is using Microsoft 365.
Graph API
This API route can be used to lookup the tenant id and tenant name.
GET https://graph.microsoft.com/beta/tenantRelationships/findTenantInformationByDomainName(domainName='<domain>')
{
    "@odata.context": "https://graph.microsoft.com/beta/$metadata#microsoft.graph.tenantInformation",
    "tenantId": "<tenantid>",
    "federationBrandName": null,
    "displayName": "<tenantdisplayname>",
    "defaultDomainName": "<tenantonmicrosoftdomainname>"
}
Response: 200 OK
If the domain is not registered inside Microsoft 365, this API route returns a 404 Error.
Send mail via Exchange Online
Requirements: Authentication header is needed to use this script and API.
Basic API information
This API can either be used to send a mail out of the mailbox of a user (application permission needed):
POST https://graph.microsoft.com/v1.0/users/<userprinciplename>/sendMail
Or to send mails out of the own mailbox (delegated permission needed):
POST https://graph.microsoft.com/v1.0/me/sendMail
JSON Body
{
    "message": {
        "subject": "<subjectofemail>",
        "body": {
            "contentType": "Text",
            "content": "<contentofemail>"
        },
        "toRecipients": [
            {
                "emailAddress": {
                    "address": "<recipientemail1>"
                }
            },
            {
                "emailAddress": {
                    "address": "<recipientemail2>"
                }
            }
        ],
        "ccRecipients": [
            {
                "emailAddress": {
                    "address": "<ccrecipientemail1>"
                }
            },
            {
                "emailAddress": {
                    "address": "<ccrecipientemail2>"
                }
            }
        ]
    },
    "saveToSentItems": "true"
}
HTTP Response
The HTTP Response in a successful submission is:
202 Accepted
Permissions
This script uses Graph API and authenticates with an App Registration, so it can be used in application permission mode to send mails out of automated powershell scripts. The App Registration needs the following Microsoft Graph permission:
Mail.Send
This permission can be set either as application permission or as delegated permission.
PowerShell script
This PowerShell script sends an email to specified people in Recipients and CCRecipients variables. The subject, senderupn and content of the mail can be provided on the function "Send-Mail".
function Send-Mail {

    param (
        [String]$SenderUPN,
        [Array]$Recipients,
        [Array]$CCRecipients,
        [String]$Subject,
        [String]$Content
    )

    $MailBodyJSON = @"
  {
    "message": {
      "subject": "$Subject",
      "body": {
        "contentType": "Text",
        "content": "$Content"
      },
      "toRecipients": [],
      "ccRecipients": []
    },
    "saveToSentItems": "true"
  }
"@

    $MailbodyObject = ConvertFrom-JSON $MailBodyJSON
    Foreach($Recipient in $Recipients){
        $RecipientBodyJson = @"
  {
    "emailAddress": {
        "address": "$Recipient"
    }
  }
  "@
        $RecipientBodyObject = ConvertFrom-JSON $RecipientBodyJson
        $MailbodyObject.message.toRecipients += $RecipientBodyObject
    }

    Foreach($CCRecipient in $CCRecipients){
        $CCRecipientBodyJson = @"
  {
    "emailAddress": {
        "address": "$CCRecipient"
    }
  }
"@
        $CCRecipientBodyObject = ConvertFrom-JSON $CCRecipientBodyJson
        $MailbodyObject.message.ccRecipients += $CCRecipientBodyObject
    }

    $MailoutputbodyJson = ConvertTo-JSON $MailbodyObject -Depth 10


    Write-Host "Sending Mail to $Recipient and $CCRecipient (CC)."
    Invoke-RestMethod -Method Post -Uri "https://graph.microsoft.com/v1.0/users/$SenderUPN/sendMail" -Headers $Header -ContentType "application/json" -Body ([System.Text.Encoding]::UTF8.GetBytes($MailoutputbodyJson))
  }

  $Recipients = @("<recipient1>","<recipient2>")
  $CCRecipients = @("<ccrecipient1>","<ccrecipient2>")

  Send-Mail -SenderUPN "<senderupn>" -Recipients $Recipients -CCRecipients $CCRecipients -Subject "<subject>" -Content "<content>"
Use Case
This Script can be used in any automation script to send mails securely over the Microsoft Graph API. This is an easy to use mechanism to modernize a script with modern authentication.
Example:
In a Runbook you can get all App Registrations and check for each one if the secret is soon to be expire. If the secret expires in X days, it sends a reminder mail to the owner(s) of the App Registration.
Migrate Markdown files to OneNote Notebook
Requirements: You need an Authorization header and Notes.ReadWrite.All permissions in the Bearer token. Eighter Delegated or Application permissions needed.
The Microsoft Graph API enables the creation of content, structure, and notes in Microsoft OneNote. In the backend it uses plain html as the basic content structure. Which means we can apply the widespread syntax for images, lists and more.
Explanation of Microsoft OneNote elements
Microsoft Graph URLs for OneNote
Replace <userupn> with user principle name that the access token is issued to. Alternatively you can use the /me endpoint (https://graph.microsoft.com/v1.0/me/onenote/*) to get the data of the user from the access token dynamically.
The Microsoft Graph API for OneNote supports a hierarchical URL structure, allowing you to drill down through related elements in a single query. You can filter sequentially from notebooks to section groups, then sections, pages, and finally retrieve the content of a specific page. This structure enables precise access to data without making multiple API calls. Example query:
https://graph.microsoft.com/v1.0/users/<userid>/onenote/notebooks/<notebookid>/sectionGroups/<sectiongroupid>/sections/<sectionid>/pages/<pageid>/contentRecommendation: Filter the results on the server side using Graph data preparation in URL parameters. More on this topic here: Serverside data preper... | LNC DOCS All of these endpoints support common query parameters to filter, sort, or paginate the results, making it a versatile tool for managing and interacting with OneNote content programmatically.
Get OneNote notebooks
The Microsoft Graph API endpoint for OneNote notebooks retrieves a list of OneNote notebooks associated with a specific user.
GET https://graph.microsoft.com/v1.0/users/<userupn>/onenote/notebooksGet OneNote section groups
This endpoint retrieves all section groups in the users OneNote account, spanning across all notebooks. Section groups are hierarchical containers for organizing sections within OneNote.
GET https://graph.microsoft.com/v1.0/users/<userupn>/onenote/sectionGroupsThis second endpoint retrieves all section groups within a specific OneNote notebook identified by <notebookid>. It allows targeted access to the section groups of a particular notebook
GET https://graph.microsoft.com/v1.0/users/<userupn>/onenote/notebooks/<notebookid>/sectionGroupsGet OneNote sections
This endpoint retrieves all sections in the users OneNote account, spanning across all available notebooks. It provides a comprehensive view of the users sections
GET https://graph.microsoft.com/v1.0/users/<userupn>/onenote/sectionsThe second endpoint retrieves all sections within a specific OneNote notebook identified by <notebookid>. It enables precise access to the sections of a targeted notebook.
GET https://graph.microsoft.com/v1.0/users/<userupn>/onenote/notebooks/<notebookid>/sectionsThis third endpoint retrieves all sections within a specific OneNote section group, identified by its unique section group ID. It allows focused access to sections organized within a particular section group.
GET https://graph.microsoft.com/v1.0/users/<userupn>/onenote/sectionGroups/<sectiongroupid>/sectionsGet OneNote pages
This endpoint provides a complete list of all pages within the users OneNote account, regardless of their notebook or section. It’s a useful way to access all notes in one request. Attention: Since this list can grow with time, it may be required to use pagination (make multiple queries because large data needs to be splittet into manageable chunks).
GET https://graph.microsoft.com/v1.0/users/<userupn>/onenote/pagesThis endpoint retrieves all pages contained within a specific OneNote section, identified by <sectionid>. It enables targeted access to notes under a particular organizational context.
GET https://graph.microsoft.com/v1.0/users/<userupn>/onenote/sections/<sectionid>/pagesGet OneNote page content
This endpoint retrieves the full content of a specific OneNote page, identified by <pageid>. The content is returned in HTML format, which includes all text, images, and other elements structured in a web-friendly format. This allows for easy rendering or further processing in web-based or other HTML-compatible applications.
GET https://graph.microsoft.com/v1.0/users/<userupn>/onenote/pages/<pageid>/contentThis endpoint is ideal for applications that need to display, edit, or analyze OneNote page data in its full context. Appropriate permissions, such as Notes.Read is required for access.
Create OneNote section group
This Graph endpoint creates a new section group within the specified notebook identified by <notebookid>. Provide a JSON payload with the "displayname" field to define the group’s name.
POST https://graph.microsoft.com/v1.0/users/<userupn>/onenote/notebooks/<notebookid>/sectionGroup
{
  "displayname":"<yoursectiongroupname>"
}
Create OneNote sections
Adds a new section to a specific notebook identified by <notebookid>. Supply a JSON payload containing the "displayname" field for the section name.
POST https://graph.microsoft.com/v1.0/users/<userupn>/onenote/notebooks/<notebookid>/sections
{
  "displayname":"<yoursectiongroupname>"
}
The followin endpoint creates a new section within an existing section group identified by <sectiongroupid>. Include a "displayname" in the JSON payload to specify the section name.
POST https://graph.microsoft.com/v1.0/users/<userupn>/onenote/sectionGroups/<sectiongroupid>/sections
{
  "displayname":"<yoursectiongroupname>"
}
Upload OneNote page content
The POST request to the following endpoint creates a new OneNote page in a specific section, identified by <sectionid>. The page content must be provided in HTML format within the request body.
Key Steps for Page Creation:
-
Prepare the Request:
- Set the target section ID in the URL.
- Include an HTML body for the page content, specifying the title and desired structure.
-
Set Metadata:
- Use meta tags (e.g., "created" date) to provide additional details for the page.
-
Send the Request:
- Use an HTTP client to send a POST request with a valid access token for authorization.
- Ensure the token has Notes.ReadWrite permission.
-
Handle the Response:
- A successful response includes the newly created pages details, including its ID and URL for further operations.
This method efficiently uploads custom page content to a specified section, making it ideal for programmatically managing OneNote.
POST https://graph.microsoft.com/v1.0/users/<userupn>/onenote/sections/<sectionid>/pagesThis is an example usage of a PowerShell request to create a new OneNote page.
$Global:MicrosoftEntraIDAccessToken = "<yourbeareraccesstoken>"

$YourSiteTitle = "<yoursitetitle"
$ParentSectionId = "<yourparentsectionid"
$UserUPN = "<youruserupn>"
$NotesContent = "<yourhtmlsitecontent>"
$CreationDate = Get-Date

$PageCreationUrl = "https://graph.microsoft.com/v1.0/users/$UserUPN/onenote/sections/$($ParentSectionId)/pages"
$PageCreationBody = @"
<!DOCTYPE html>
<html>
<head>
<title>$YourSiteTitle</title>
<meta name="created" content="$($YourCreationDate.ToString("yyyy-MM-ddTHH:mm:sszzz"))" />
</head>
<body>
$($NotesContent)
</body>
</html>
"@
$PageCreationResponse = Invoke-RestMethod -Uri $PageCreationUrl -Header @{Authorization = "Bearer $Global:MicrosoftEntraIDAccessToken" } -Method POST -Body $PageCreationBody -ContentType "application/xhtml+xml"
Migration script for Obsidian Markdown
This chapter provides a detailed guide on how to use this PowerShell script to migrate an entire folder structure of Markdown files from Obsidian into Microsoft OneNote while preserving the original hierarchy. The script processes folders as section groups, subfolders as sections or section groups, and Markdown files as pages. Using this migration script you can seamlessly transferring content into OneNote.
Import images from OneDrive (optional)
To integrate pictures into the OneNote page, we need a static link to the binary source of the image. If you are storing your Markdown structure including the images in OneDrive or SharePoint you can retrieve the direct download URL from their storage.
Open the desired folder in the browser and open the DevTools (F12) of your browser. Go to the corresponding resource folder and reload the page. Search for the query to https://api.onedrive.com and review the link on the right side. 
On this entry switch to "Response" and copy the whole JSON content into a file on your local computer. This file will then be imported in the next script. We want the direct URL of each image (@content.downloadUrl) as this is static per file and will not change. It also returns the binary element of the image which we want on the OneNote side.
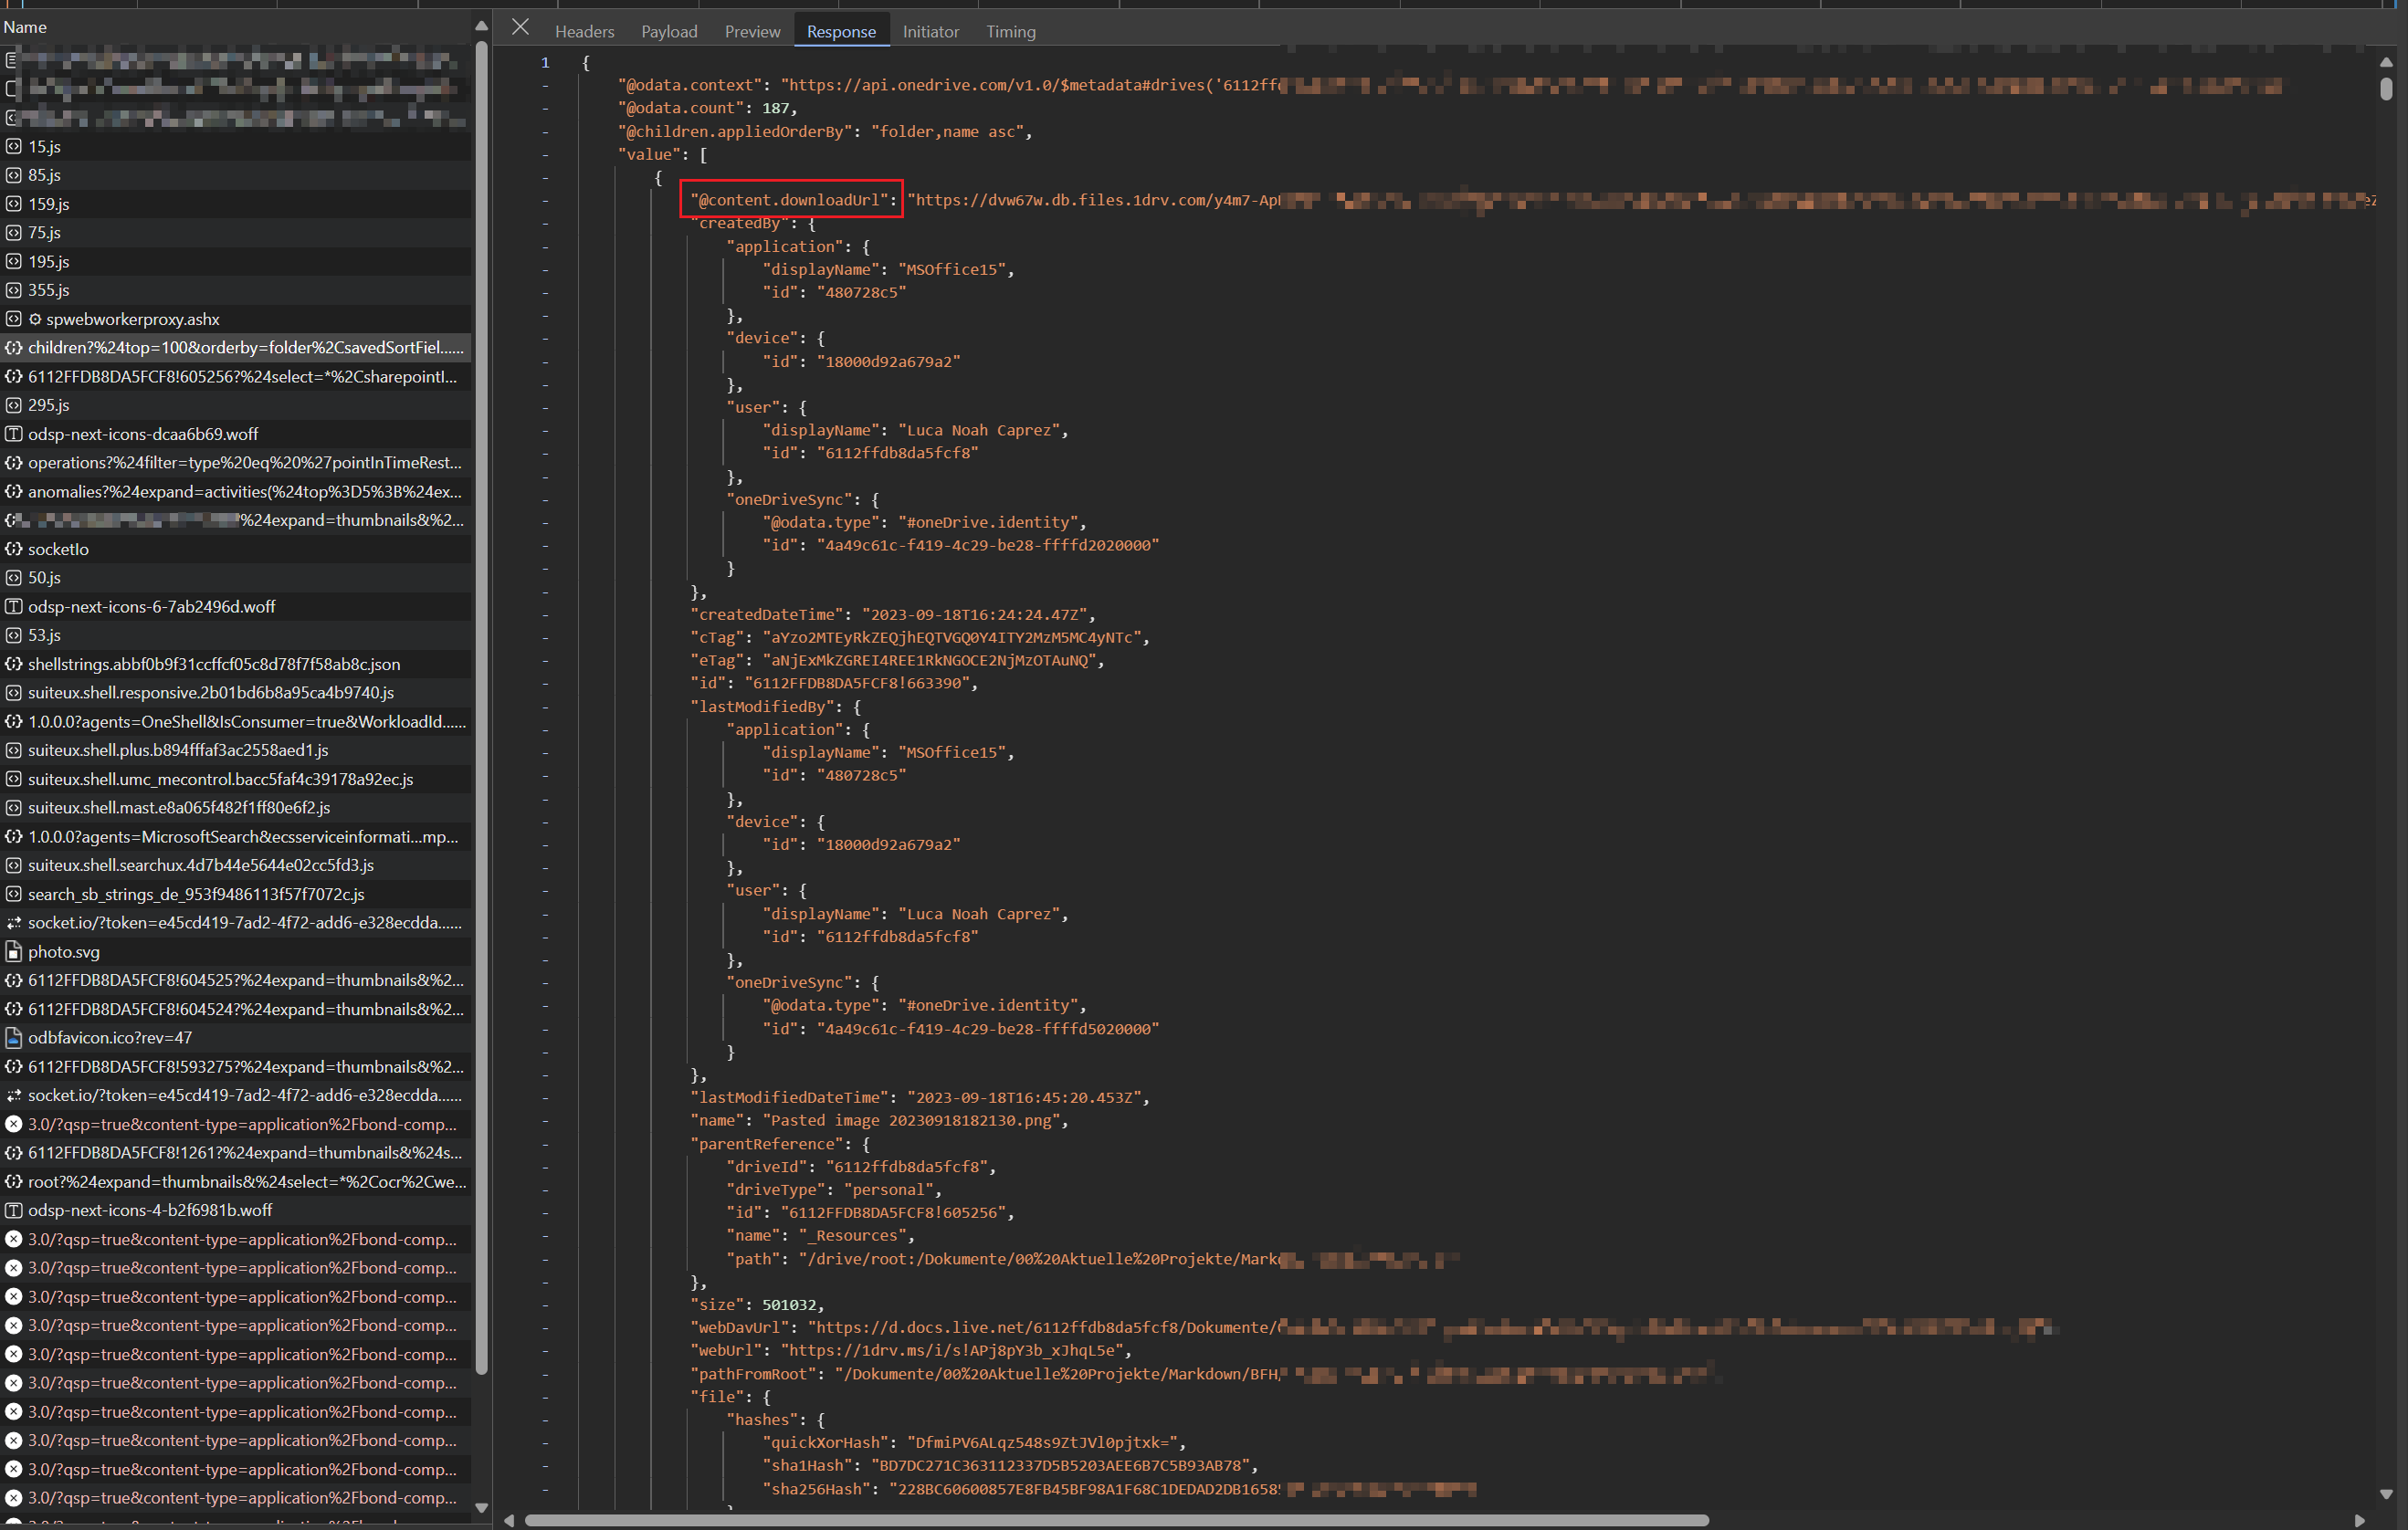
To comply with the script below, name the file "AllMarkdownPictures.json" and put it into the same folder as the script. Now you are ready to start the migration of your Markdown files to OneNote.
PowerShell script
-
Configure Parameters:
Update variables such as the access token, user principal name (UPN), parent section group ID, and the local path to the Obsidian Markdown folder.Specify whether you want to import the images directly from OneDrive (previous chapter). -
Run the Script:
Execute the script in PowerShell. The script uses Microsoft Graph API endpoints to create section groups, sections, and pages dynamically. -
Output:
The script outputs the progress of folder, section, and page creation, and highlights any issues encountered during the migration. Make sure to check the structure in OneNote for any errors or wrong content!
$Global:MicrosoftEntraIDAccessToken = "<yourentraidaccesstoken>"
$UserUPN = "<youruserupn>"
$ParentSectionGroup = "<parentsectiongroupid>" # Find via Microsoft Graph Explorer
$ParentFolder = "<yourlocalpathforobsidian structure>"
$ImportImages = $true # Set to false if you don't want to import images -> Importing images is advanced and requires more indepth knowledge of OneDrive API
$AllNotebooksFolder = Get-ChildItem -Path $ParentFolder -Directory

# Got Image JSON via Browser DevTools (https://api.onedrive.com/v1.0/drives/6112ffdb8da5fcf8/items/6112ffdb8da5fcf8!605256/children?%24top=1000)
$AllFolders = Get-Content ".\AllMarkdownPictures.json"
$AllPictures = $AllFolders | ConvertFrom-Json -Depth 10

foreach ($Folder in $AllNotebooksFolder) {
  $FolderName = $Folder.Name
  if ($FolderName.Length -gt 50) {
    $FolderName = $FolderName.Substring(0, 50)
  }
  if ($FolderName -like ".*" -or $FolderName -like "_*" ) {
    Write-Output "Skipping $Folder"
    continue
  }

  $SectionUrl = "https://graph.microsoft.com/v1.0/users/$UserUPN/onenote/sections?`$filter=displayName eq '$($FolderName)'"
  $SectionResponse = (Invoke-RestMethod -Uri $SectionUrl -Header @{Authorization = "Bearer $Global:MicrosoftEntraIDAccessToken" } -Method GET).value
  if ($SectionResponse.Count -eq 0) {
    $SectionCreationUrl = "https://graph.microsoft.com/v1.0/users/$UserUPN/onenote/sectionGroups/$ParentSectionGroup/sections"
    $SectionCreationBody = @{
      displayName = "$($FolderName)"
    } | ConvertTo-Json
    $SectionResponse = Invoke-RestMethod -Uri $SectionCreationUrl -Body $SectionCreationBody -Header @{Authorization = "Bearer $Global:MicrosoftEntraIDAccessToken" } -Method POST -ContentType "application/json"
    Write-Output "Created section $($FolderName)"
  }

  $MarkdownNotes = Get-ChildItem -Path $Folder.FullName
  foreach ($FileName in $MarkdownNotes) {
    Write-Output "Processing $($FileName.BaseName)"
    $PageUrl = "https://graph.microsoft.com/v1.0/users/$UserUPN/onenote/pages?`$filter=title eq '$($FileName.BaseName)'"
    $PageResponse = (Invoke-RestMethod -Uri $PageUrl -Header @{Authorization = "Bearer $Global:MicrosoftEntraIDAccessToken" } -Method GET).value

    $NotesContent = (Get-Content $FileName.FullName -Raw | ConvertFrom-Markdown).html
    if ($ImportImages) {
      # Add Pictures from OneDrive Source
      $PictureMatches = ($NotesContent | Select-String -Pattern '!\[\[(.*?)\]\]' -AllMatches).Matches
      if ($PictureMatches.Count -gt 0) {
        $Pictures = $PictureMatches | ForEach-Object { $_.Groups[1].Value }
        foreach ($Picture in $Pictures) {
          $PicturePath = ($AllPictures.value | Where-Object { $_.name -eq $Picture })."@content.downloadUrl"
          if ($PicturePath) {
            $NotesContent = $NotesContent -replace "!\[\[$Picture\]\]", "<img src='$($PicturePath)' alt='$Picture' />"
          }
        }
      }
    }

    # Add New Line Characters
    $Lines = $NotesContent -split "`n"
    $ModifiedLines = $Lines | ForEach-Object {
      if (-not $_.EndsWith(">")) {
        $_ + "<br>"
      }
      else {
        $_
      }
    }
    $NotesContent = $ModifiedLines -join "`n"

    # if (!$PageResponse) {
    try {

      $PageCreationUrl = "https://graph.microsoft.com/v1.0/users/$UserUPN/onenote/sections/$($SectionResponse.id)/pages"
      $PageCreationBody = @"
<!DOCTYPE html>
<html>
<head>
<title>$($FileName.BaseName)</title>
<meta name="created" content="$($FileName.CreationTime.ToString("yyyy-MM-ddTHH:mm:sszzz"))" />
</head>
<body>
$($NotesContent)
</body>
</html>
"@
      $PageCreationResponse = Invoke-RestMethod -Uri $PageCreationUrl -Header @{Authorization = "Bearer $Global:MicrosoftEntraIDAccessToken" } -Method POST -Body $PageCreationBody -ContentType "application/xhtml+xml"
      Write-Output "Created $($FileName.BaseName)"
    }
    catch {
      Write-Output "Error creating page $($FileName.BaseName)"
      Write-Output $_
    }
    # }
    # else {
    #   Write-Output "Page $($FileName.BaseName) already exists"
    #   # TODO Update the pages content
    # }
  }
}