Bash
- Quick commands
- Allow ssh with password
- Increase diskstorage for Linux VMs
- Make script executable
- Backup MongoDB Docker container via Bash script
- All you need to know about SSH for Ubuntu
Quick commands
Change owner of folder
sudo chown -R <linuxuser>:<linuxgroup> <pathtofolder>Manage Linux groups
Create group
groupadd <groupname>Add user to group
usermod -a -G <linuxgroupname> <linuxusername>List groups
sudo groups -laManaging tar files
Preview content of tar file
tar -tzf <pathtofile.tar>Extract content of tar file
tar -xzf <pathtofile.tar>Copy files and folders
cp -r <sourcefolder1/sourcefile1> <sourcefolder2/sourcefile2> <sourcefolder3/sourcefile3> <destinationfolder>SCP
scp <username>@<sourcehost>:<sourcefile/sourcefolder> <destinationfolder>Get folder size
du -s <folderpath>Get task manager view
SARTOPMove foreground job to background
CTRL + Z
bg -> Move job to background
fg -> Move job to foreground
Generate SSH key
ssh-keygen -t rsa -b 4096 -C "<nameforsshkey>" -f .ssh/<nameforsshkey>Apt remove insecure repositories
sudo apt autoremoveReplace characters in file
sed -i 's/<oldcharacters>/<newcharacters>/g' <filepath>Sync clock
sudo hwclock -sResolve DNS Server
Set dns server on specific interface
sudo systemd-resolve --set-dns=<yourprefereddnsip> --interface=<yourinterface>Allow ssh with password
Change parameter in config file
Edit ssh config file:
sudo nano /etc/ssh/sshd_config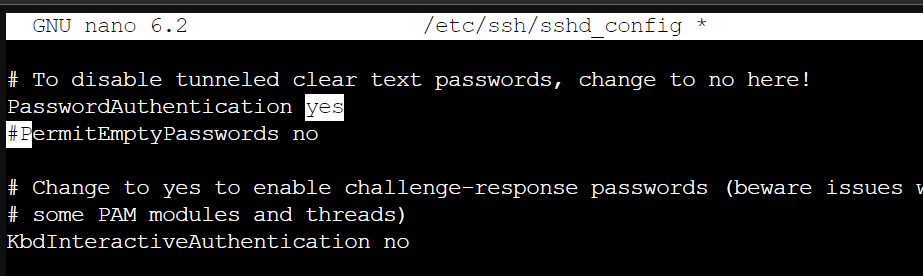
Restart ssh service
sudo systemctl restart sshdIncrease diskstorage for Linux VMs
The overall process involves several layers: disk → partition → LVM physical volume → LVM logical volume → filesystem. Each layer has its own size and doesn't grow automatically just because the layer below it got bigger — that's why several steps are needed.
Before you start: Although these steps are generally safe and non-destructive, it's recommended to create a backup or snapshot of the VM beforehand, especially in production environments.
1. Check the new disk size
fdisk -l
Lists all block devices and their partitions. Check whether the disk (e.g. /dev/sda) already shows the larger total size. If not, reboot the VM once so the kernel picks up the new disk size.
2. Resize the partition
cfdisk
In the interactive menu:
- Select the affected partition (usually the last partition on the disk)
- Choose Resize and confirm the new size (usually defaults to all available free space)
- Choose Write and confirm with
yes - Exit with Quit
📝
cfdiskonly changes the partition table, not the data itself. Growing a partition is therefore uncritical — it's just important that the partition being resized is the last one on the disk.
3. Verify the partition size
fdisk -l <pathtomaindevice> #example path: /dev/sda
Check that the target partition (e.g. /dev/sda3) now shows the expected new size.
4. Cross-check with parted (optional)
parted
In the parted prompt:
print— shows the current partition table- As an alternative to
cfdisk, you can also resize here usingresizepart: enter the partition number, then the new end point (or100%for maximum size) quit— exit the program
5. Grow the LVM Physical Volume (PV)
pvresize <pathtonewdevice>
Example: pvresize /dev/sda3
Extends the physical volume to use the newly available space on the partition. Use pvs to verify the new PV size.
6. Grow the LVM Logical Volume (LV)
lvextend -l +100%FREE <pathtolocalpartition>
-l +100%FREE allocates all free space in the volume group to the logical volume. If you only want to allocate part of it, you can use e.g. -L +20G instead.
7. Grow the filesystem
resize2fs <pathtolocalpartition>
Grows the filesystem (ext2/ext3/ext4) to the new size of the logical volume — only this step actually makes the additional space usable by the system.
⚠️ For XFS,
resize2fswon't work — usexfs_growfs <mountpoint>instead (note: this takes the mount point, not the device path). You can check the filesystem type withdf -T.
8. Verify the result
df -h
9. Reboot
reboot
A reboot isn't strictly necessary since the changes are already active, but it's good practice to confirm the VM comes back up cleanly with the new configuration.
Common pitfalls
- Wrong partition selected — always check with
fdisk -lorlsblkbefore each step to confirm which device/partition is affected. - Not the last partition — a partition can generally only be extended into unallocated space immediately following it.
- Forgetting the filesystem step —
pvresize/lvextendonly grow the LVM layers; the filesystem still needs to be extended separately withresize2fs/xfs_growfs. - XFS with
resize2fs— fails or does nothing useful; usexfs_growfsinstead. - No backup — always back up before modifying partition tables.
Make script executable
In order to make sure that a file ending in .sh can be executed, you have to change its permissions. This is necessary if a script is to be executed by an automation like Ansible or Crontab.
chmod +x /path/to/yourscript.shAfterwards it can be called by its relative or absolut path. Sometimes you have to specify the interpreter path such as /bin/bash.
/path/to/yourscript.sh./yourscript.sh/bin/bash /path/to/yourscript.shBackup MongoDB Docker container via Bash script
This short script is to backup a MongoDB database inside a docker container. A command is executed inside the Docker container via "docker exec". The command uses the program "mongodump", which is already installed on most container images. There you can specify the path in the Docker container where the backup should be stored. Here it is important that the folder in the Docker container is mapped to the filesystem of the host.
datetmp=$(date '+%Y%m%d')
dateprod=${datetmp:2}
docker exec <dockercontainername> /bin/sh -c "mongodump --host="localhost:27017" --port=27017 -o '/data/backups/${dateprod} backup'"
This script can be executed regularly by means of a cronjob, so that the backups are available at a regular interval.
Instructions for creating a cronjob can be found here: Quick commands | LNC DOCS (lucanoahcaprez.ch)
All you need to know about SSH for Ubuntu
A practical guide to setting up, securing, and getting the most out of SSH on Ubuntu.
Setup
Install OpenSSH and open the firewall:
sudo apt update && sudo apt install openssh-server -y
sudo systemctl enable --now ssh
sudo ufw allow ssh
Verify it's running with sudo systemctl status ssh, then connect from your client:
ssh user@server-ip
Key-Based Authentication
Always use keys over passwords. Generate one on your client:
ssh-keygen -t ed25519 -C "my-device"
Copy it to the server:
ssh-copy-id user@server-ip
If you set a passphrase (you should), use the SSH agent so you don't have to re-enter it every time:
eval "$(ssh-agent -s)"
ssh-add ~/.ssh/id_ed25519

# macOS: persist in Keychain
ssh-add --apple-use-keychain ~/.ssh/id_ed25519
Hardening the Server
Edit /etc/ssh/sshd_config — here are the settings that matter most:
PermitRootLogin no
PasswordAuthentication no
MaxAuthTries 3
LoginGraceTime 30
AllowUsers alice bob
Always test before restarting:
sudo sshd -t && sudo systemctl restart ssh
Keep an existing session open while testing changes. Getting locked out of your own server is not fun.
Tips & Tricks
This is a non-exhaustive collection of things that make working with SSH much nicer. Most of these go into ~/.ssh/config.
Host Aliases
Instead of typing ssh -p 2222 deployer@prod.example.com -i ~/.ssh/id_ed25519_prod every time, define it once:
Host prod
    HostName prod.example.com
    User deployer
    Port 2222
    IdentityFile ~/.ssh/id_ed25519_prod
Now just run ssh prod. This also works with scp, rsync, and git.
You can define as many as you want:
Host staging
    HostName staging.example.com
    User deployer

Host pi
    HostName 192.168.1.50
    User pi
Defaults and Wildcards
Set sane defaults for all connections:
Host *
    ServerAliveInterval 60
    ServerAliveCountMax 3
    AddKeysToAgent yes
    IdentitiesOnly yes
Or scope settings to a domain:
Host *.corp.example.com
    User admin
    IdentityFile ~/.ssh/id_ed25519_work
Port Forwarding (SSH Tunnels)
Local forward — access a remote service through a local port. Great for databases that only listen on localhost:
ssh -L 5432:localhost:5432 admin@db-server
# now connect to localhost:5432 as if you were on the server
In config (runs automatically when you connect):
Host db-tunnel
    HostName db-server.example.com
    User admin
    LocalForward 5432 localhost:5432
    LocalForward 8080 internal-app:8080
Remote forward — expose a local service through the remote server:
ssh -R 8080:localhost:3000 user@vps
# vps:8080 now points to your local port 3000
SOCKS proxy — route all traffic through the server:
ssh -D 1080 user@ssh-server
# configure your browser to use SOCKS5 proxy on localhost:1080
Background tunnels — run a tunnel without an interactive shell:
ssh -f -N -L 5432:localhost:5432 admin@db-server
For tunnels that should survive disconnects, use autossh:
sudo apt install autossh -y
autossh -M 0 -f -N -L 5432:localhost:5432 admin@db-server
Jump Hosts / Bastion
Reach a server that's only accessible through an intermediate host:
Host bastion
    HostName bastion.example.com
    User jump-user

Host internal
    HostName 10.0.0.5
    User admin
    ProxyJump bastion
ssh internal now transparently hops through the bastion. Chain multiple hops with ProxyJump bastion,internal.
Connection Multiplexing
Reuse an existing connection for instant subsequent logins:
Host *
    ControlMaster auto
    ControlPath ~/.ssh/sockets/%r@%h-%p
    ControlPersist 600
mkdir -p ~/.ssh/sockets
The first connection creates a socket. Every connection after that to the same host is near-instant.
Multiple Git Identities
Use different keys for different GitHub/GitLab accounts:
Host github-personal
    HostName github.com
    User git
    IdentityFile ~/.ssh/id_ed25519_personal

Host github-work
    HostName github.com
    User git
    IdentityFile ~/.ssh/id_ed25519_work
Then clone with git clone git@github-work:company/repo.git.
Escape Sequences
These work inside any SSH session (press Enter first):
| Keys | What it does |
|---|---|
~. |
Force-disconnect a frozen session |
~C |
Open command line to add tunnels on the fly |
~# |
List active forwarded ports |
~? |
Show all escape sequences |
Adding a tunnel mid-session via ~C:
ssh> -L 3306:localhost:3306
Forwarding port.
Run Commands Remotely
ssh prod "df -h && free -m"
ssh prod 'bash -s' < local-script.sh
Mount Remote Filesystems (SSHFS)
sudo apt install sshfs -y
sshfs prod:/var/www ~/mounts/prod

# unmount
fusermount -u ~/mounts/prod    # Linux
umount ~/mounts/prod           # macOS
Skip Host Key Checking (Internal Networks Only)
Host 192.168.1.*
    StrictHostKeyChecking no
    UserKnownHostsFile /dev/null
Only use this in trusted networks. It disables MITM protection.
Debugging
When something doesn't work, add -v flags:
ssh -vvv prod
To see exactly which config options apply to a host:
ssh -G prod
Quick Reference
| Action | Command |
|---|---|
| Install SSH server | sudo apt install openssh-server |
| Generate key | ssh-keygen -t ed25519 |
| Copy key to server | ssh-copy-id user@host |
| Local port forward | ssh -L 8080:localhost:80 user@host |
| Remote port forward | ssh -R 9090:localhost:3000 user@host |
| SOCKS proxy | ssh -D 1080 user@host |
| Background tunnel | ssh -f -N -L 8080:localhost:80 user@host |
| Jump host | ssh -J bastion user@target |
| Debug | ssh -vvv user@host |