Azure Storage
- Save money with lifecycle policies
- List table content with PowerShell via OAuth 2.0 authentication
- Write table content with PowerShell via OAuth 2.0 authentication
- Upload Log Files to Azure Blob Storage via PowerShell
Save money with lifecycle policies
General information
Data sets have unique lifecycles. Early in the lifecycle, people access some data often. But the need for access often drops drastically as the data ages. Some data remains idle in the cloud and is rarely accessed once stored. Some data sets expire days or months after creation, while other data sets are actively read and modified throughout their lifetimes. Azure Storage lifecycle management offers a rule-based policy that you can use to transition blob data to the appropriate access tiers or to expire data at the end of the data lifecycle.
Create lifecycle policy
1. Open storage account
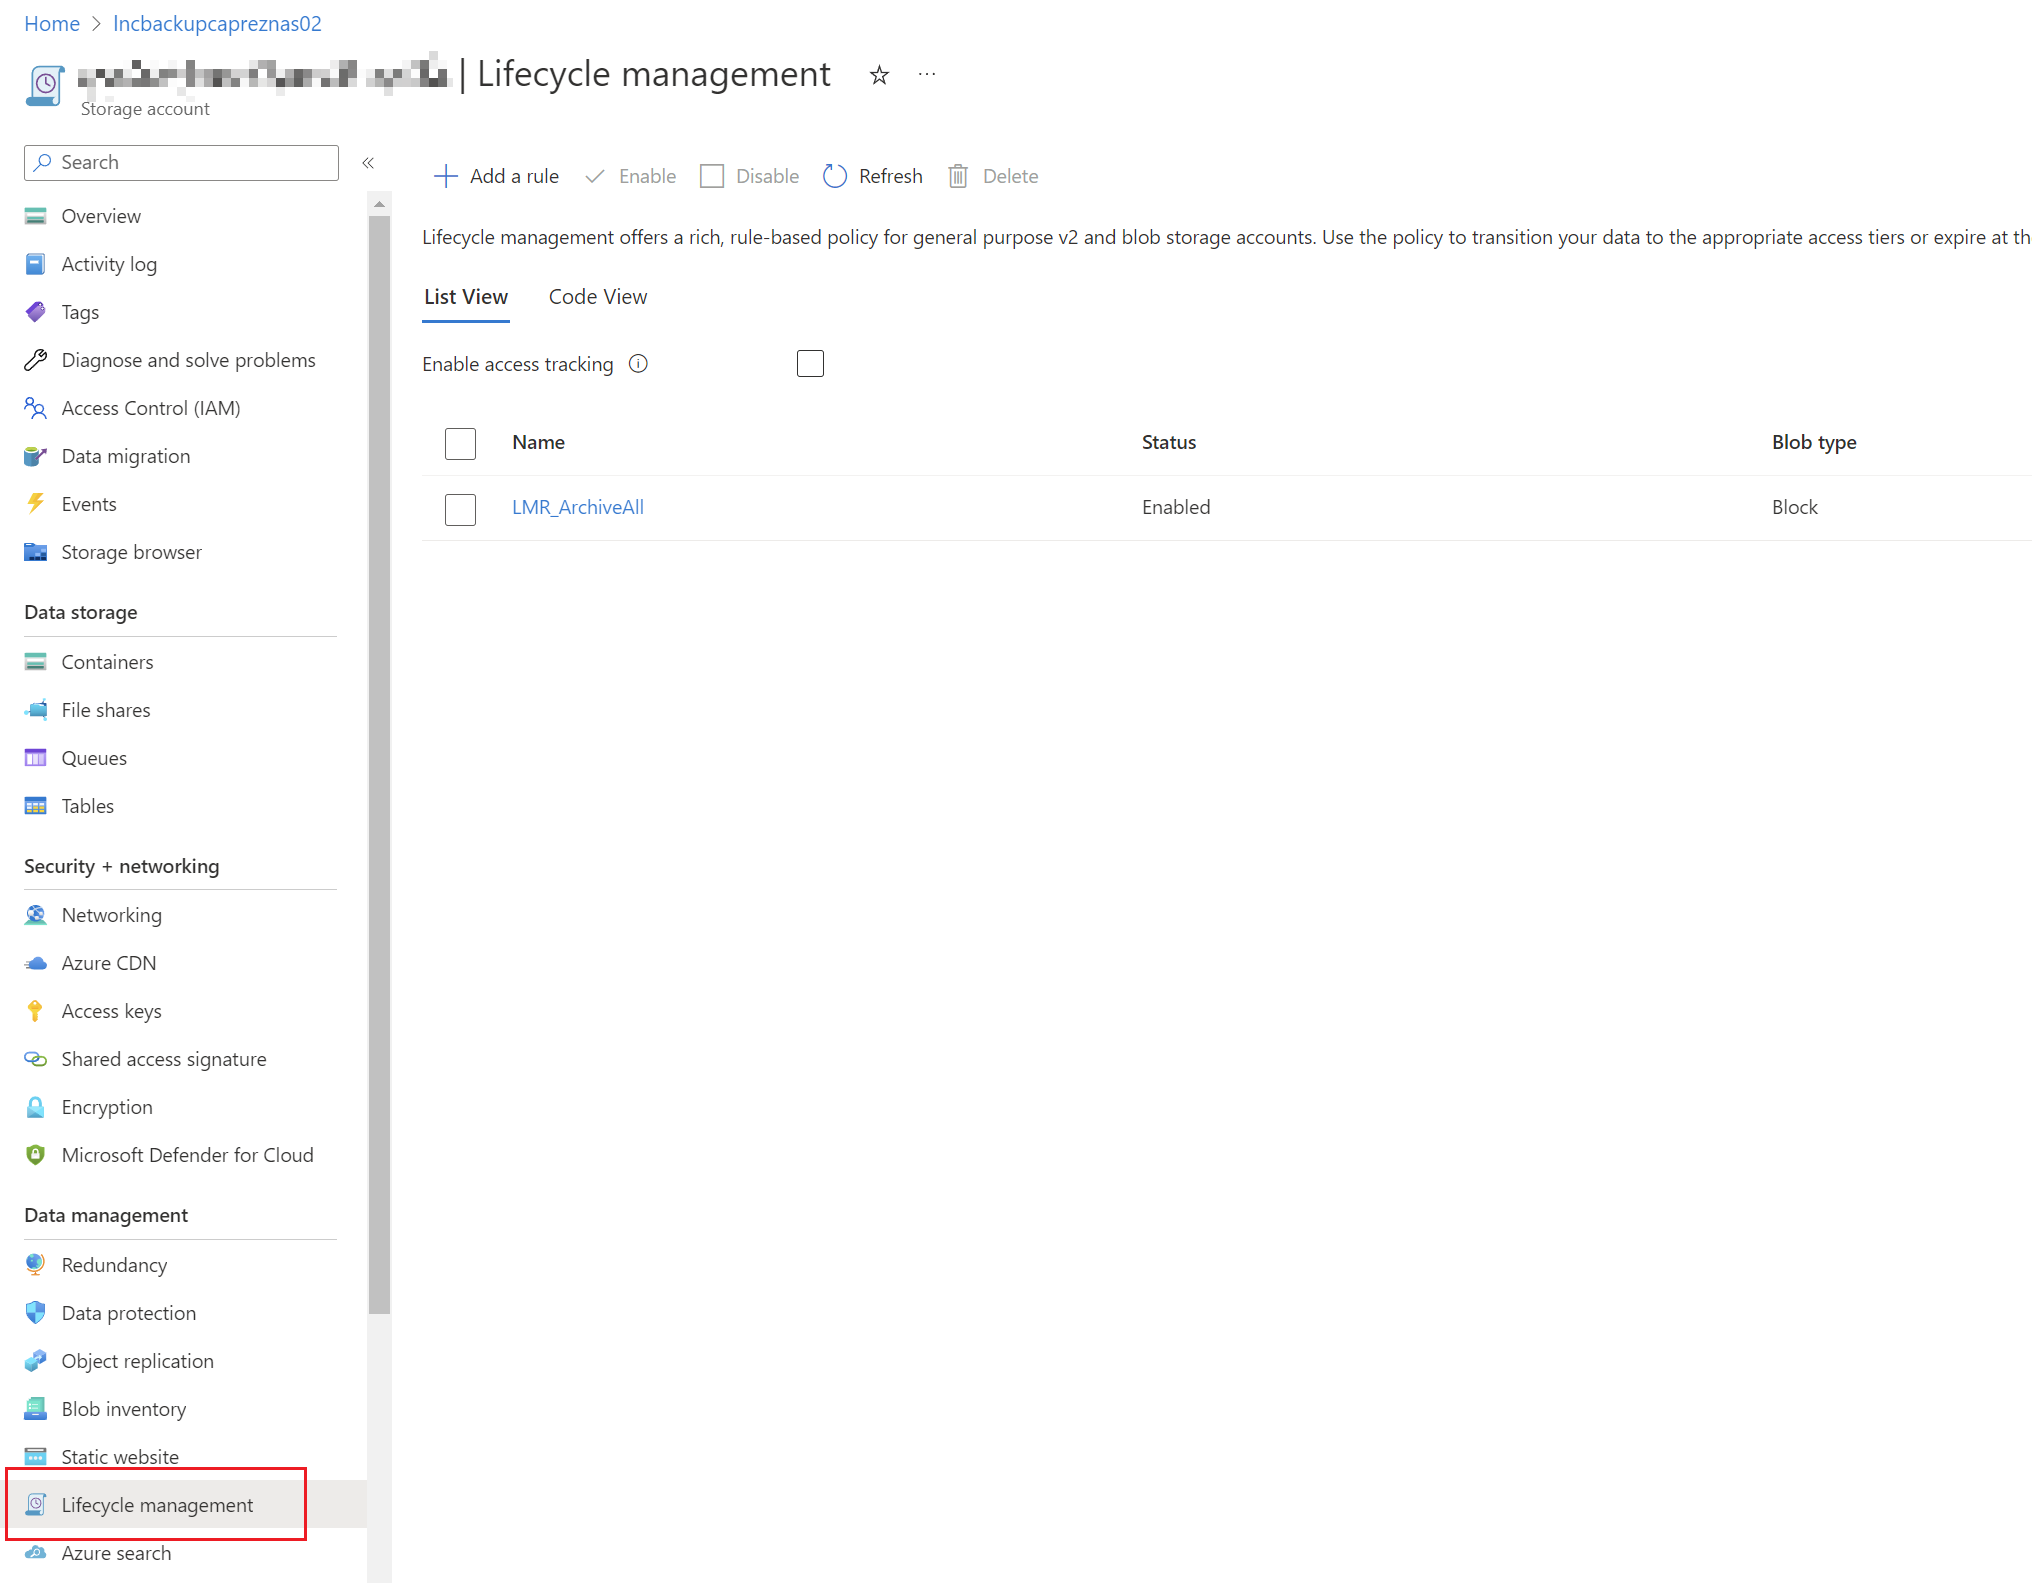
2. Create rule and give name to the policy and set the scope and blob type / subtype.
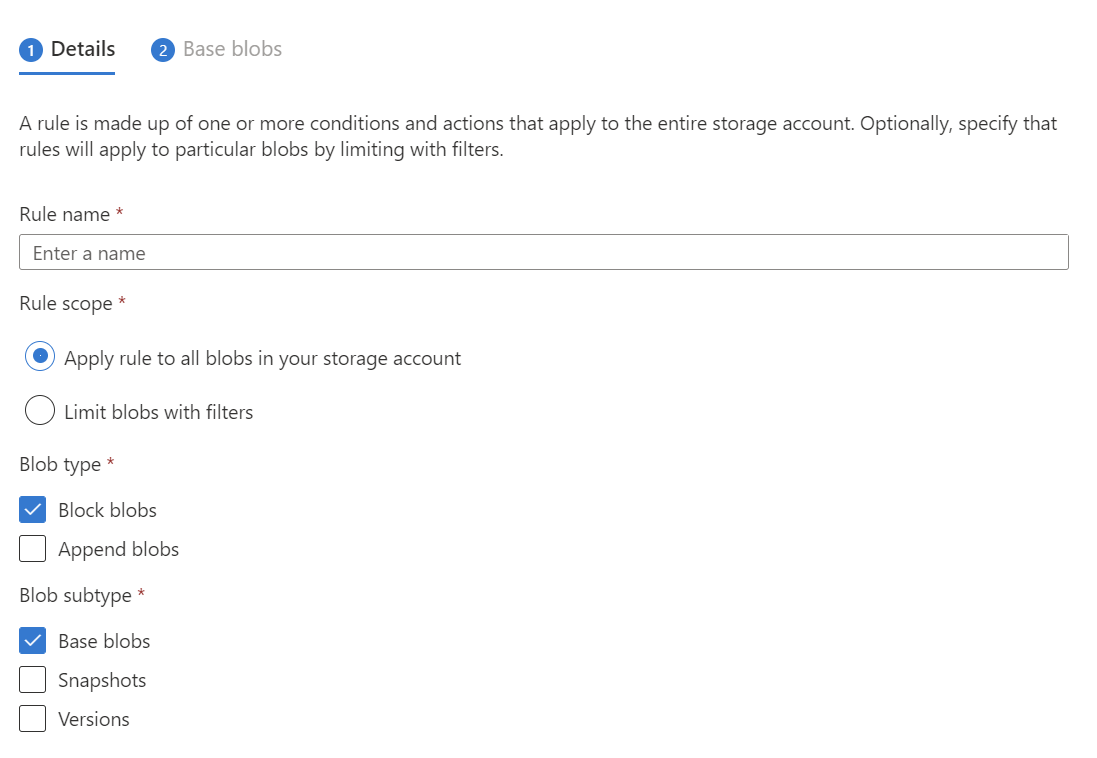
3. The last step is to create conditions and apply actions on the blob.

List table content with PowerShell via OAuth 2.0 authentication
Requirements: Permissions to create an App Registration and PowerShell Modules "AzTable" & "Az.Storage".
This tutorial describes how to use content from an Azure Storage Table in a PowerShell script. The authentication against the Azure Storage API is unattended and credentials are handled with an App Registration.
Create App Registration
Create a new App Registration and get the three variables as described in this guide: Get app details and gr... | LNC DOCS (lucanoahcaprez.ch)
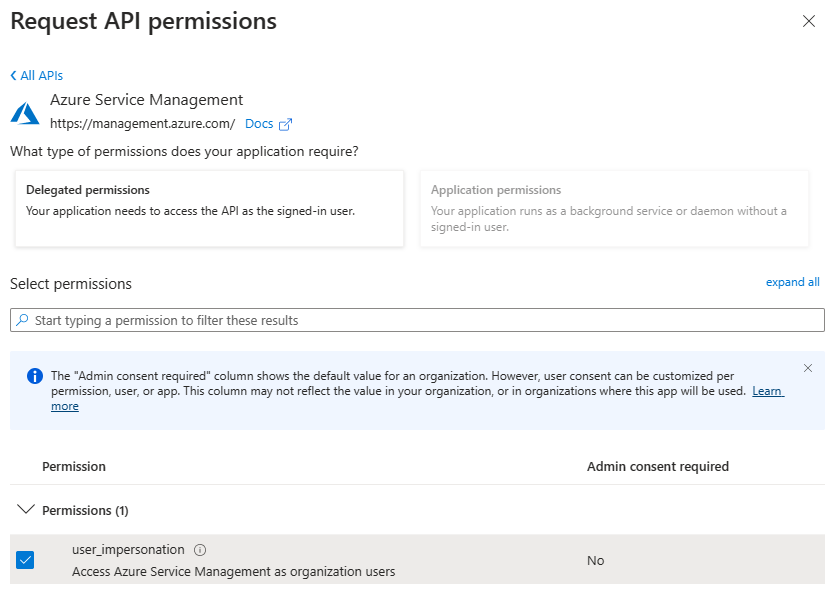
Add API permission
The only required permission for this App Registration is "user_impersonation". This permission can be found under the Azure Service Management API.
Grant permissions to Azure Storage Account
After you got all variables (Tenant ID, Client ID & Client Secret) you can add the permissions for Azure RBAC to the created App Registration. You need to go to the corresponding storage account within the azure portal. There you have to add the "Storage Account Contributor" role under "Access Control IAM":
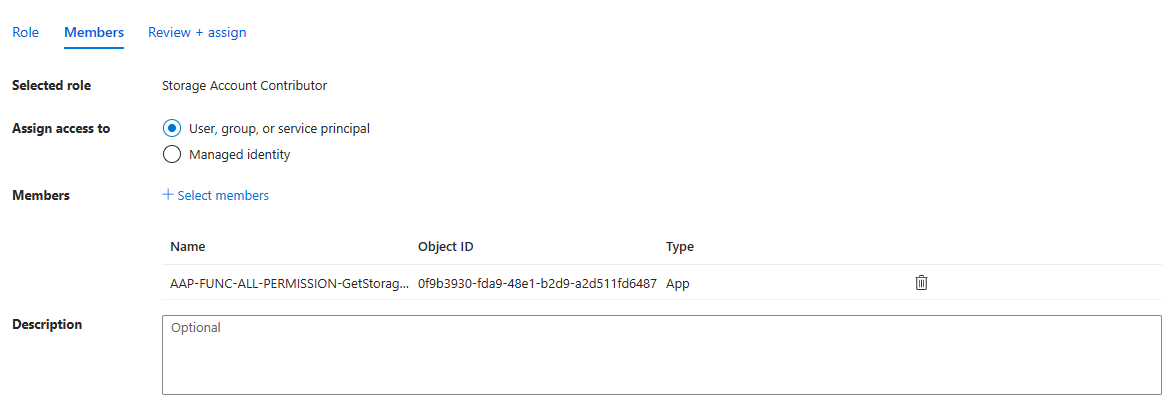
Unfortunately, the "Storage Account Contributor" role is mandatory and restricting to a Storage Table Reader for example is not possible, otherwise the data cannot be read.
PowerShell Code
The following code can be used to read the data from the storage table specified. Here it is important that the variables are filled in correctly and that the PowerShell modules are accessible.
$TenantID = "<tenantid>"
$ClientId = "<cliendid>"
$ClientSecret = "<clientsecret>"

$SubscriptionId = "<subscriptionid>"
$resourceGroupName = "<resourceGroupName>"
$storageAccName = "<storageaccountname>"
$tableName = "<tablename>"

Import-Module -Name Az.Storage
Import-Module -Name AzTable

$Password = ConvertTo-SecureString -AsPlainText $ClientSecret -Force
$Credential = New-Object System.Management.Automation.PSCredential ($ClientId, $Password)
$ctx = Connect-AzAccount -ServicePrincipal -Credential $Credential -Tenant $TenantId -Subscription $SubscriptionId
$ctx=(Get-AzStorageAccount -ResourceGroupName $resourceGroupName -Name $storageAccName).Context

$cloudTable = (Get-AzStorageTable –Name $tableName –Context $ctx.context).CloudTable
$TableContent = Get-AzTableRow -table $cloudTable
Write table content with PowerShell via OAuth 2.0 authentication
This tutorial describes how to add new content to an Azure Storage Table with a PowerShell script. The authentication against the Azure Storage API is unattended and credentials are handled with an App Registration.
Preparations
To gain access to the storage table you need to initialize an App Registration and add permission & a client secret. Then you have to add the Azure RBAC role to the storage account. Everything is documented here in detail: List table content wit... | LNC DOCS (lucanoahcaprez.ch)
PowerShell Code
The following code can be used to write data to the storage table specified. Here it is important that the variables are filled in correctly and that the PowerShell modules are accessible.
$TenantID = "<tenantid>"
$ClientId = "<cliendid>"
$ClientSecret = "<clientsecret>"

$SubscriptionId = "<subscriptionid>"
$resourceGroupName = "<resourceGroupName>"
$storageAccName = "<storageaccountname>"
$tableName = "<tablename>"


Import-Module -Name Az.Storage
Import-Module -Name AzTable

$Password = ConvertTo-SecureString -AsPlainText $ClientSecret -Force
$Credential = New-Object System.Management.Automation.PSCredential ($ClientId, $Password)
$ctx = Connect-AzAccount -ServicePrincipal -Credential $Credential -Tenant $TenantId -Subscription $SubscriptionId
$ctx = (Get-AzStorageAccount -ResourceGroupName $resourceGroupName -Name $storageAccName).Context

$cloudTable = (Get-AzStorageTable –Name $tableName –Context $ctx.context).CloudTable

Add-AzTableRow -partitionKey "dn" -Rowkey "$DomainName" -table $cloudTable -property @{ "<property1>" = "value1"; "<property2>" = "value2"; "<property3>" = "value3"; } | Out-Null
Upload Log Files to Azure Blob Storage via PowerShell
When troubleshooting Windows installations, upgrades, or updates, collecting log files like setupact.log or WindowsUpdate.log is essential. This blog provides a simple PowerShell script to automatically upload these files to Azure Blob Storage, making it easier to gather diagnostics from end-user devices. The script is designed for flexible use without any requirement for PowerShell modules It can either be run manually or deployed through tools like Intune, SCCM, or NinjaOne. The goal is to collect logs without interfering the work of end users.
Security considerations
To keep data secure, use a SAS (Shared Access Signature) token that is limited to write-only access and has a defined expiration. Make sure to use a separate container for this automation. Don't let the SAS token be able to access other locations than the specified container. Avoid hardcoding credentials into shared scripts, and store tokens securely if possible.
Prerequisites
To use this script, you’ll need an Azure Storage account with a container and a valid SAS (Shared Access Signature) token that allows write access (More information: Create SAS tokens for storage containers and blobs | Microsoft Learn). Make sure that the script gets executed with administrator rights, since some paths for the log sources are in system protected folders. Finally, ensure the device has internet access and can reach Azure Blob endpoints over HTTPS.
PowerShell Script
This script gathers key log files from standard Windows locations and uploads them securely to Azure Blob Storage using a SAS token. Uploaded logs are automatically named and organized into folders based on the device’s hostname and timestamp. The script also includes basic error handling and checks if files exist before attempting upload.
Storage and File Locations
The script uploads files to a specific Azure Blob container under a folder named after the device’s hostname. Each file is named with a timestamp, hostname, and sanitized file path, such as:PC123_logs/250614_135200_PC123_C__Windows_Panther_setupact.log
function Upload-LogFilesToBlob {
    param (
        [Parameter(Mandatory = $true)]
        [string[]]$Path
    )

    # Set your static SAS URL prefix
    $baseUploadUrl = "https://<storageaccountname>.blob.core.windows.net/<rootfolder>"
    $sasToken = "<storageaccountsastoken>"

    foreach ($filePath in $Path) {
        if (-Not (Test-Path $filePath)) {
            Write-Warning "File not found: $filePath"
            continue
        }

        # Escape full path to make it filename-safe
        $escapedPath = $filePath -replace '[\\/:*?"<>|]', '_'

        # Construct blob name inside a folder named by hostname
        $blobFolder = "$(hostname)_logs"
        $blobName = "$blobFolder/$(Get-Date -Format 'yyMMdd_HHmmss')_$(hostname)_$escapedPath"

        $uploadUrl = "$baseUploadUrl/$blobName$sasToken"

        $headers = @{
            "x-ms-blob-type" = "BlockBlob"
        }

        $fileBytes = [System.IO.File]::ReadAllBytes($filePath)

        try {
            Invoke-RestMethod -Uri $uploadUrl -Method Put -Headers $headers -Body $fileBytes
            Write-Output "Uploaded: $filePath"
        }
        catch {
            Write-Warning "Failed to upload: $_"
        }
    }
}

Get-WindowsUpdateLog -LogPath "C:\Windows\Logs\WindowsUpdateLog.log"

Upload-LogFilesToBlob -Path @(
    "C:\Windows\Panther\setupact.log",
    "C:\Windows\Panther\setuperr.log",
    "C:\Windows.old\Windows\Panther\setupact.log",
    "C:\Windows.old\Windows\Panther\setuperr.log",
    "C:\Windows\Logs\WindowsUpdateLog.log"
)