Microsoft Entra ID
- Get app details and grant permissions to app registration
- Regularly clean up MEID devices with automation
- Regularly clean up MEID guest user with automation
- Notify license shortage with automation
- Notify client app secret expiration with automation
- Get App Registrations by User Principal Name
- Change MFA Phone via Graph API
- Move Azure Subscriptions between Microsoft Entra ID tenants
- Single sign on (SSO) with third party applications
Get app details and grant permissions to app registration
Provision App Registration
App Registrations are containers that allow user-independent permission assignment and are therefore ideally suited for automation. App Registrations can be created in Azure Portal → Microsoft Entra ID → App Registrations. App Registrations should be preferred to service accounts whenever possible.
The following variables are used to authenticate to the Graph API using application permissions. The ClientSecret must not be stored as clear text in scripts or applications under any circumstances, but must be stored in designated containers (e.g. Azure Runbook Credential Store, Azure Key Vault or Windows Credential Store).
Variables used
$TenantID: This is the identity of the tenant, which is unique.
$ClientID: The ClientID can be used to uniquely identify the App Registration.
$ClientSecret: The ClientSecret expires every max. 24 months (2 years) and is like the password for the App Registration.
Read ClientID & TenantID
The ClientID & TenantID can be read out on the start page of the App Registration itself.
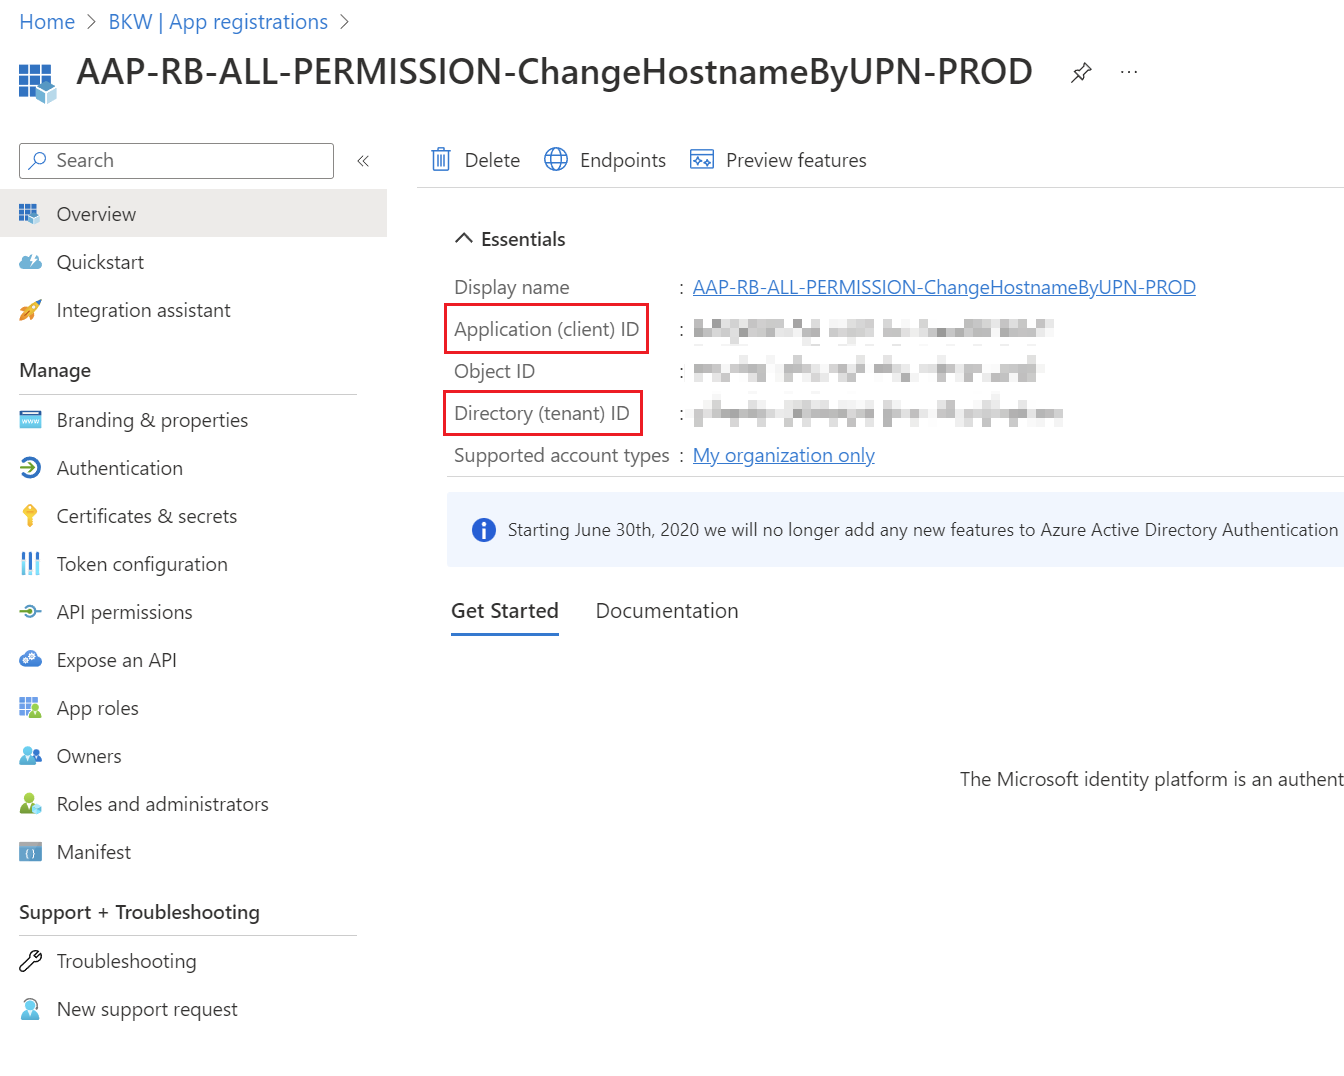
Create client secret
For the ClientSecret you have to switch to the "Certificates & Secrets" tab. A ClientSecret can be added via "New client secret". Then a name can be given there. Attention: Afterwards the ClientSecret is valid for 24 months (2 years) and expires after a certain time. In addition, the value is only displayed once. Save the ClientSecret as the first step in your password storage solution and note the expirationdate.

Grant permissions
As soon as the authentication via the app registration with the three values works, the permissions have to be assigned. This is a very tricky step, as an app could practically become a global administrator and overwrite or delete any tenant configurations.
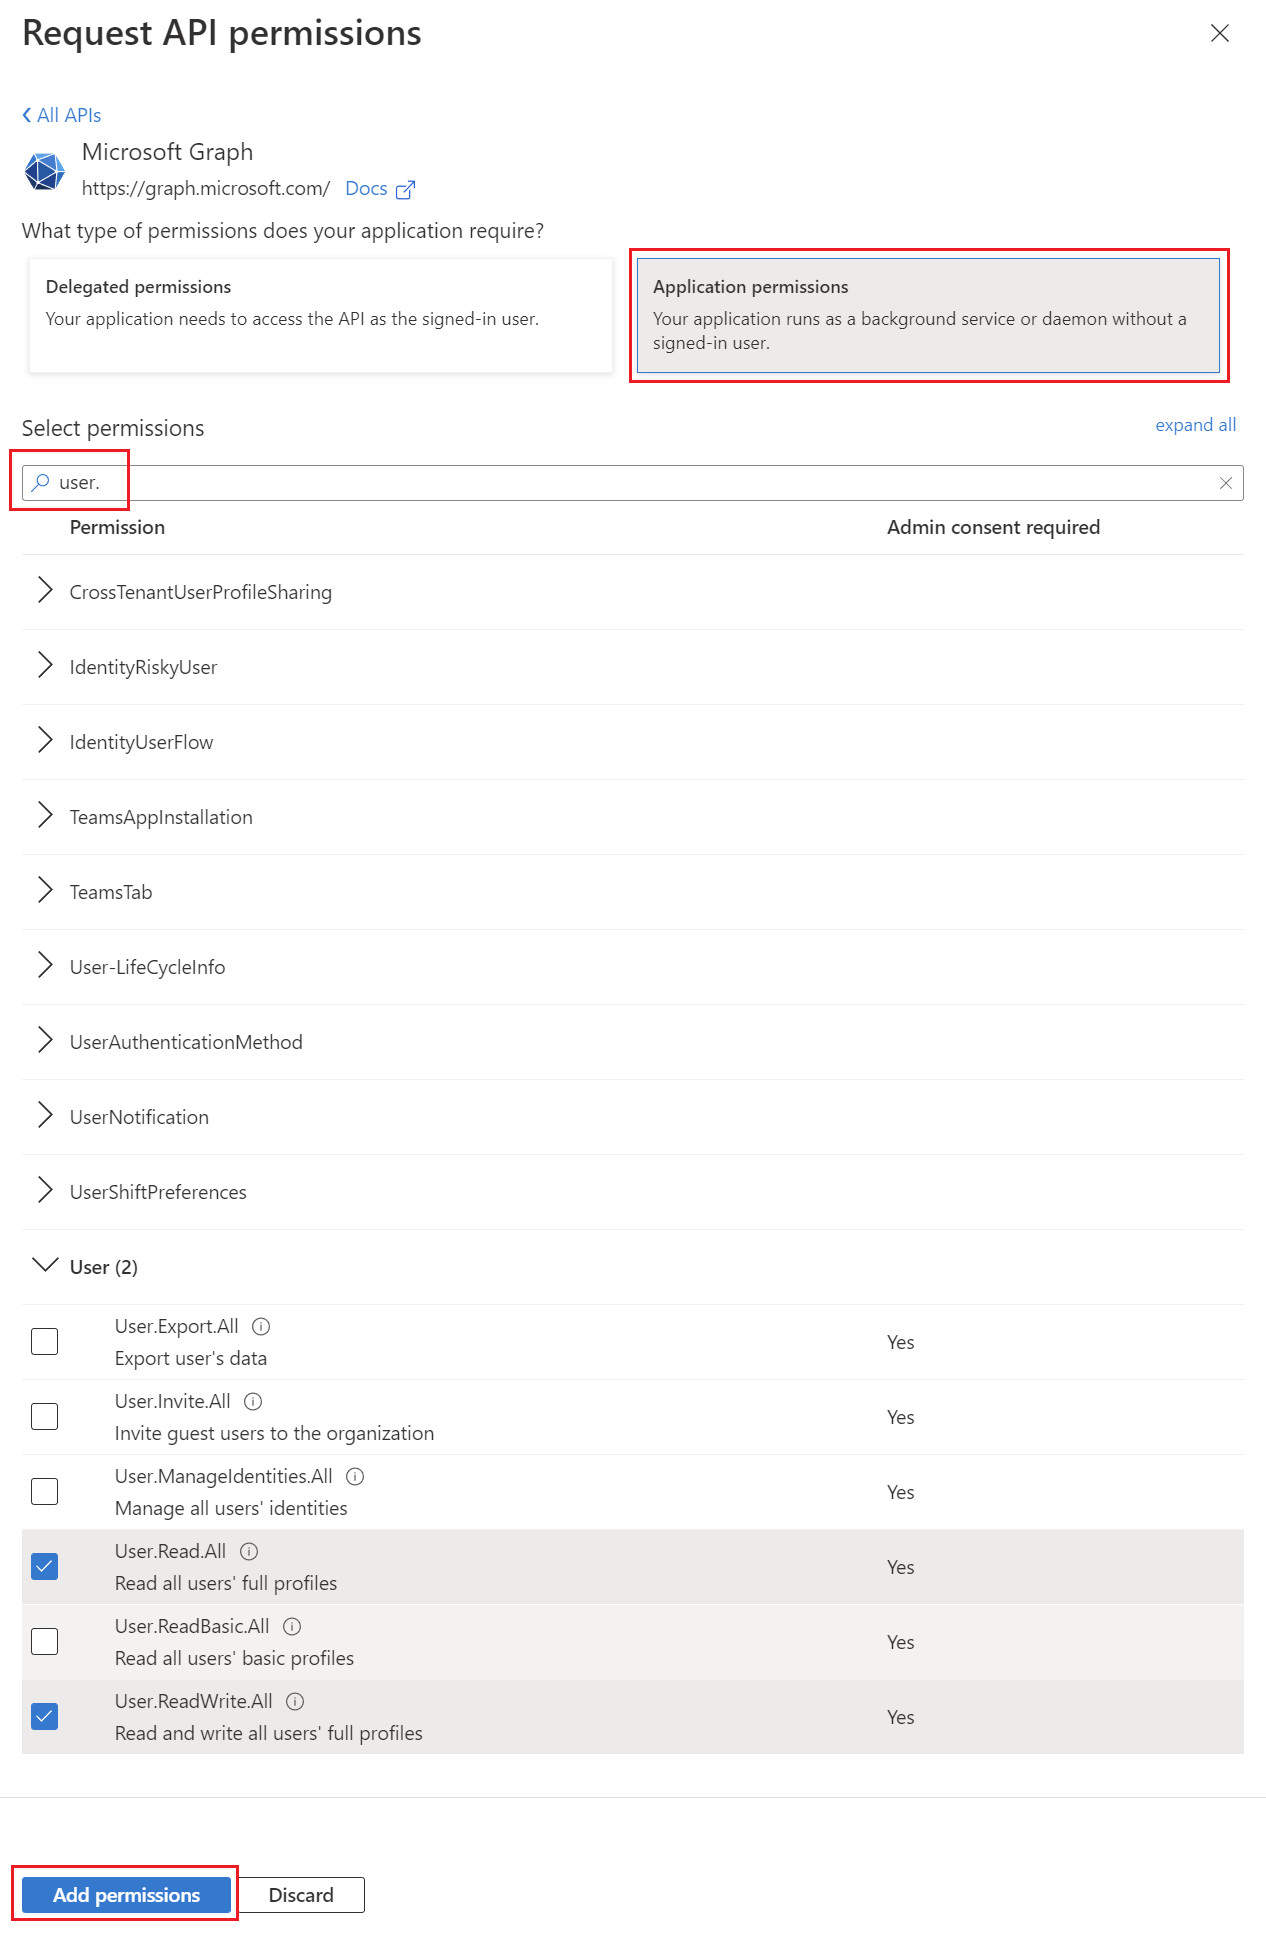
The permissions on App Registrations for PowerShell Scripts must always be set to Application-Permissions, because the actions should be executed as App-Context.
Find the required permissions
The best way to find the required permissions is to visit the Microsoft Docs page for Graph API: Microsoft Graph REST API v1.0 endpoint reference - Microsoft Graph v1.0 | Microsoft Learn

Assign permissions
Once it has been determined which permissions need to be assigned, this can be done in Azure Portal → Microsoft Entra ID → App Registration → API permissions.
First, "Add a permission" must be selected and then Microsoft Graph as an API resource.
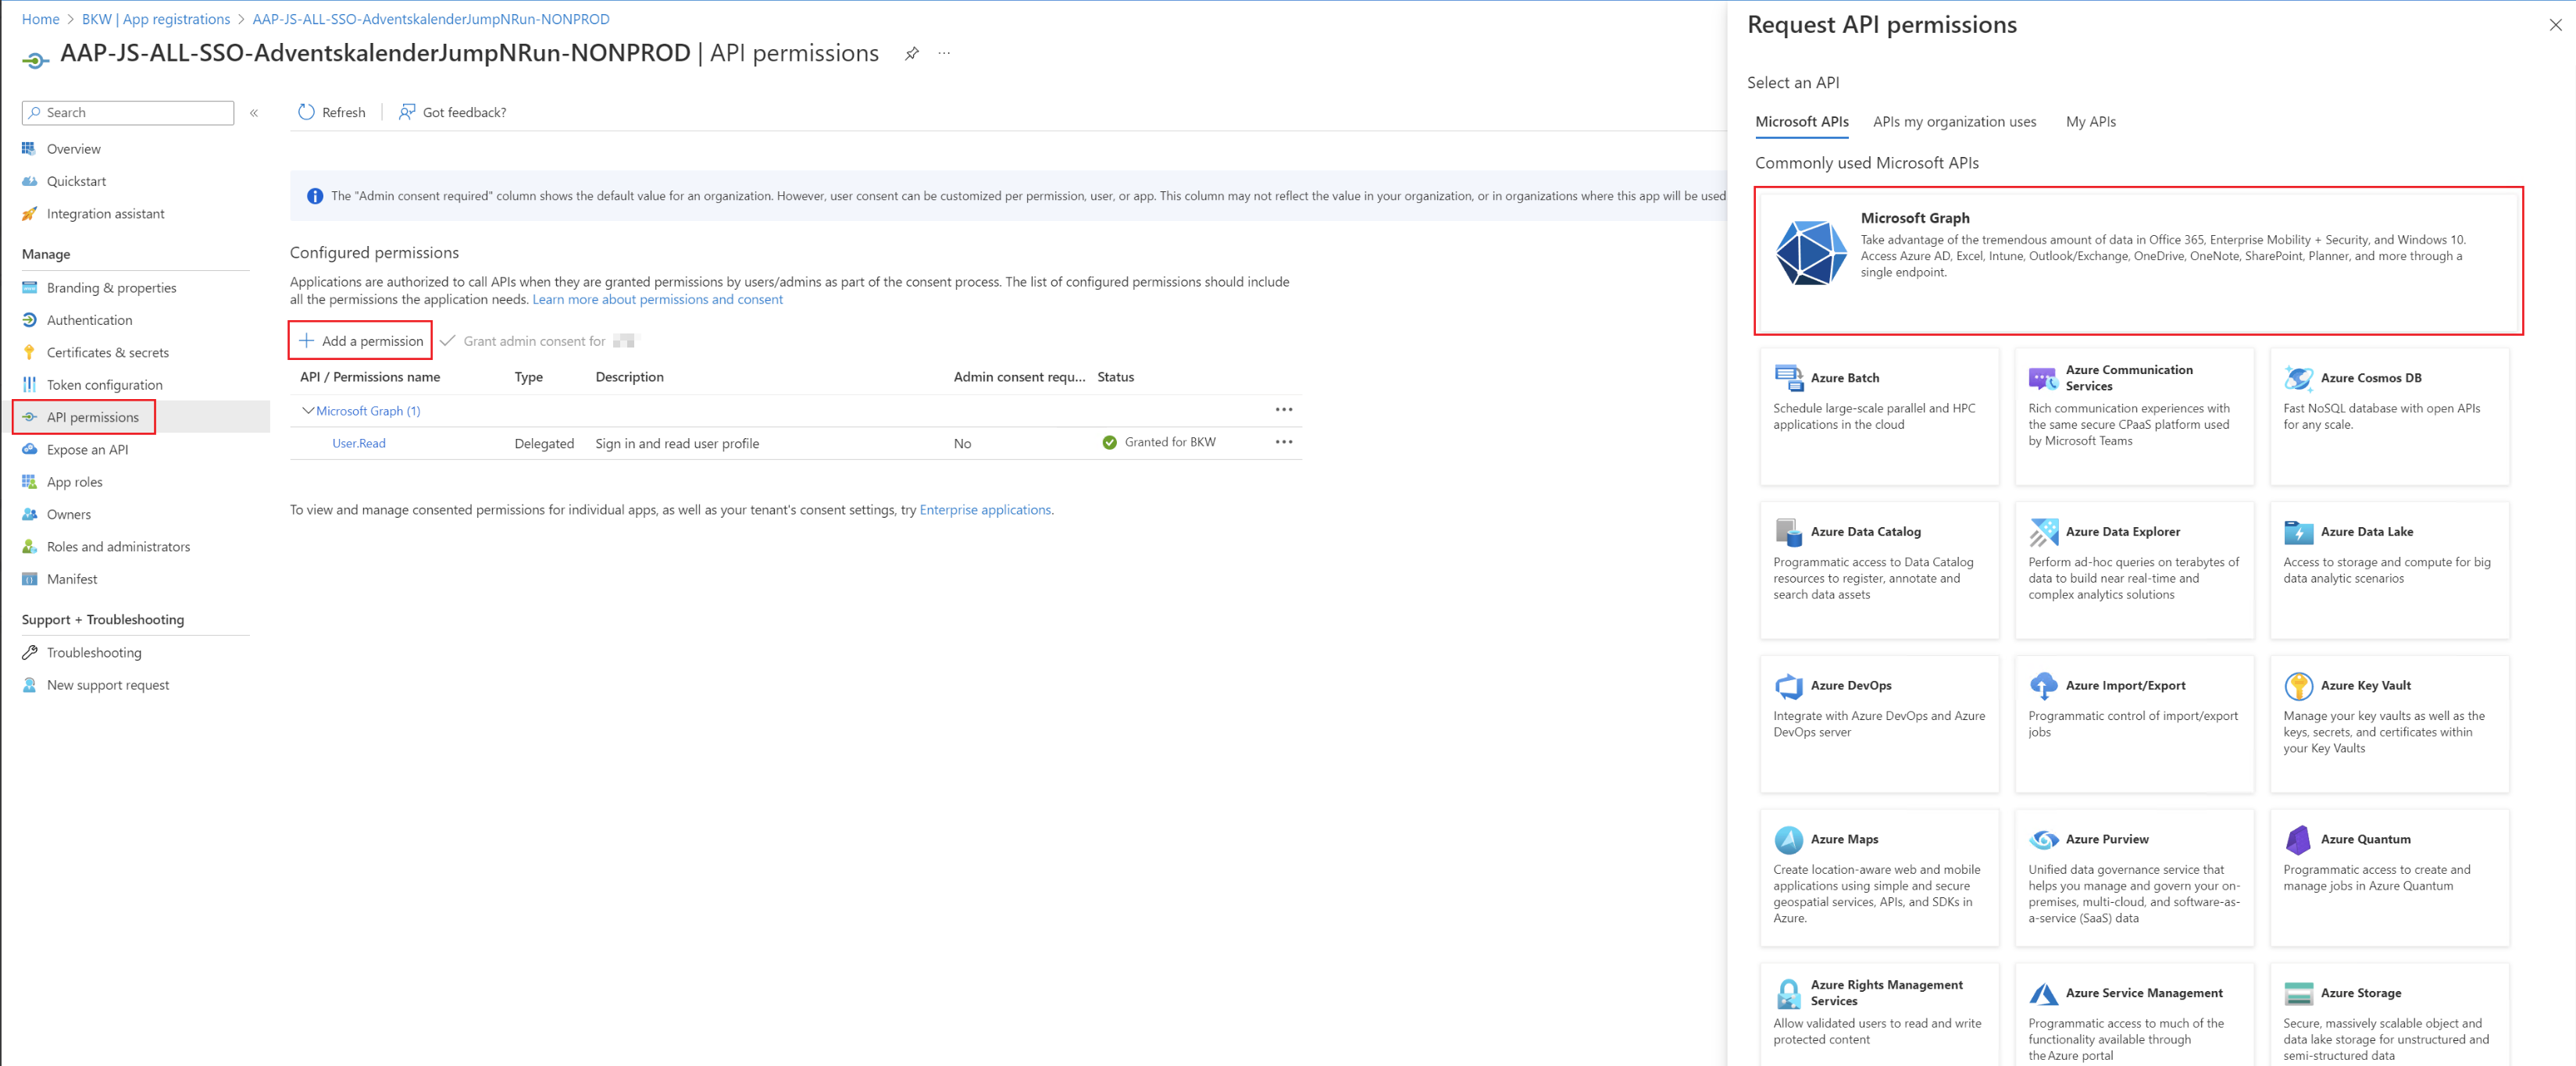
Then it is important that "Application permissions" is selected. There you can then search for the corresponding permission from the Microsoft Docs page and add it using "Add permissions".
Consent assigned permissions
Now that the permission has been added thanks to the previous step, the last thing to do is to check it and then approve it. This can only be done with the "Global Administrator" role, as the app will then receive this permission forever and this is like assigning a role. The person who has Global Administrator must click on "Grand admin consent for <companyname>" in the app so that the permissions also become active.
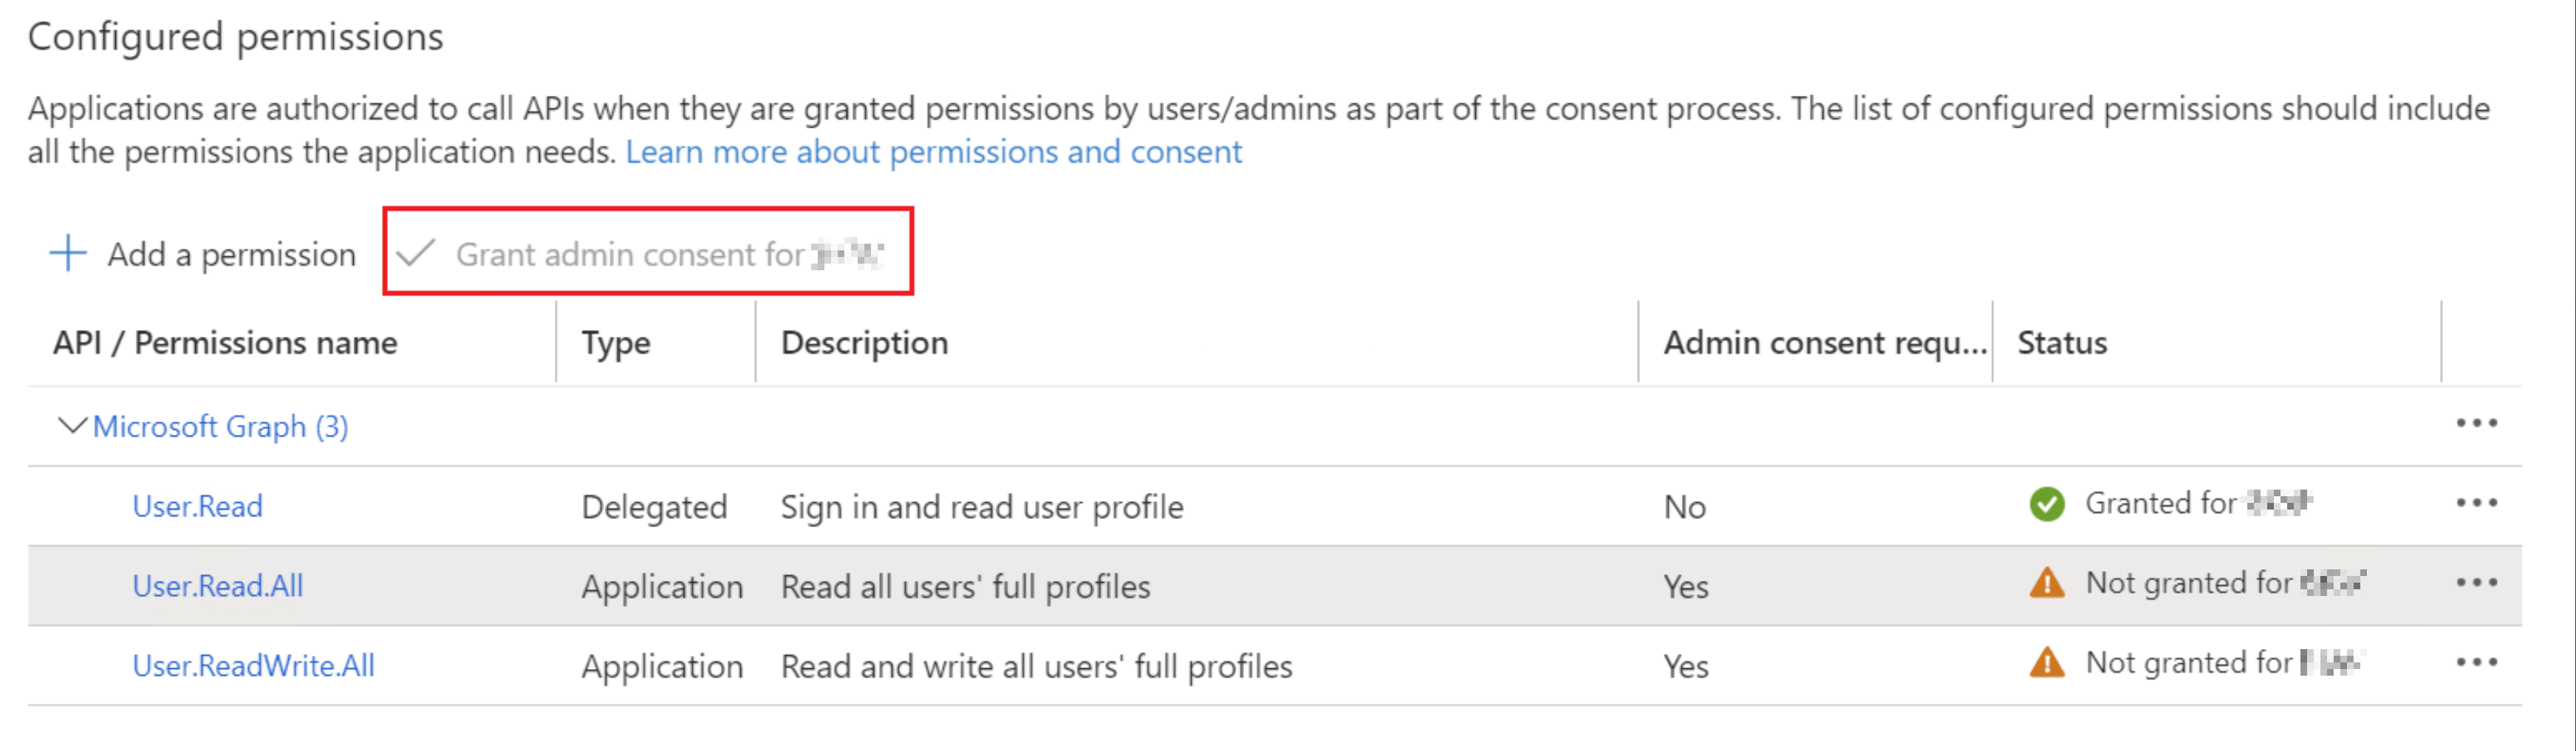
Afterwards, the app can be used with the assigned permissions.
Regularly clean up MEID devices with automation
Requirements: Create an App Registration or System Managed Identity with Directory.ReadWrite.All and Device.ReadWrite.All. For logging you need to have an Azure Function to create an API to centralize logs in an Azure Log Analytics Workspace.
This automation gets all Microsoft Entra ID Devices via the Microsoft Graph API and checks everyone for their latest sign in. If the login was more than 6 months ago, the device will be deleted from the Microsoft Entra ID. Afterwards, the key figures for the deleted devices and the errors are passed to the Azure Function API, where they are then stored in the corresponding Log Analytics Workspace.
Use case
This automation concept is perfectly suited for large enterprises which don't have an overview of their old Microsoft Entra ID Devices. Authentication in the direction of Microsoft Entra ID is user-independent with an app registration. This makes it perfect for automated and regular execution of this code. In combination with an Azure Runbook that runs weekly, the Microsoft Entra ID environment can be simplified significantly.
PowerShell script
This PowerShell script needs the AzureAD Module, an app registration with the appropriate permissions and an Azure Function to collect the logs and write them to an Azure Log Analytics Workspace.
First install the Microsoft.Graph.Authentication Module.
Install-Module Microsoft.Graph.AuthenticationAfter you have installed the modules and organized the prerequisites (App Registration with Directory.ReadWrite.All and Device.ReadWrite.All permission and an Azure Function API for centralizing the logs) you can fill the four variables to the PowerShell code and run the script.
Authentication with System Managed Identity
Import-Module Microsoft.Graph.Authentication
Connect-MgGraph -Identity -NoWelcome -ErrorAction Stop
$mgGraphRequest = Invoke-MgGraphRequest -Uri "https://graph.microsoft.com/v1.0/" -OutputType HttpResponseMessage
$Global:MicrosoftEntraIDAccessToken = $mgGraphRequest.RequestMessage.Headers.Authorization.Parameter
$Result = Invoke-RestMethod -Method GET -Uri "https://graph.microsoft.com/v1.0/devices" -Header @{Authorization = "Bearer $Global:MicrosoftEntraIDAccessToken" }
$Devices = $Result.value
while ($Result.'@odata.nextLink') {
$Result = Invoke-RestMethod -Uri $Result.'@odata.nextLink' -Headers @{Authorization = "Bearer $Global:MicrosoftEntraIDAccessToken" }
$Devices += $Result.value
}
$oldDevices = @()
$failedDateDevices = @()
foreach ($inactiveDevice in $Devices) {
try {
$Date = Get-Date($inactiveDevice.approximateLastSignInDateTime)
if ($Date -lt ((Get-Date).AddMonths(-6))) {
$oldDevices += $inactiveDevice
}
}
catch {
$failedDateDevices += $inactiveDevice
}
}
Write-Output "Date Errors: $($failedDateDevices.count)"
$failedDeleteDevices = @()
$deletedDevices = @()
foreach ($Device in $oldDevices) {
try {
Invoke-RestMethod -Method DELETE -Uri "https://graph.microsoft.com/v1.0/devices/$($Device.id)" -Header @{Authorization = "Bearer $Global:MicrosoftEntraIDAccessToken" }
Write-Output "Deleted: $($Device.displayName)"
$deletedDevices += $Device
}
catch {
$failedDeleteDevices += $Device
}
}
Write-Output "Delete Errors: $($failedDeleteDevices.count)"Authentication using Application Credentials
$tenantId= "<yourtenantid>"
$ClientId= "<yourclientidofappregistration>"
$ClientSecret = "<yourclientsecretofappregistration>"
$url="<yoururlofcentralizedlogcollectionfunction>"
$expirationThresholdMonths = 6
Function Send-Logs() {
param (
[String]$LogType,
[Hashtable]$LogBodyList
)
$LogBodyJSON = @"
{
"logtype": "$LogType",
"logbody": {}
}
"@
$LogBodyObject = ConvertFrom-JSON $LogBodyJSON
Foreach ($Log in $LogBodyList.GetEnumerator()) {
$LogBodyObject.logbody | Add-Member -MemberType NoteProperty -Name $log.key -Value $log.value
}
$Body = ConvertTo-JSON $LogBodyObject
$Response = Invoke-Restmethod -uri $url -Body $Body -Method POST -ContentType "application/json"
return $Response
}
$Body = @{
"tenant" = $TenantId
"client_id" = $ClientId
"scope" = "https://graph.microsoft.com/.default"
"client_secret" = $ClientSecret
"grant_type" = "client_credentials"
}
$Params = @{
"Uri" = "https://login.microsoftonline.com/$TenantId/oauth2/v2.0/token"
"Method" = "Post"
"Body" = $Body
"ContentType" = "application/x-www-form-urlencoded"
}
$AuthResponse = Invoke-RestMethod @Params
$Global:MicrosoftEntraIDAccessToken = $AuthResponse.access_token
$Result = Invoke-RestMethod -Method GET -Uri "https://graph.microsoft.com/v1.0/devices" -Header @{Authorization = "Bearer $Global:MicrosoftEntraIDAccessToken" }
$Devices = $Result.value
while ($Result.'@odata.nextLink') {
$Result = Invoke-RestMethod -Uri $Result.'@odata.nextLink' -Header @{Authorization = "Bearer $Global:MicrosoftEntraIDAccessToken" }
$Devices += $Result.value
}
$oldDevices = @()
$failedDateDevices = @()
foreach ($inactiveDevice in $Devices) {
try {
$Date = Get-Date($inactiveDevice.approximateLastSignInDateTime)
if ($Date -lt ((Get-Date).AddMonths(-$expirationThresholdMonths))) {
$oldDevices += $inactiveDevice
}
}
catch {
$failedDateDevices += $inactiveDevice
}
}
Write-Warning "Date Errors: $($failedDateDevices.count)"
$failedDeleteDevices = @()
$deletedDevices = @()
foreach ($Device in $oldDevices) {
try {
Invoke-RestMethod -Method DELETE -Uri "https://graph.microsoft.com/v1.0/devices/$($Device.id)" -Header @{Authorization = "Bearer $Global:MicrosoftEntraIDAccessToken" }
Write-Output "Deleted: $($Device.displayName)"
$deletedDevices += $Device
}
catch {
$failedDeleteDevices += $Device
}
}
Write-Warning "Delete Errors: $($failedDeleteDevices.count)"
$Logs = @{
"deletesuccess" = "$($deletedDevices.count)"
"dateerrors" = "$($failedDateDevices.count)"
"deleteerrors" = "$($failedDeleteDevices.count)"
}
Send-Logs -LogType "CleanUpMEIDDevicesExecutions" -LogBodyList $LogsRegularly clean up MEID guest user with automation
Requirements: Create an App Registration with AuditLog.Read.All and User.ReadWrite.All. For logging you need to have an Azure Function to create an API to centralize logs in an Azure Log Analytics Workspace.
This automation gets all Microsoft Entra ID Guest User via the Microsoft Graph API and checks everyone for their latest sign in. If the login was more than 6 months ago, the user account will be deleted from the Microsoft Entra ID. Afterwards, the key figures for the deleted devices and the errors are passed to the Azure Function API, where they are then stored in the corresponding Log Analytics Workspace.
Use case
This automation concept is perfectly suited for large enterprises which don't have an overview of all of their Microsoft Entra ID Guests. Authentication in the direction of Microsoft Entra ID is user-independent with an app registration. This makes it perfect for automated and regular execution of this code. In combination with an Azure Runbook that runs weekly, the Microsoft Entra ID environment can be simplified significantly.
PowerShell script
This script has no dependency on any modules and is based on all standard powershell modules. After you organized the prerequisites (App Registration with AuditLog.Read.All and User.ReadWrite.All permission and an Azure Function API for centralizing the logs) you can fill the four variables to the PowerShell code and run the script.
$tenantId= "<yourtenantid>"
$ClientId= "<yourclientidofappregistration>"
$ClientSecret = "<yourclientsecretofappregistration>"
$url="<yoururlofcentralizedlogcollectionfunction>"
$expirationThresholdDays = 180
$NotificateOnDays = @(1,5,10,30)
$SenderUPN = "<yoursenderupn>"
$Subject = "<yourinformationsuccess>"
Function Send-Logs(){
param (
[String]$LogType,
[Hashtable]$LogBodyList
)
$LogBodyJSON = @"
{
"logtype": "$LogType",
"logbody": {}
}
"@
$LogBodyObject = ConvertFrom-JSON $LogBodyJSON
Foreach($Log in $LogBodyList.GetEnumerator()){
$LogBodyObject.logbody | Add-Member -MemberType NoteProperty -Name $log.key -Value $log.value
}
$Body = ConvertTo-JSON $LogBodyObject
$Response = Invoke-Restmethod -uri $url -Body $Body -Method POST -ContentType "application/json"
return $Response
}
function Send-Mail {
param (
[String]$SenderUPN,
[Array]$Recipients,
[Array]$CCRecipients,
[String]$Subject,
[String]$Content,
[String]$DisplayName,
[Int]$deletionDay,
[String]$UPN
)
$Content = @"
Hello $DisplayName
<yourmailbody>
"@
$MailBodyJSON = @"
{
"message": {
"subject": "$Subject",
"body": {
"contentType": "Text",
"content": ""
},
"toRecipients": [],
"ccRecipients": []
},
"saveToSentItems": "true"
}
"@
$MailBodyObject = ConvertFrom-Json $MailBodyJSON
$MailBodyObject.message.body.content = $Content
Foreach($Recipient in $Recipients){
$RecipientBodyJson = @"
{
"emailAddress": {
"address": "$Recipient"
}
}
"@
$RecipientBodyObject = ConvertFrom-JSON $RecipientBodyJson
$MailbodyObject.message.toRecipients += $RecipientBodyObject
}
Foreach($CCRecipient in $CCRecipients){
$CCRecipientBodyJson = @"
{
"emailAddress": {
"address": "$CCRecipient"
}
}
"@
$CCRecipientBodyObject = ConvertFrom-JSON $CCRecipientBodyJson
$MailbodyObject.message.ccRecipients += $CCRecipientBodyObject
}
$MailoutputbodyJson = ConvertTo-JSON $MailbodyObject -Depth 10
Write-Host "Sending Mail to $Recipient and $CCRecipient (CC)."
Invoke-RestMethod -Method Post -Uri "https://graph.microsoft.com/v1.0/users/$SenderUPN/sendMail" -Headers $Header -ContentType "application/json" -Body ([System.Text.Encoding]::UTF8.GetBytes($MailoutputbodyJson))
}
$Body = @{
"tenant" = $TenantId
"client_id" = $ClientId
"scope" = "https://graph.microsoft.com/.default"
"client_secret" = $ClientSecret
"grant_type" = "client_credentials"
}
$Params = @{
"Uri" = "https://login.microsoftonline.com/$TenantId/oauth2/v2.0/token"
"Method" = "Post"
"Body" = $Body
"ContentType" = "application/x-www-form-urlencoded"
}
$AuthResponse = Invoke-RestMethod @Params
$Header = @{
"Authorization" = "Bearer $($AuthResponse.access_token)"
}
$Result = Invoke-RestMethod -Method GET -Uri "https://graph.microsoft.com/beta/users?`$filter=userType eq 'Guest'&`$select=userPrincipalName,signInActivity,displayName" -Header $Header
$GuestUsers = $Result.value
while ($Result.'@odata.nextLink') {
$Result = Invoke-RestMethod -Uri $Result.'@odata.nextLink' -Headers $Header
$GuestUsers += $Result.value
}
$failedDateGuestUsers = @()
$failedDeletedGuestUsers = @()
$failedNotifiedGuestUsers = @()
$successfullynotifiedGuestUsers = @()
$successfullydeletedGuestUsers = @()
foreach($GuestUser in $GuestUsers){
try{
$NonInteractiveDayspan = [math]::Round($(New-TimeSpan -Start $(Get-Date $GuestUser.signInActivity.lastNonInteractiveSignInDateTime) -End $(Get-Date)).TotalDays)
$InteractiveDayspan = [math]::Round($(New-TimeSpan -Start $(Get-Date $GuestUser.signInActivity.lastSignInDateTime) -End $(Get-Date)).TotalDays)
} catch {
$failedDateGuestUsers += $GuestUser
}
if ($NonInteractiveDayspan -lt $InteractiveDayspan) {
$deletionDay = $expirationThresholdDays - $NonInteractiveDayspan
} else {
$deletionDay = $expirationThresholdDays - $InteractiveDayspan
}
if($deletionDay -in $NotificateOnDays -or $deletionDay -lt 0){ # DELETE -or $deletionDay -lt 0
if($deletionDay -le 0){
$deletionDay = "paar"
}
try{
$GuestUserMail = (Invoke-RestMethod -Method GET -Uri "https://graph.microsoft.com/v1.0/users/$($GuestUser.id)?`$select=mail" -Header $Header).mail
Send-Mail -Recipients @("$GuestUserMail") -SenderUPN $SenderUPN -DisplayName $GuestUser.displayName -UPN $GuestUser.userPrincipalName -DeletionDay $deletionDay -Subject $Subject
$successfullynotifiedGuestUsers += $GuestUser
}
catch{
$failedNotifiedGuestUsers += $GuestUser
}
}
if(($deletionDay -lt -5)){
try{
$Result = Invoke-RestMethod -Method DELETE -Uri "https://graph.microsoft.com/v1.0/users/$($GuestUser.id)" -Header $Header
$successfullydeletedGuestUsers += $GuestUser
}catch{
$failedDeletedGuestUsers += $GuestUser
}
}
}
Write-Warning "Date Errors: $($failedDateUsers.count)"
Write-Warning "Delete Errors: $($failedDeletedGuestUsers.count)"
Write-Warning "Notification Errors: $($failedNotifiedGuestUsers.count)"
Write-Output "Notified GuestUsers: $($successfullynotifiedGuestUsers.count)"
Write-Output "Deleted GuestUsers: $($successfullydeletedGuestUsers.count)"
$Logs = @{
"deletesuccess"="$($successfullydeletedGuestUsers.count)"
"notificationsuccess"="$($successfullynotifiedGuestUsers.count)"
"notificationerrors"="$($failedNotifiedGuestUsers.count)"
"deleteerrors"="$($failedDeletedGuestUsers.count)"
"dateerrors"="$($failedDateUsers.count)"
}
Send-Logs -LogType "CleanUpMEIDGuestUserExecutions" -LogBodyList $Logs
Notify license shortage with automation
Requirements: Create an App Registration with LicenseAssignment.ReadWrite.All permissions and a client secret.
With this automation all licenses and their usage are evaluated via Graph API. A message is posted in a team channel when a certain amount of usage of a license is reached.
Use case
This automation helps large organizations with many Microsoft 365 licenses to keep track. If this automation is carried out regularly, interruptions in operation and overbooked licenses can be noticed at an early stage. To run such scripts on a regular basis, an Azure Runbook is a good choice.
Teams webhook notification
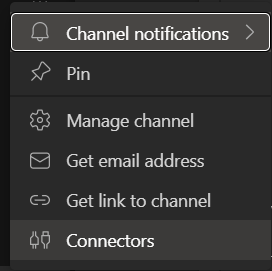
To send a notification to a Teams Channel you can use a webhook. To create a webhook for a channel you can rightclick on a channel and then choose "Connectors".
There you can then configure a new incoming webhook:

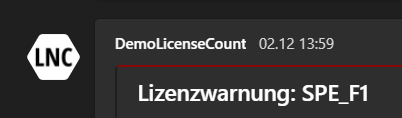
You have to name the webhook first. This name will be displayed as the sender of the message. You can upload an image which will then be used as a profile picture of the sender. After that you can click "create". This will return an URL which then can be used to send a payload message. This will then look like that:
PowerShell script
This PowerShell script needs an App Registration and the according LicenseAssignment.ReadWrite.All Graph API permission. This script uses the three Azure Automation variables "$tenantid", "$clientid" and "$clientsecret" as well as the perviously created "$WebhookURI", which should be added before.
$tenantId=Get-AutomationVariable -Name "<nameoftenantidrunbookvariable>"
$ClientId=Get-AutomationVariable -Name "<nameofclientidrunbookvariable>"
$CredentialObject=Get-AutomationPSCredential -Name '<nameofclientsecretrunbookcredentials>'
$ClientSecret = $CredentialObject.GetNetworkcredential().password
$WebhookURI = ""
$PercentageAlert = "98"
$Body = @{
"tenant" = $TenantId
"client_id" = $ClientId
"scope" = "https://graph.microsoft.com/.default"
"client_secret" = $ClientSecret
"grant_type" = "client_credentials"
}
$Params = @{
"Uri" = "https://login.microsoftonline.com/$TenantId/oauth2/v2.0/token"
"Method" = "Post"
"Body" = $Body
"ContentType" = "application/x-www-form-urlencoded"
}
$AuthResponse = Invoke-RestMethod @Params
$Header = @{
"Authorization" = "Bearer $($AuthResponse.access_token)"
}
$AllLicenses = Invoke-RestMethod -Method GET -Uri "https://graph.microsoft.com/v1.0/subscribedSkus" -Header $Header
Foreach($License in $AllLicenses.value){
if($License.prepaidUnits.enabled -ge 50){
try{
$LicensePercentage = ($License.consumedUnits/$License.prepaidUnits.enabled*100)
}
catch{
$null
}
if($LicensePercentage -ge $PercentageAlert){
$CurrentTime = Get-Date
$JsonBody = @"
{
"@context": "https://schema.org/extensions",
"@type": "MessageCard",
"themeColor": "880808",
"title": "License warning: $($License.skuPartNumber)",
"text": "License has more than 98% allocations. Please order new licenses in order not to jeopardize the operation.<br><br>Licensename: $($License.skuPartNumber) <br><br>Licenses available: $($License.prepaidUnits.enabled - $License.consumedUnits) <br><br> Licenses total: $($License.prepaidUnits.enabled) <br> Licenses assigned: $($License.consumedUnits) <br><br> Time of the evaluation: $($CurrentTime.addHours(2))<br><br> More details about the license: https://admin.microsoft.com/#/licensedetailpage/$($License.skuId)",
}
"@
Invoke-RestMethod -Method Post -Body $JsonBody -Uri $WebhookURI -Header @{"content-type" = "application/json; charset=UTF-8"}
}
}
}
Notify client app secret expiration with automation
Requirements: Create an App Registration with Application.Read.All permissions and a client secret.
With this automation all client secrets and their expiration dates are evaluated via Graph API. A message is posted in a team channel when a client secret is about to expire.
Use case
This automation helps large organizations with many Microsoft Entra ID App Registrations to keep track of expiration dates of their Client Secrets. If this automation is carried out regularly, interruptions in operation and expired client secrets can be noticed at an early stage. To run such scripts on a regular basis, an Azure Runbook is a good choice.
Teams webhook notification
To send a notification to a Teams Channel you can use a webhook. To create a webhook for a channel you can rightclick on a channel and then choose "Connectors".
There you can then configure a new incoming webhook:
You have to name the webhook first. This name will be displayed as the sender of the message. You can upload an image which will then be used as a profile picture of the sender. After that you can click "create". This will return an URL which then can be used to send a payload message.
PowerShell script
This PowerShell script needs an App Registration and the according Application.Read.All Graph API permission. This script uses the three Azure Automation variables "$tenantid", "$clientid" and "$clientsecret" as well as the perviously created "$WebhookURI", which should be added before.
$tenantId=Get-AutomationVariable -Name "<nameoftenantidrunbookvariable>"
$ClientId=Get-AutomationVariable -Name "<nameofclientidrunbookvariable>"
$CredentialObject=Get-AutomationPSCredential -Name '<nameofclientsecretrunbookcredentials>'
$ClientSecret = $CredentialObject.GetNetworkcredential().password
$WebhookURI = "<yourwebhookuri>"
$NotifyOnDays = @(1,2,3,4,5,10,15,20,30)
$DeleteSecretIfExpiredForDays = 30
$Body = @{
"tenant" = $TenantId
"client_id" = $ClientId
"scope" = "https://graph.microsoft.com/.default"
"client_secret" = $ClientSecret
"grant_type" = "client_credentials"
}
$Params = @{
"Uri" = "https://login.microsoftonline.com/$TenantId/oauth2/v2.0/token"
"Method" = "Post"
"Body" = $Body
"ContentType" = "application/x-www-form-urlencoded"
}
$AuthResponse = Invoke-RestMethod @Params
$Header = @{
"Authorization" = "Bearer $($AuthResponse.access_token)"
}
function Send-ToTeams {
Param(
$SecretOB
)
$Body = @{
"@context" = "https://schema.org/extensions"
"@type" = "MessageCard"
"themeColor" = "880808"
"title" = "Secret of App Registration $($SecretOB.AppName) expires in $($SecretOB.ExpiresInXDays)!"
"text" = "<ul><li>App: $($SecretOB.AppName)</li><li>AppId: $($SecretOB.AppID)</li><li>SecretId: $($SecretOB.SecretID)</li><li>Expirationdate: $($SecretOB.ExpiryDate) (in $($SecretOB.ExpiresInXDays) days)</li></ul>"
}
$JsonBody = $Body | ConvertTo-JSON
Invoke-RestMethod -Method Post -Body $JsonBody -Uri $WebhookURI -Headers @{"content-type" = "application/json; charset=UTF-8"} | out-null
}
$AllApps = @()
$Response = Invoke-RestMethod -Method Get -Uri "https://graph.microsoft.com/v1.0/applications" -Headers $Header
$AllApps = $Response.value
while ($Response.'@odata.nextLink') {
$Response = Invoke-RestMethod -Method Get -Uri $Response.'@odata.nextLink' -Headers $Header
$AllApps += $Response.value
}
Write-Output "$($Allapps.Count) Apps were discovered"
$AllSecrets = @()
foreach ($App in $AllApps) {
foreach ($AppSecret in $App.passwordCredentials) {
$ExpiresInXDays = $(New-TimeSpan -Start $(Get-Date) -End $(Get-Date $AppSecret.endDateTime)).TotalDays
switch ($ExpiresInXDays) {
{ $_ -lt 30 } {$Status = "Expires Soon" }
{ $_ -lt 0 } {$Status = "Expired" }
Default {$Status = "Ok" }
}
$SecretOB = [PSCustomObject]@{
AppID = $App.AppID
AppName = $App.DisplayName
SecretID = $AppSecret.KeyID
ExpiryDate = $AppSecret.endDateTime
ExpiresInXDays = [math]::Round($ExpiresInXDays)
Status = $Status
}
$AllSecrets += $SecretOB
if ($SecretOB.ExpiresInXDays -in $NotifyOnDays) {
[array]$AppOwners = $(Invoke-RestMethod -Method get -Uri "https://graph.microsoft.com/v1.0/applications/$($App.ID)/owners" -Headers $Header).value
Write-Warning "Secret $($SecretOB.SecretID) on App $($SecretOB.AppID) expires in $($SecretOB.ExpiresInXDays) days."
if ($AppOwners) {
foreach ($AdminOwner in $AppOwners | Where-Object { $_.userPrincipalName -like "A_" }) {
$SAM = $AdminOwner.userPrincipalName.Split("@")[0].replace("A_","")
$RegularUser = $(Invoke-RestMethod -Method GET -uri "https://graph.microsoft.com/v1.0/users?`$filter=startswith(MailNickName, '$SAM')" -Headers $Header).Value
$AppOwners += $RegularUser
}
if ([array]$AppOwners.Mail) {
Send-ToTeams -SecretOB $SecretOB
} else {
Send-ToTeams -SecretOB $SecretOB
}
} else {
Send-ToTeams -SecretOB $SecretOB
}
} elseif ($SecretOB.ExpiresInXDays -lt -$DeleteSecretIfExpiredForDays) {
if ($($App.passwordCredentials | Where-Object { $_.endDateTime -gt $(get-date) }).Count -ge 1) {
Write-Output "Secret $($SecretOB.SecretID) on App $($SecretOB.AppID) expired $(-$SecretOB.ExpiresInXDays) Days ago and can be deleted. Client has at least one Secret that does not expire whithin the next $DeleteSecretIfExpiredForDays days."
} else {
Write-Output "Secret $($SecretOB.SecretID) on App $($SecretOB.AppID) expired $(-$SecretOB.ExpiresInXDays) Days ago and can be deleted"
}
$SecretDeletionBody = @"
{
"keyId": "$($SecretOB.SecretID)"
}
"@
#Invoke-RestMethod -Method Post -Uri "https://graph.microsoft.com/v1.0/applications/$($SecretOB.AppID)/removePassword" -Body $SecretDeletionBody -Headers $Header
}
}
}
If you want to automatically delete old app registrations that have expired for more than a defined number of days ($DeleteSecretIfExpiredForDays) and no longer have any active secrets, you can show the time 118. This will permanently delete all app registrations that have expired client secrets.
Get App Registrations by User Principal Name
Graph API permission "Application.Read.All" or Cloud Application Administrator Role.
This guide explains how you can get all App Registrations by a certain user. This can be handy when someone leaves a company and it needs to be evaluated which app registration was maintained by that person.
Preparations
For this script to work you need the permission to list the App Registrations. This needs the Application.Read.All permission. The access token can be acquired either by delegated or application permissions.
This is a manual for application based token acquisition: Create application acc... | LNC DOCS (lucanoahcaprez.ch)
And this one is for user based tokens: Create user access tok... | LNC DOCS (lucanoahcaprez.ch)
Evaluate App Registration Owners
This is the script that evaluates the owners of the app registrations and the app registrations of the corresponding user are stored in the $UsersApplication variable. In advance, the UPN of the user to be evaluated must be stored in the $UserPrincipleName variable.
$AccessToken = "<yourazureadaccesstoken>"
$UserPrincipalName = "<userprincipalnametosearchfor>"
$Header = @{
"Authorization" = "Bearer $($AccessToken)"
}
$Params = @{
"Method" = "Get"
"Uri" = "https://graph.microsoft.com/v1.0/applications"
"Headers" = $Header
"ContentType" = "application/json"
}
$Result = Invoke-RestMethod @Params
$AllApplications = $Result.value
while ($Result.'@odata.nextLink') {
$Result = Invoke-RestMethod -Uri $Result.'@odata.nextLink' -Headers $Header
$AllApplications += $Result.value
}
$UsersApplication = @()
Foreach($Application in $AllApplications){
$Params.Uri = "https://graph.microsoft.com/v1.0/applications/$($Application.id)/owners?`$select=id,userPrincipalName"
$ApplicationInfo = (Invoke-RestMethod @Params).value
if($ApplicationInfo.userPrincipalName -eq $UserPrincipalName){# -and $ApplicationInfo.userPrincipalName.count -eq 1){ #This can be displayed if you want to serach only for apps where the user is the only owner
$UsersApplication += $Application
}
}Change MFA Phone via Graph API
This automation sets the primary mobile number as MFA method according to a UPN. This can be used, for example, if from an internal store or user interface (e.g. ServiceNow) the users should automatically set the MFA method a first time. For example, this code can be placed in an Azure Runbook or Azure Function and executed via a trigger.
Requirements
To execute this code you need to create an App Registration and add the Permissions "UserAuthenticationMethod.ReadWrite.All". How you can create an App Registration and how you get the variables "TenantId", "ClientId" and "ClientSecret" with the according values, you can view this manual: Get app details and gr... | LNC DOCS (lucanoahcaprez.ch)
PowerShell Code
This code must be filled with the correct variables for everything to work. On the one hand it needs the standard variables for the Graph Authentication: "$TenantID", "$ClientID", "$Clientsecret". And on the other hand the variables "$Email" and "$PhoneNumber" are used to locate the user to whom the mobile number should be set as MFA method.
$Email = "<youremail>"
$PhoneNumber = "<yourphonenumber>"
# Filter empty spaces
if($PhoneNumber.contains(" ")){
$PhoneNumber = $PhoneNumber.replace(" ","")
}
$TenantId = "<yourtenantid>"
$ClientId = "<yourappregistrationid>"
$ClientSecret = "<yourclientsecret>"
$Body = @{
"tenant" = $TenantId
"client_id" = $ClientId
"scope" = "https://graph.microsoft.com/.default"
"client_secret" = $ClientSecret
"grant_type" = "client_credentials"
}
$Params = @{
"Uri" = "https://login.microsoftonline.com/$TenantId/oauth2/v2.0/token"
"Method" = "Post"
"Body" = $Body
"ContentType" = "application/x-www-form-urlencoded"
}
$AuthResponse = Invoke-RestMethod @Params
$Headers = @{
"Authorization" = "Bearer $($AuthResponse.access_token)"
}
# Get User ID By UPN
$UsersResponse = Invoke-RestMethod -Method GET -Uri "https://graph.microsoft.com/v1.0/users/$email" -ContentType "Application/Json" -Headers $Headers
$UserId = $UsersResponse.id
# Change Phone Number for MFA
$PhoneMethod = @"
{
"phoneNumber":"$PhoneNumber",
"phoneType":"mobile"
}
"@
$MFAResponse = Invoke-RestMethod -Method PUT -Uri "https://graph.microsoft.com/beta/users/$UserId/authentication/phoneMethods/3179e48a-750b-4051-897c-87b9720928f7" -ContentType "Application/Json" -Body $PhoneMethod -Headers $Headers
Start-Sleep 30
# Compare Phone Numbers
$MFAMethod = Invoke-RestMethod -Method GET -Uri "https://graph.microsoft.com/beta/users/$UserId/authentication/phoneMethods" -ContentType "Application/Json" -Headers $Headers
$AzurePhoneNumber = $MFAMethod.value.phoneNumber.Replace(" ","")
if($AzurePhoneNumber -eq $PhoneNumber){
Write-Output "success"
}else{
Write-Output "Failed to compare Azure Phone Number to Input from SNOW."
}Move Azure Subscriptions between Microsoft Entra ID tenants
Prerequisites: Permissions to invite new guest users in source tenant. Permissions to grant Owner permissions to subscription in source tenant. Permissions to accept guest invitations in destination tenant.
This guide shows you how to move an Azure subscription from one Microsoft Entra ID tenant to another. This can be useful if business requirements or other company structures have changed and you do not want to rebuild the resources.
Instructions using Entra ID guest user
The procedure is quite simple. The source tenant must simply invite the administrator account on the destination tenant as a guest. Once the invitation has been accepted, the user from the destination tenant can see the subscription in the Azure subscription and transfer it to their destination tenant via the Azure portal.
Limitations
There are various limitations. Here is a list of some that are already known in the community. It certainly makes sense to search the official Microsoft pages here.
- Role based access control roles cannot be taken over. This is actually logical, as the roles, groups and users are very likely to be completely different in the source and destination tenants. In addition, the elements certainly do not have the same IDs, which makes it impossible to migrate these role assignments.
- If billing is resolved at management group level, this is still handled in the source tenant and must be changed manually afterwards.
This list is not exhaustive and migrating subscriptions is always associated with risk.
How it is done
First you have to invite the user account from the destination tenant as guest user in the source tenant.
Log in to the source tenant and make sure that you have all permissions to invite guest users. You must also be able to adjust the IAM permissions on the subscription that you want to migrate.
Invite new guest user
You can now invite the user account in the source tenant as described in this guide: Quickstart: Add a guest user and send an invitation - Microsoft Entra External ID | Microsoft Learn
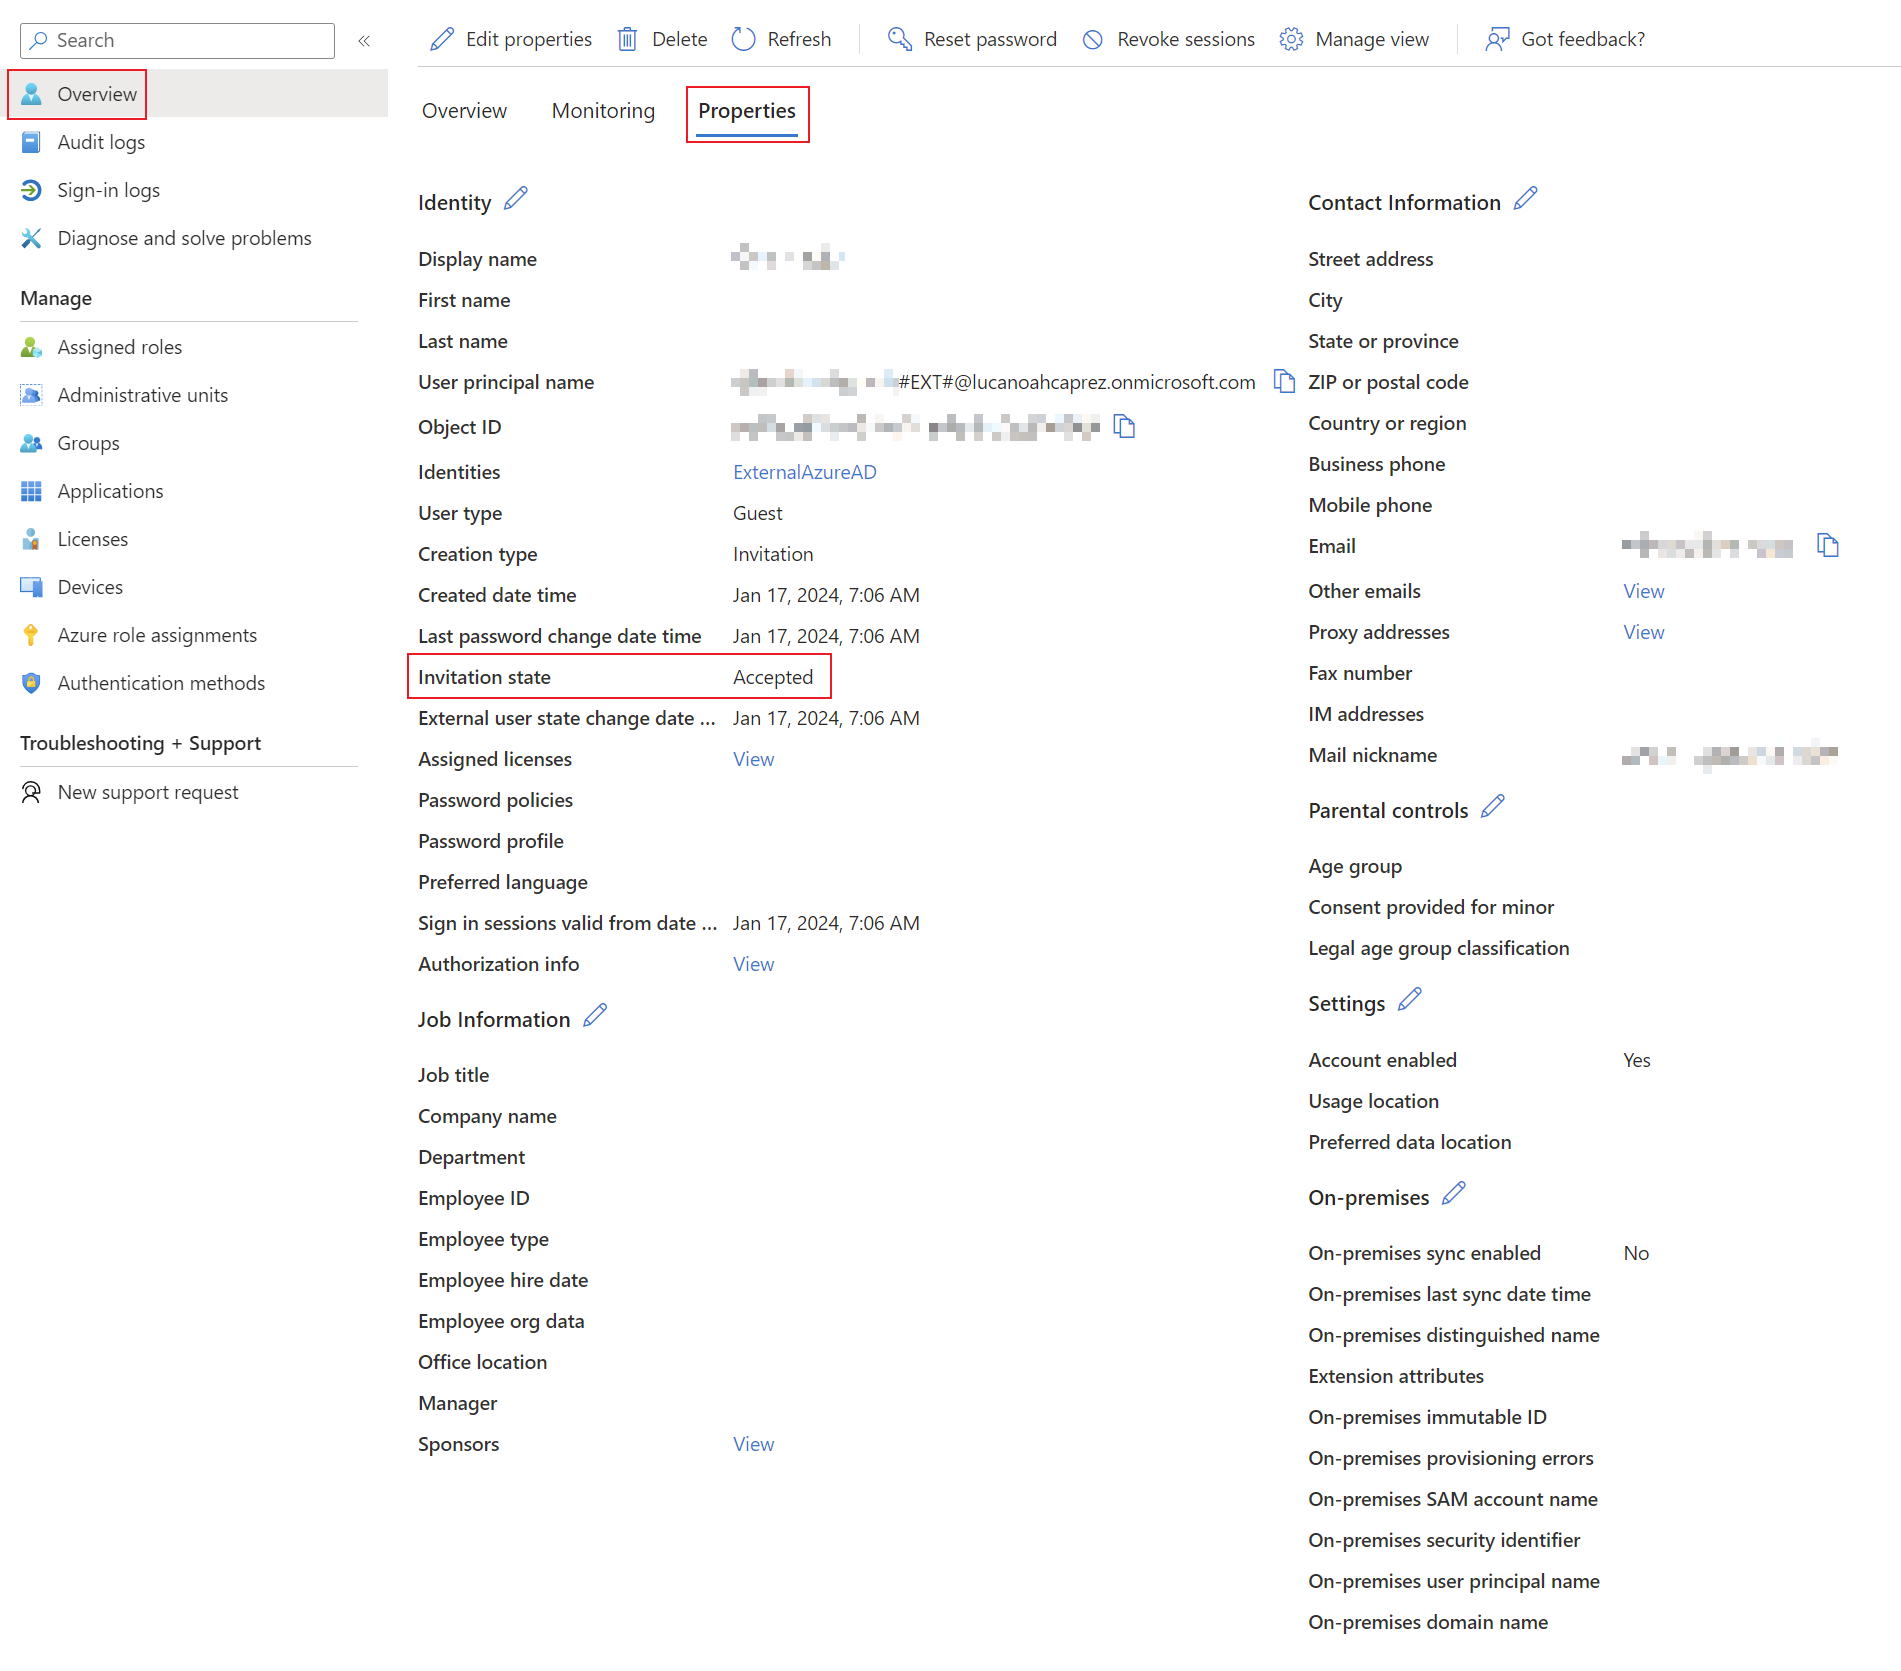
Make sure that the user has accepted the invitation. Check the guest users state under "Invitation state":
Add Azure role based access to guest user
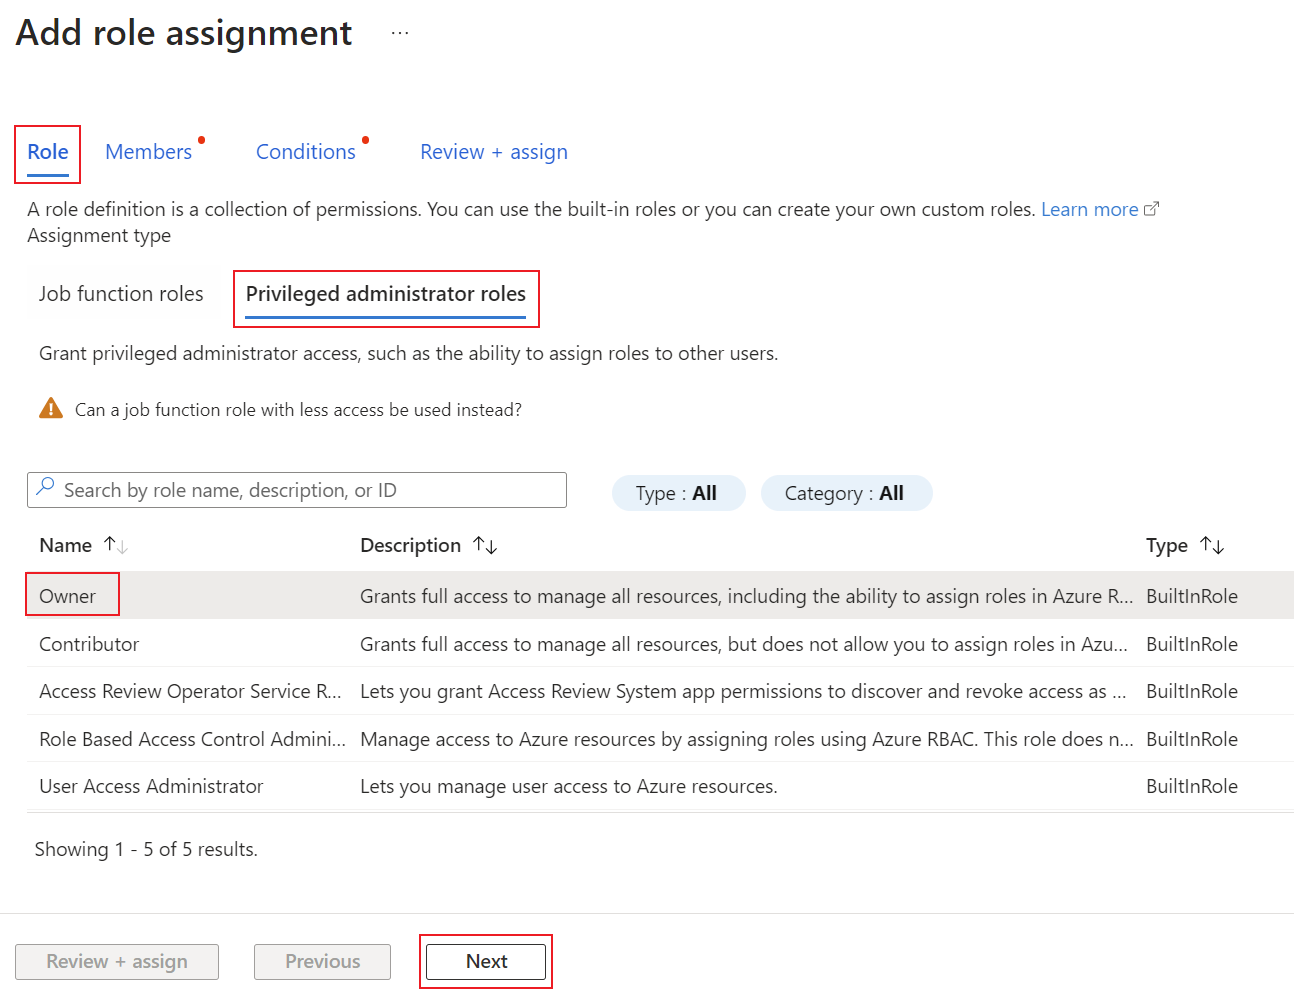
If the user is successfully registered in the Entra ID, the subscription can be opened in the Azure portal and a new role assignment can be made under Access control.
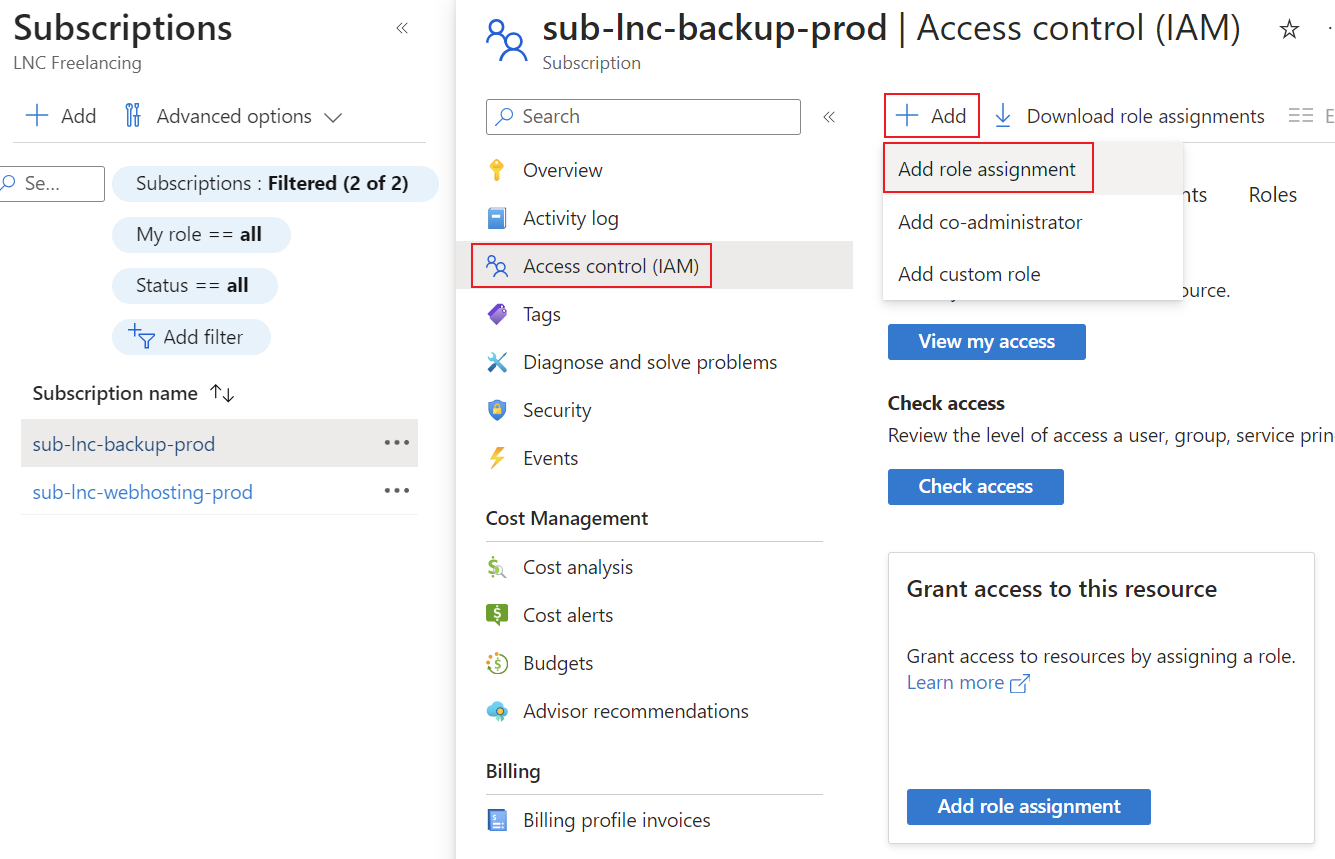
Make sure to add the correct privileged administrator role:
Make sure to select the corresponding user account of the destination tenant. Under "Conditions" select the second property to grant all admin privileges:
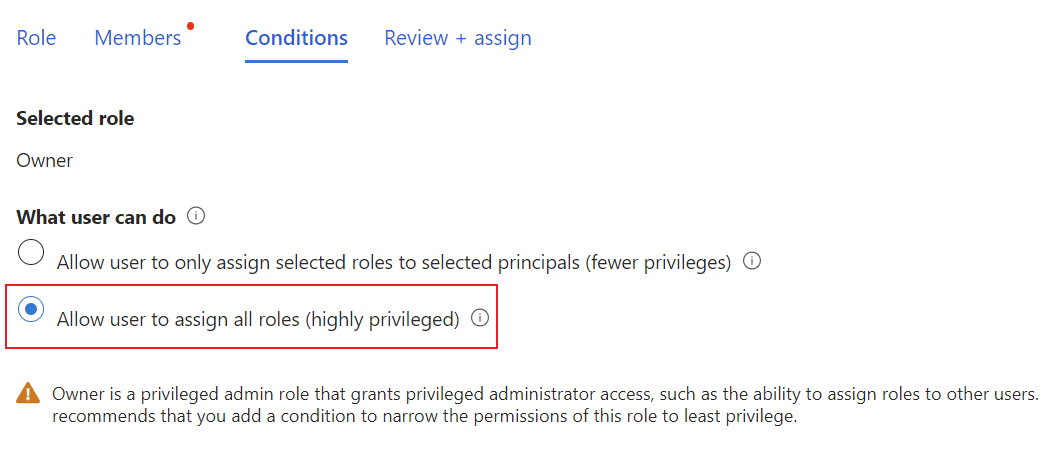
Then you can create the role assignment.
Switch account and make sure to use the invited user account of the destination tenant from now on.
Start subscription migration
Switch directory to the source tenant and do the following steps:
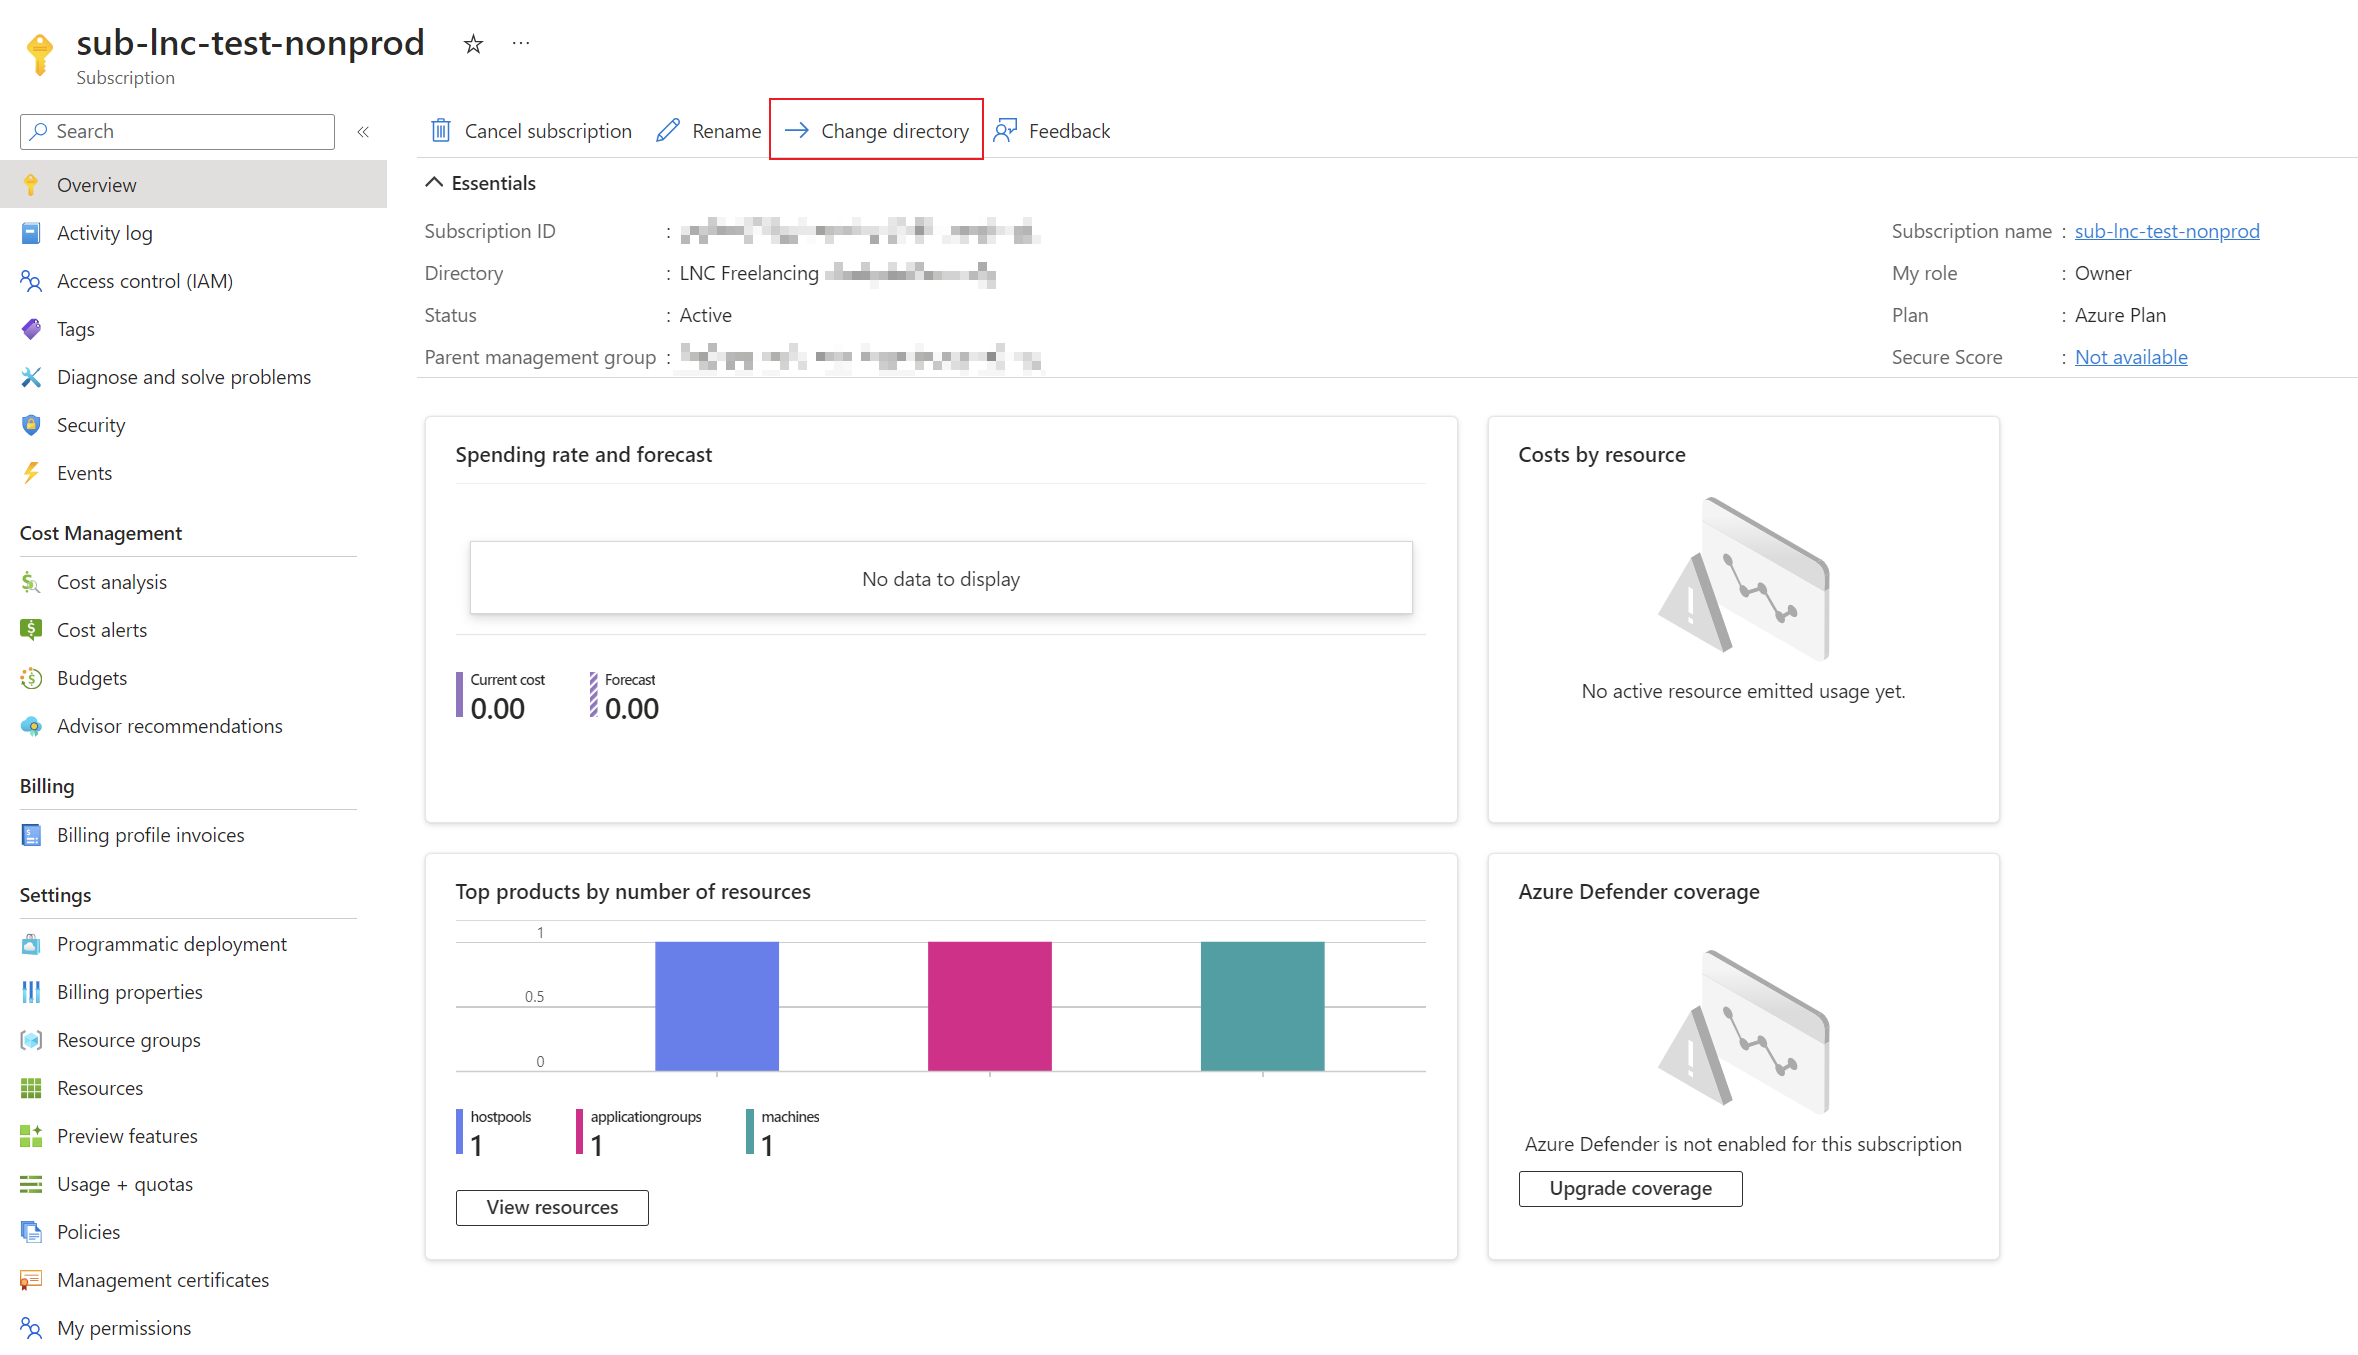
Go to subscriptions and there you should see the subscription of the source tenant that you want to move. Open the subscription and make sure you are in the Overview blade.
Now you can choose "Change directory":
You can then select the destination tenant in this dialog. You must confirm that RBAC roles cannot be transferred.
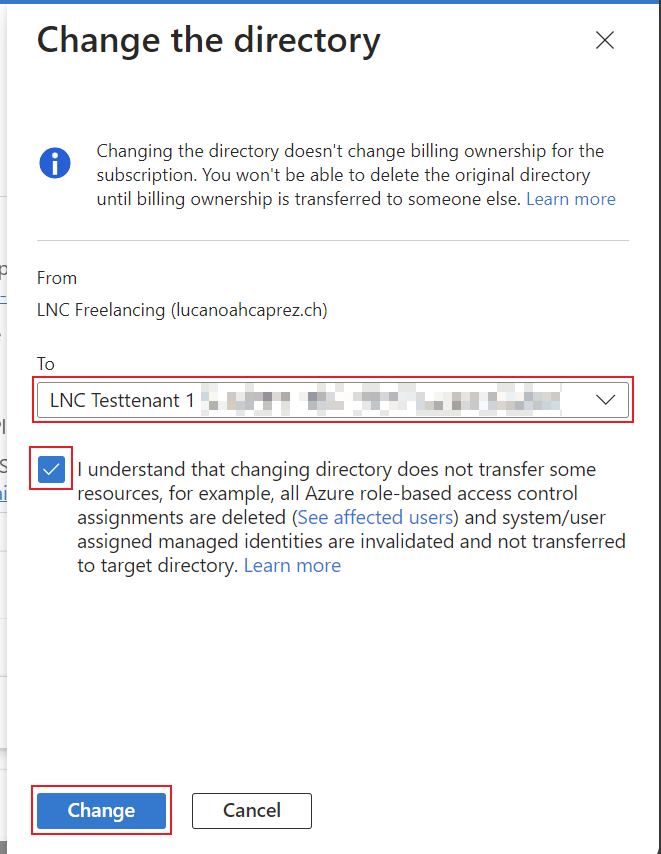
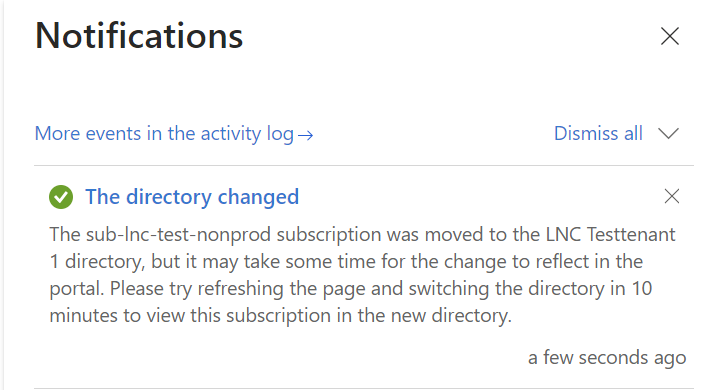
Wait for the confirmation message that the subscription is being migrated. It can then take up to 10 minutes before you can reuse all resources. However, the resources are not offline, they are just not displayed. There is normally no downtime with this type of migration.
Switch to the destination tenant and wait for the completion of the migration. Make sure once the migration is complete, make sure that everything works as expected.
Migration of billing ownership
Once the previous steps have been completed, you can do the following. The billing accounts for the subscription are still in the old tenant at this stage and will remain there unless a migration is carried out.
If this migration is to be carried out, we recommend working through these instructions:
Change the account back to the source tenant.
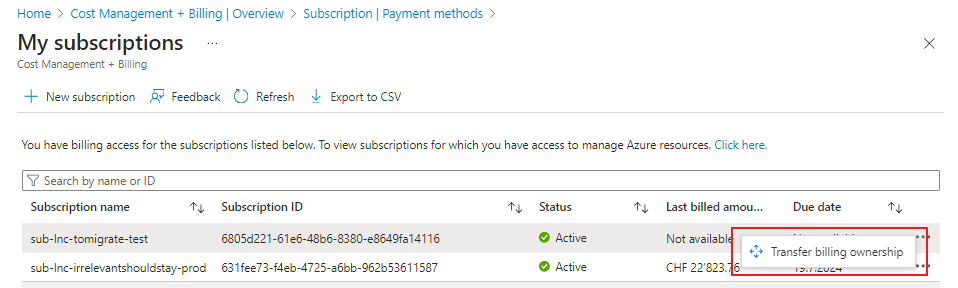
- Open This link using the current Billing Owner: My subscriptions - Microsoft Azure
- Click on "Transfer billing ownership" and enter the UPN from the administrator of the destination tenant.

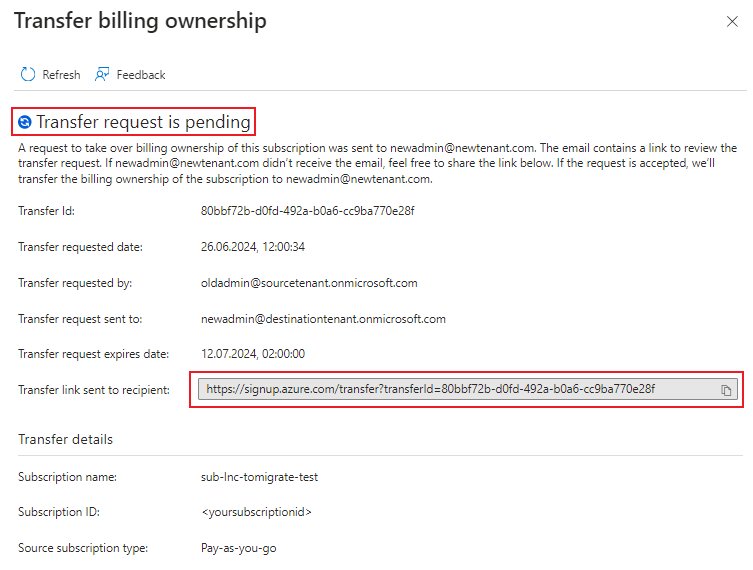
If the user does not have a mailbox (avoid unnecessary licenses), this button can be clicked again after execution to view the link for the subscription transfer and the status of the process.
Change the account to the destination tenant.
You must then log in to the link with the destination tenant admin and enter the company's contact details including the new credit card. Once this has been completed, you will be redirected to a page where you will see the billing account that has been transferred to the destination tenant.
Microsoft Docs: Transfer billing ownership of an MOSP Azure subscription - Microsoft Cost Management | Microsoft Learn
Single sign on (SSO) with third party applications
Microsoft Entra ID is the authentication solution for Microsoft Cloud products. Using various standards such as OAuth 2.0 or SAML, Microsoft Entra ID can be used as a central management platform for third party solutions, whereby granular access to apps, groups, authorizations and much more can be set. This allows external applications without their own user administration to offer a secure and nice user experience. Unfortunately, the integration of these standards is quite different for each application and therefore sometimes requires in-depth knowledge of the application environment.
Microsoft Entra ID SSO for Grafana
Prerequisites: Ability to create an app registration with delegated standard rights and access to the Grafana Docker volume. Grafana should be installed and administrator access to the web interface should be available.
These instructions describe how a Grafana Docker instance can be equipped with all the advantages of Single Sign On (SSO) using Microsoft Entra ID. Since there are different types of SSO, it is important to know that Grafana has many possibilities and offers granular, requirement-specific implementation options. For example, this means that automatic sign-up, role and user mapping, authentication scope and much more can be set.
Create App Registration
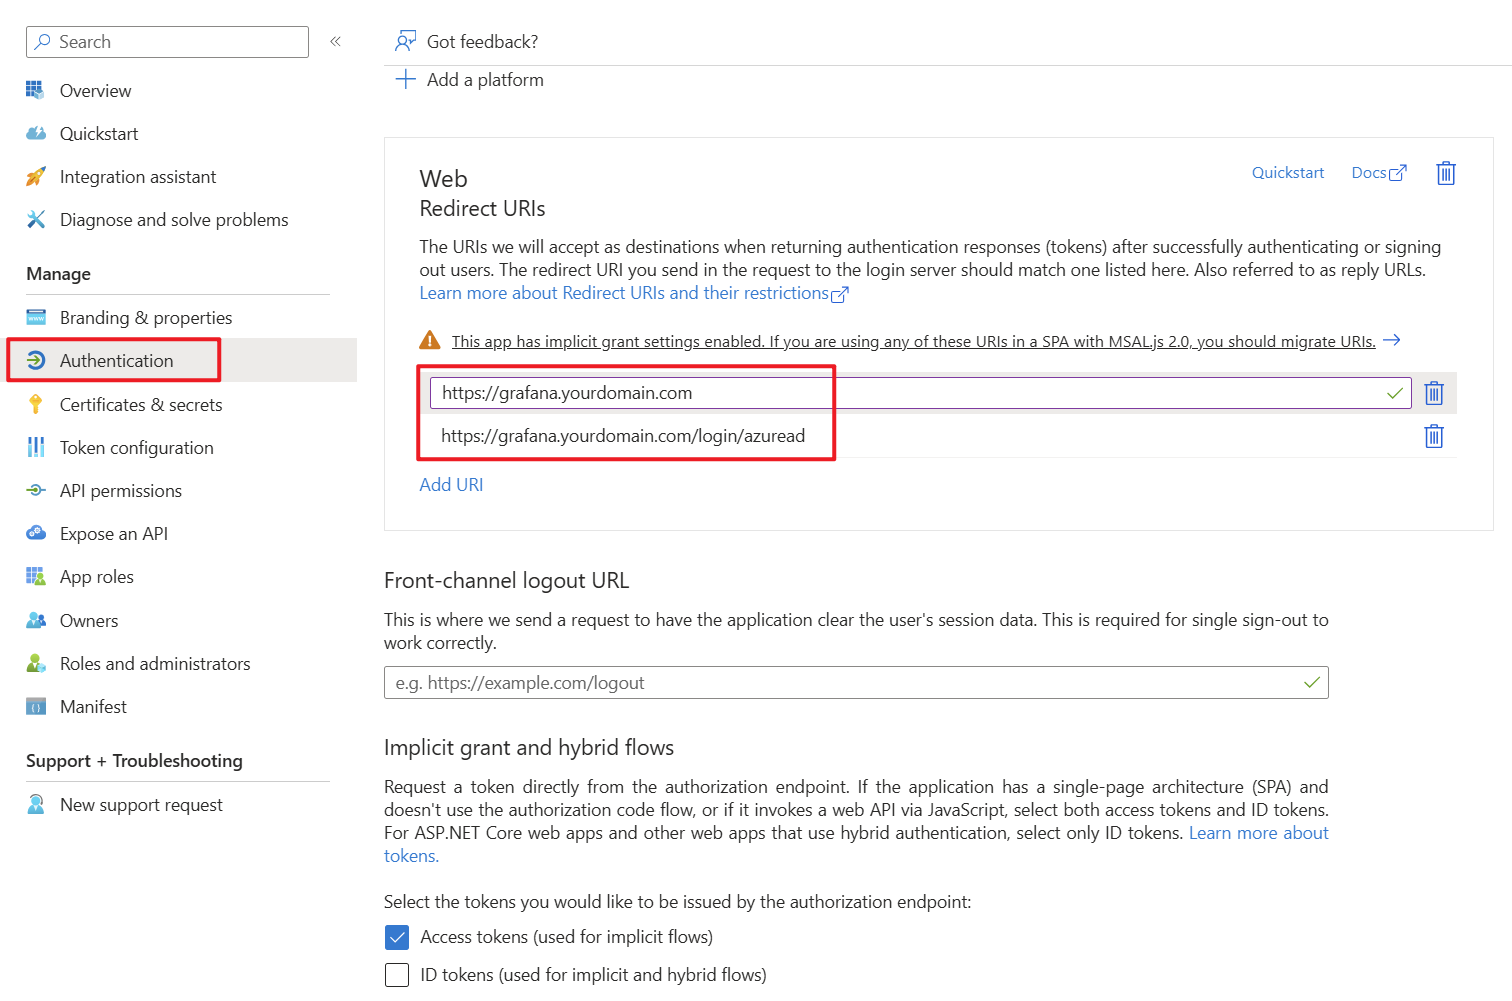
First, an app registration including client secret must be created in Microsoft Entra ID. All settings can be left at the default values. Important settings are the Redirect URIs under the Authentication tab. Set these URIs to your external or internal domain on which Grafana is available. These URIs will be used for Microsoft Entra ID to know where to redirect the user in case of successful logins.
- Authentication Type: Web
- Redirect URIs: https://grafana.yourdomain.com/ & https://grafana.yourdomain.com/login/azuread
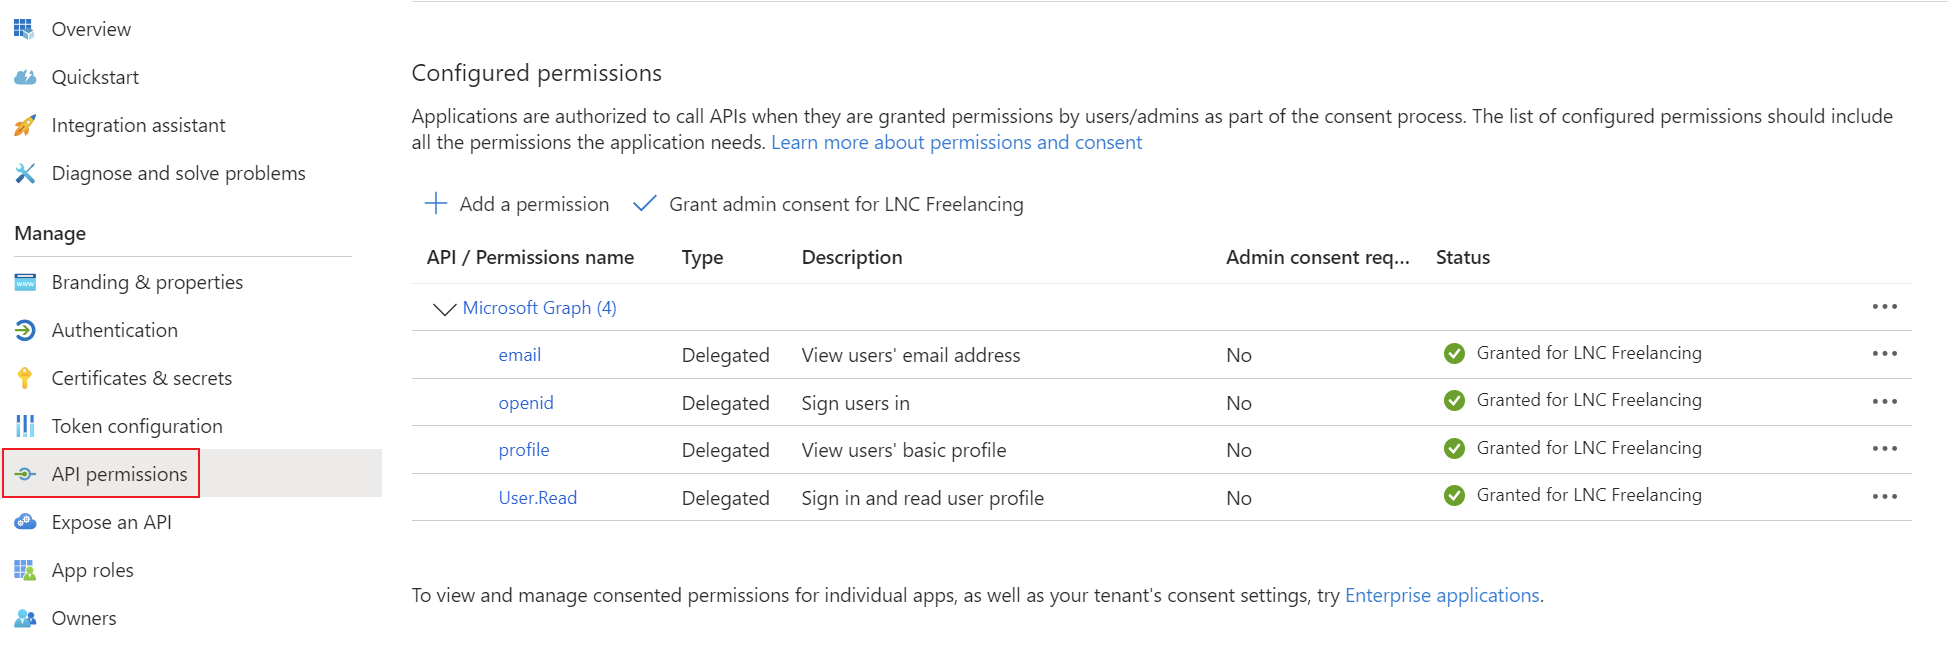
Add the corresponding permissions for OpenID Connect as delegated permissions and grant admin consent for your tenant.
- Permissions: Delegated OpenId permissions (email, offline_access, openid, profile)
Create a client secret for the application and save the tenant ID, application ID and client secret in your password manager. You can find instructions for this information here: Get app details and grant permissions to app registration
Enable authentication login provider
To equip Grafana with SSO options, the SSO API must be activated in the configuration file. To do this, the following file “/etc/grafana/grafana.ini” must be adapted. This file is normally saved in a persistent location. Create the document if it does not already exist and add the following configuration line:
[feature_toggles]
ssoSettingsApi = trueYou should then restart the Docker container or the application.
Check whether configuration was successful
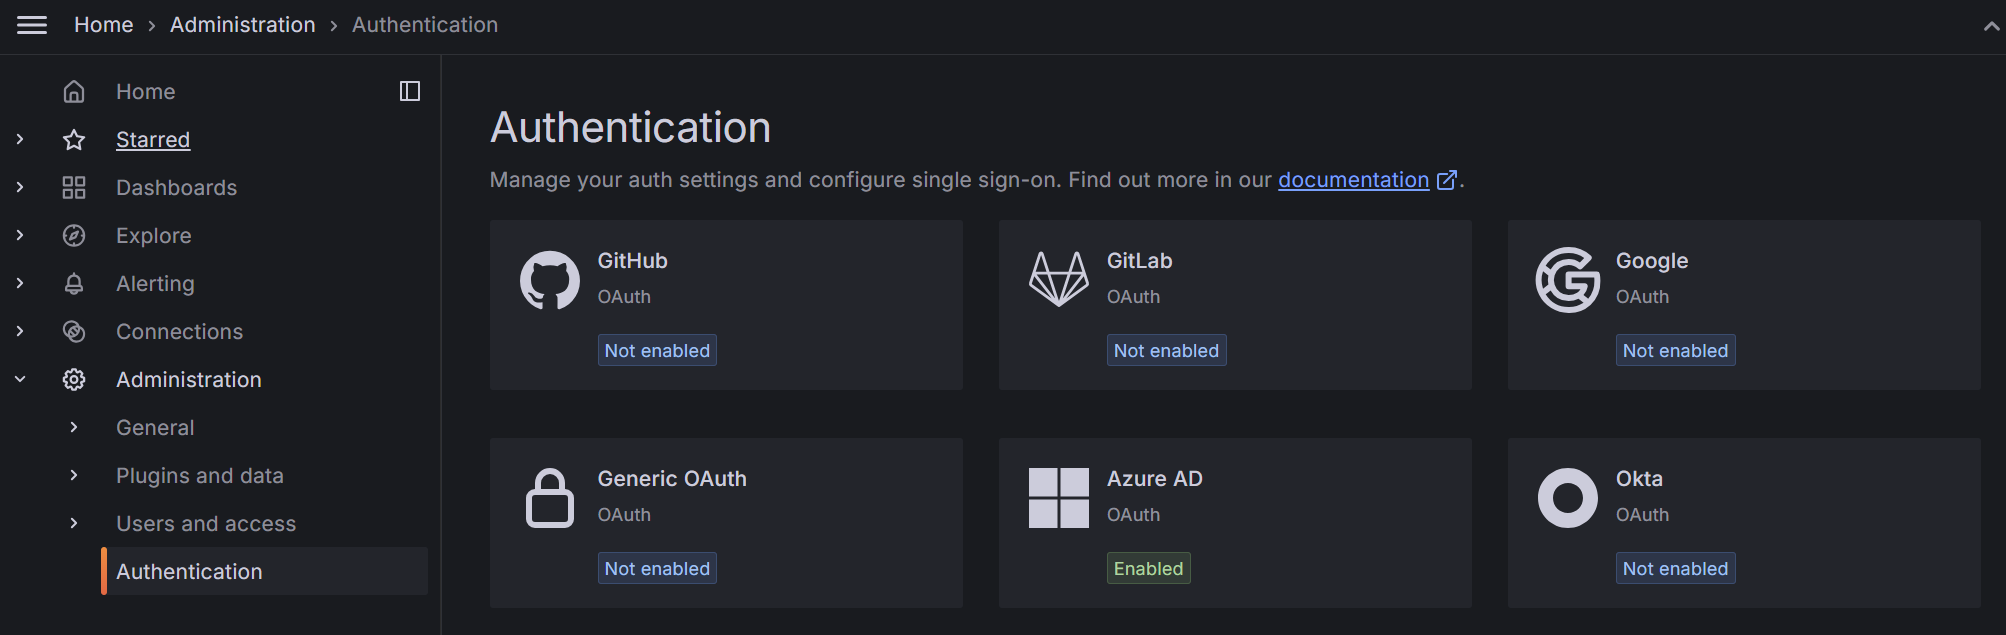
If everything is set up correctly, you can log in with the administrator account in the webgui of your Grafana installation.
You should then be able to see the OAuth providers supported by Grafana in the “Authentication” tab.
Setup Microsoft Entra ID provider
This step requires the authentication details TenantID, ClientID, Client Secret from the first step.
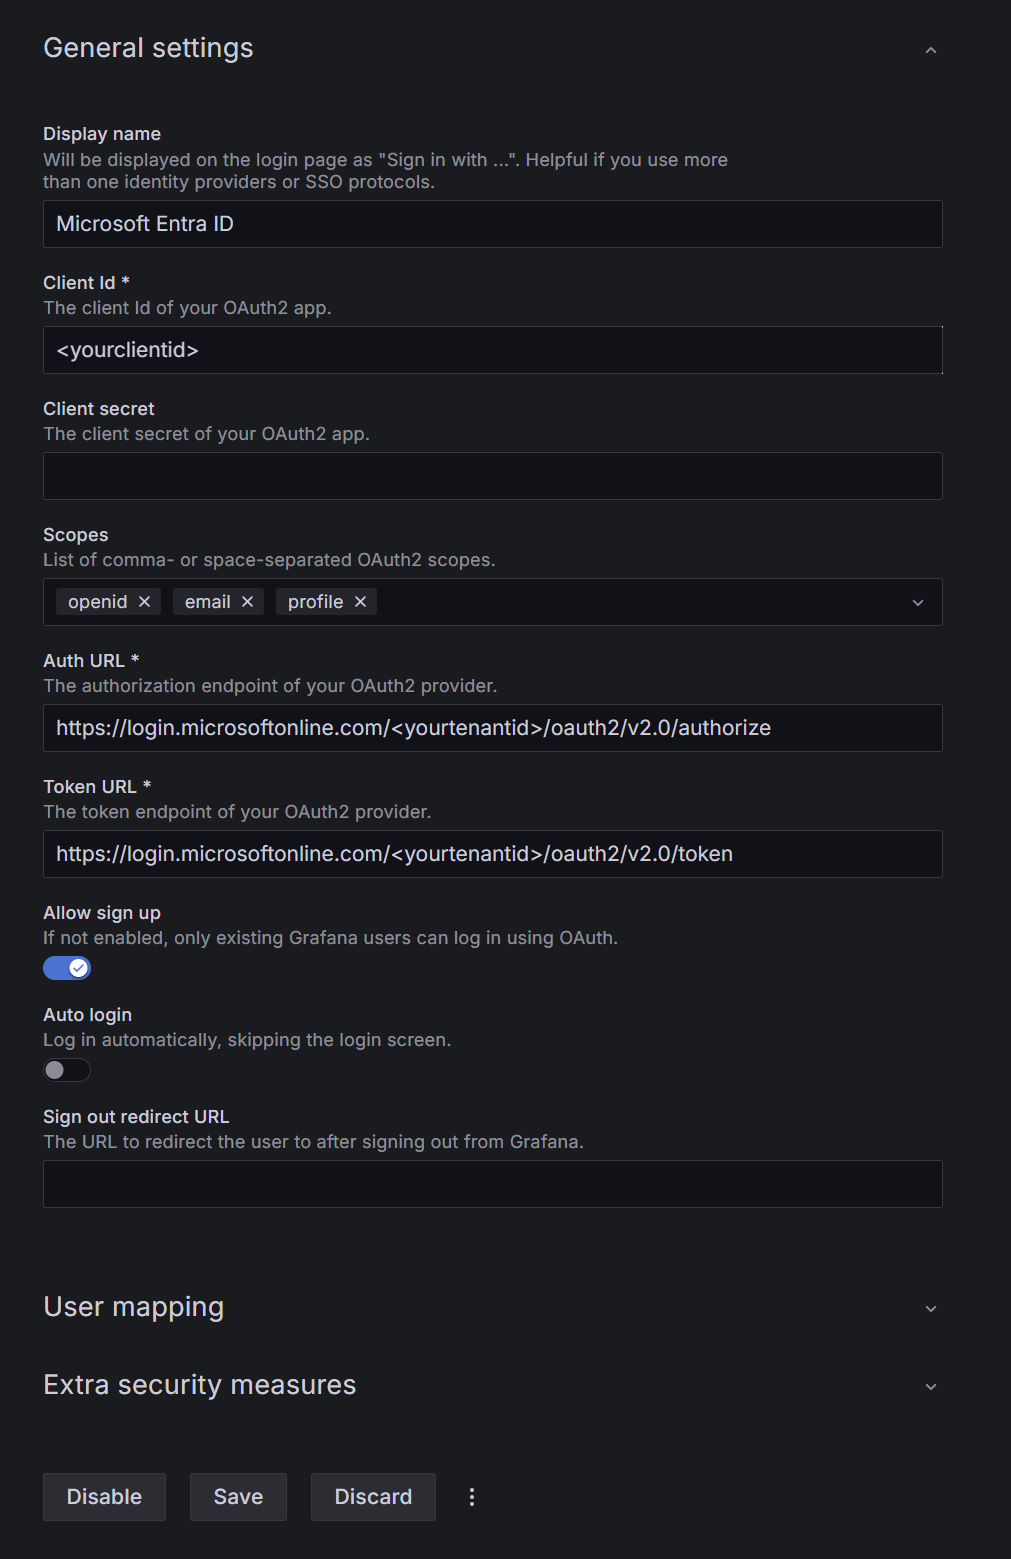
In the Grafana web interface select "Authentication" -> "Azure AD". There you can enter the credentials from Microsoft Entra ID. Enter the information as described here:
- Display Name: Enter a name that will be displayed to the end user as a button when logging in.
- Client id: Enter your ClientID from the App Registration of your Microsoft Entra ID.
- Client secret: Here you have to enter the Client Secret as passphrase.
- Scopes: This allows you to receive multiple parameters from the Microsoft Entra ID user object. The Access Token is requested with these scopes at login. The default values are usually sufficient.
- Auth URL: Enter the following URL and fill your tenant id:
https://login.microsoftonline.com/<yourtenantid>/oauth2/v2.0/authorize - Token URL: Enter the following URL and fill your tenant id:
https://login.microsoftonline.com/<yourtenantid>/oauth2/v2.0/token - Allow sign up: If this is enabled all user who have permission to sign in to your App Registration, are automatically signed up as user objects in Grafana. As you can still manage permissions within the App Registration this is usually recommended.
- Auto login: This logs your users automatically into Grafana if they have an Access Token for Microsoft Entra ID.
After these settings are properly configured your users should be able to sign into Grafana. For more granular settings and things like role mapping or default Grafana groups, change the settings under "User mapping" and "Extra security measures".
Microsoft Entra ID SSO for Proxmox
Prerequisites: Ability to create an app registration with delegated standard rights. Proxmox should be installed and access to the Datacenters Realms section should be possible.
Proxmox allows various external authentication services via protocols such as Active Directory, LDAP or OpenID Connect. We will use the latter for the Microsoft Entra ID connection and SSO functionality.
Limitations
Proxmox allows the automatic creation of user objects, but is otherwise relatively limited compared to other applications, as it does not use the OAUTH 2.0 standard but only handles logins via Open ID Connect. These certain limitations must be taken into account when introducing this setup.
In addition, logins will only be possible for the Webgui. The login on the individual cluster nodes is still regulated via the Linux authentication of the individual hosts. This means that no console connections can be made to the host shells with the Microsoft Entra ID user objects.
Create App Registration
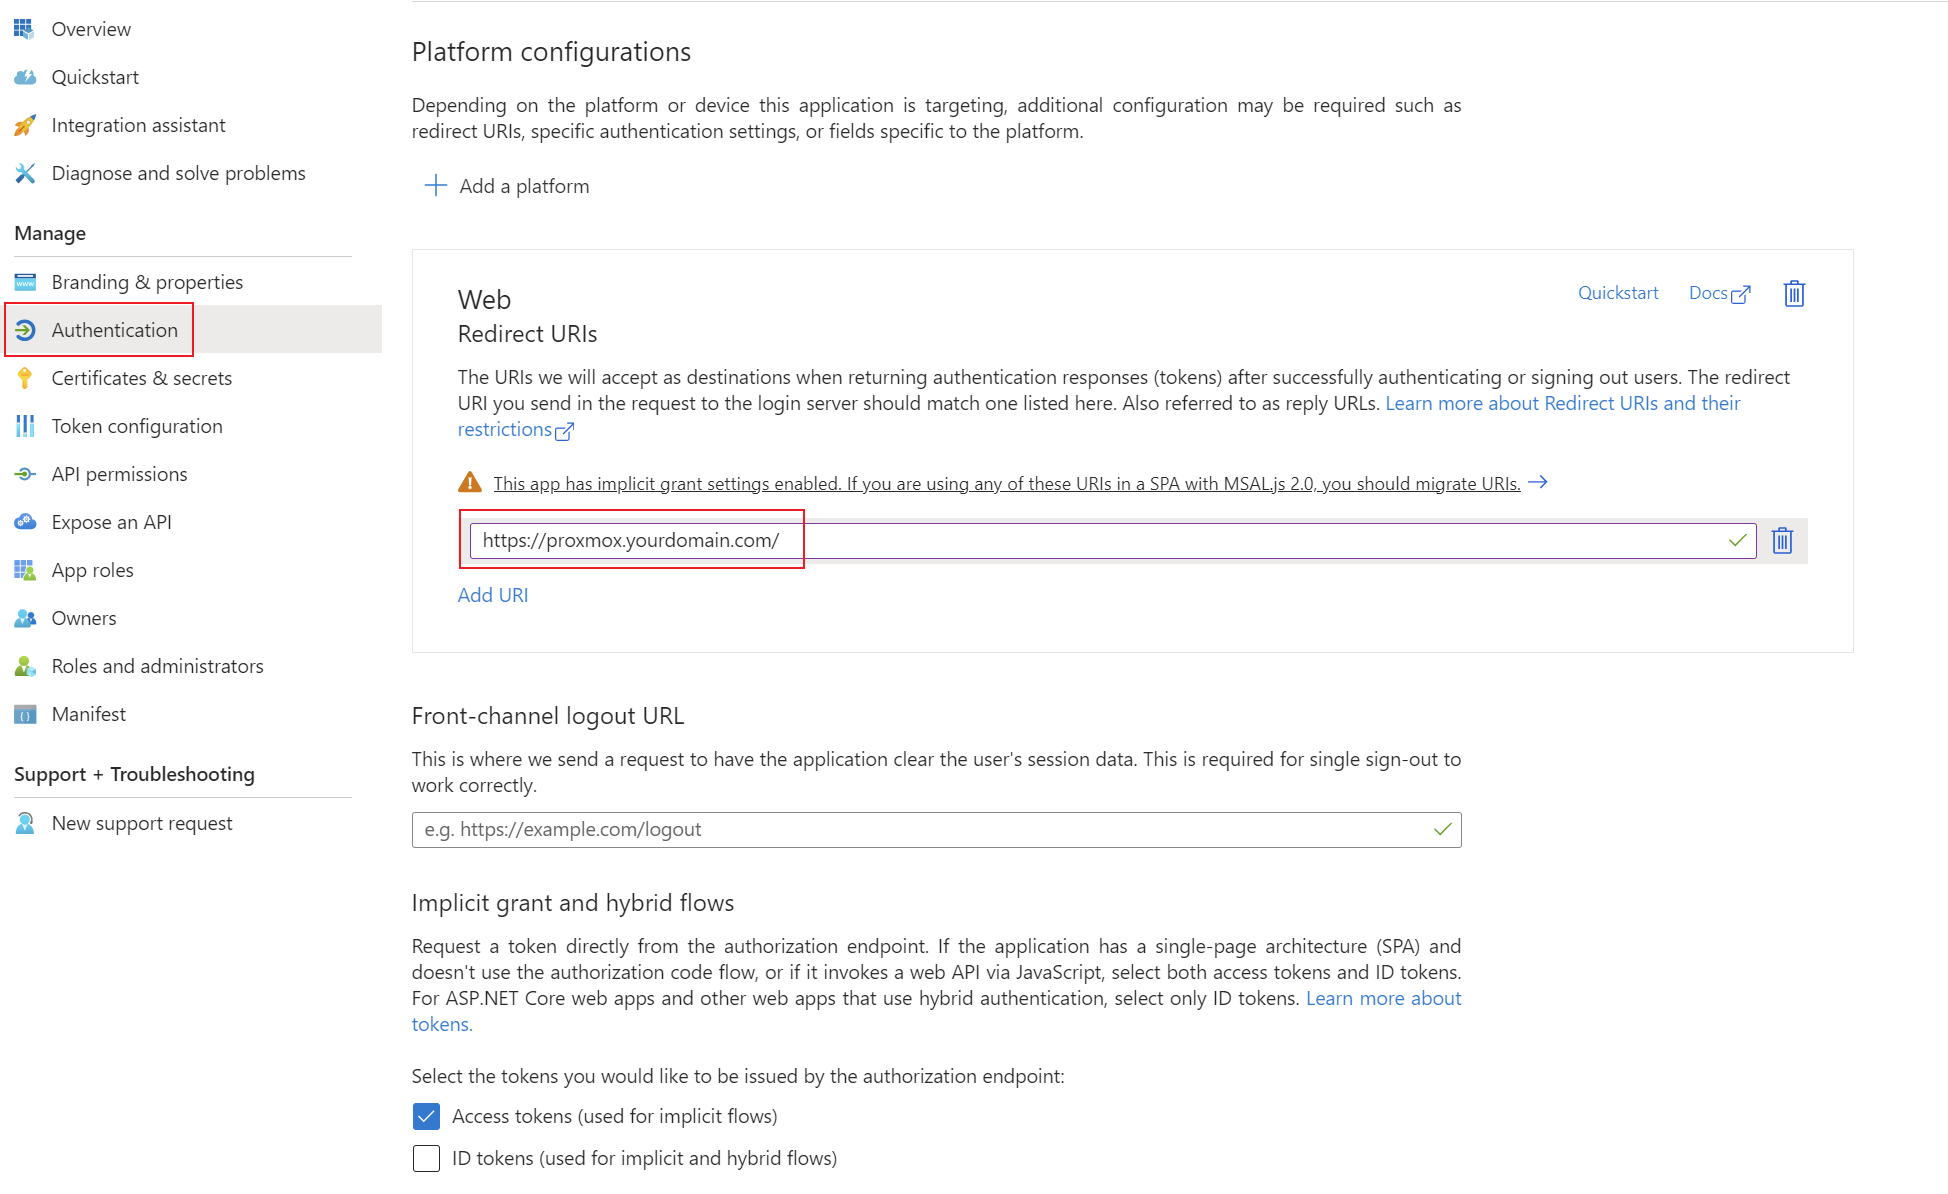
First, an app registration including client secret must be created in Microsoft Entra ID. All settings can be left at the default values. Important settings are the Redirect URIs under the Authentication tab. Set these URIs to your external or internal domain on which Proxmox is available. These URIs will be used for Microsoft Entra ID to know where to redirect the user in case of successful logins.
- Authentication Type: Web
- Redirect URIs: https://proxmox.yourdomain.com/
Add the corresponding permissions for OpenID Connect as delegated permissions and grant admin consent for your tenant.
- Permissions: Delegated OpenId permissions (email, offline_access, openid, profile)
Create a client secret for the application and save the tenant ID, application ID and client secret in your password manager. You can find instructions for this information here: Get app details and grant permissions to app registration
Setup Microsoft Entra ID in Proxmox Realm
This step requires the authentication details TenantID, ClientID, Client Secret from the first step.
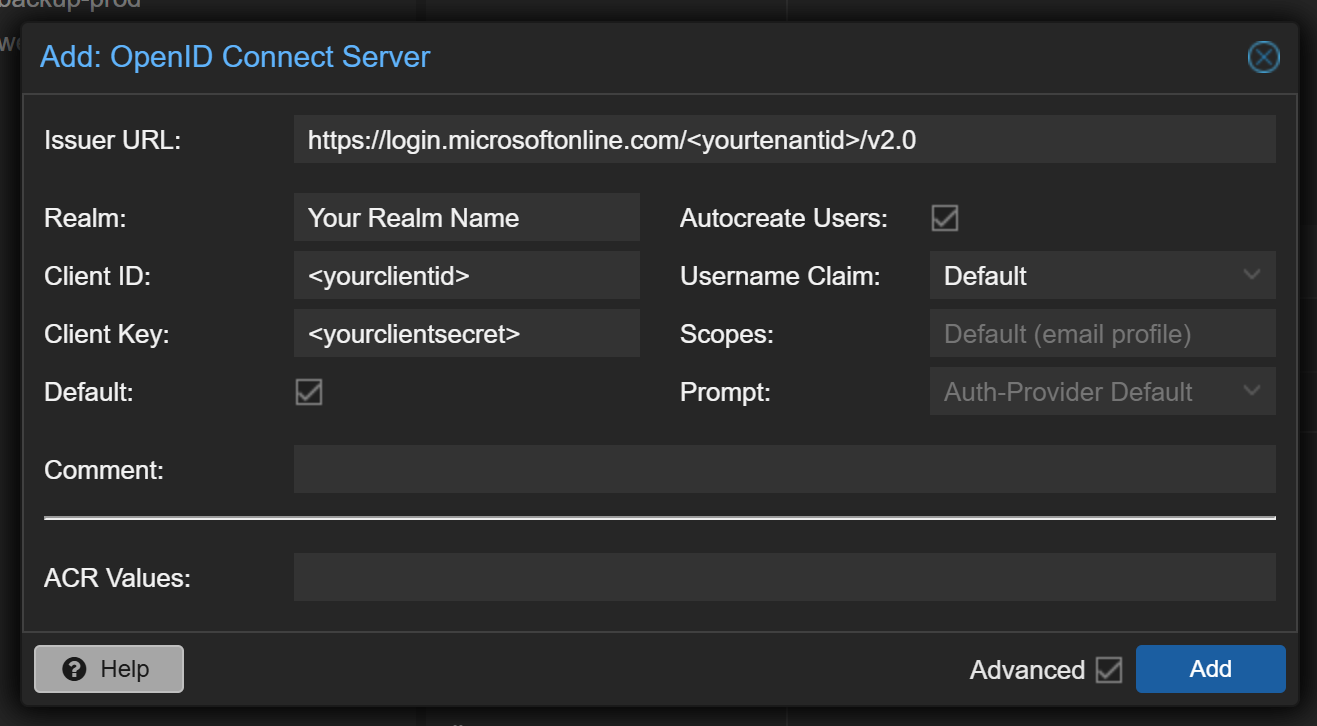
In the Proxmox web interface select "Datacenter" -> "Realms" -> "Add" -> "OpenID Connect Server". There you can enter the credentials from Microsoft Entra ID. Enter the information as described here:
- Issuer URL: https://login.microsoftonline.com/<yourtenantid>/v2.0
- Realm: This is the id of the installed authentication provider. The name must be lower case and without special characters.
- Client ID: Enter your ClientID from the App Registration of your Microsoft Entra ID.
- Client Key: Here you have to enter the Client Secret.
- Default: If this box is checked, the default auth provider on the sign in screen will be this method.
- Autocreate Users: If this is enabled all user who have permission to sign in to your App Registration, are automatically signed up as user objects in Proxmox. As you can still manage permissions within the App Registration this is usually recommended.
- Scopes: This allows you to receive multiple parameters from the Microsoft Entra ID user object. The Access Token is requested with these scopes at login. The default values are usually sufficient.
- Prompt: This setting defines which action Proxmox should perform when users log in. The default options are sufficient for the Microsoft Entra ID login.
- Comment: Enter a name that will be displayed to the end user on the login screen in the auth provider selection.
After these settings are properly configured your users should be able to sign into Proxmox web interface. After sign in the default grouping, role and permissions mechanisms from Proxmox take place.
Microsoft Entra ID SSO for Portainer
Prerequisites: Ability to create an app registration with delegated standard rights. Portainer should be installed and administrator access to the web interface should be available.
This guide will take you through the various stages of installing SSO using Microsoft Entra ID. Unfortunately, it is not possible to add the SSO functions in the Portainer Community Edition (CE). Accordingly, we have to purchase a free license of the Business Edition (BE) and upgrade the Portainer instance. You will then be able to manage the logins and authorizations for the web interface via Microsoft Entra ID. Functions such as automatic user provisioning or default permissions are also supported by Portainer.
Create App Registration
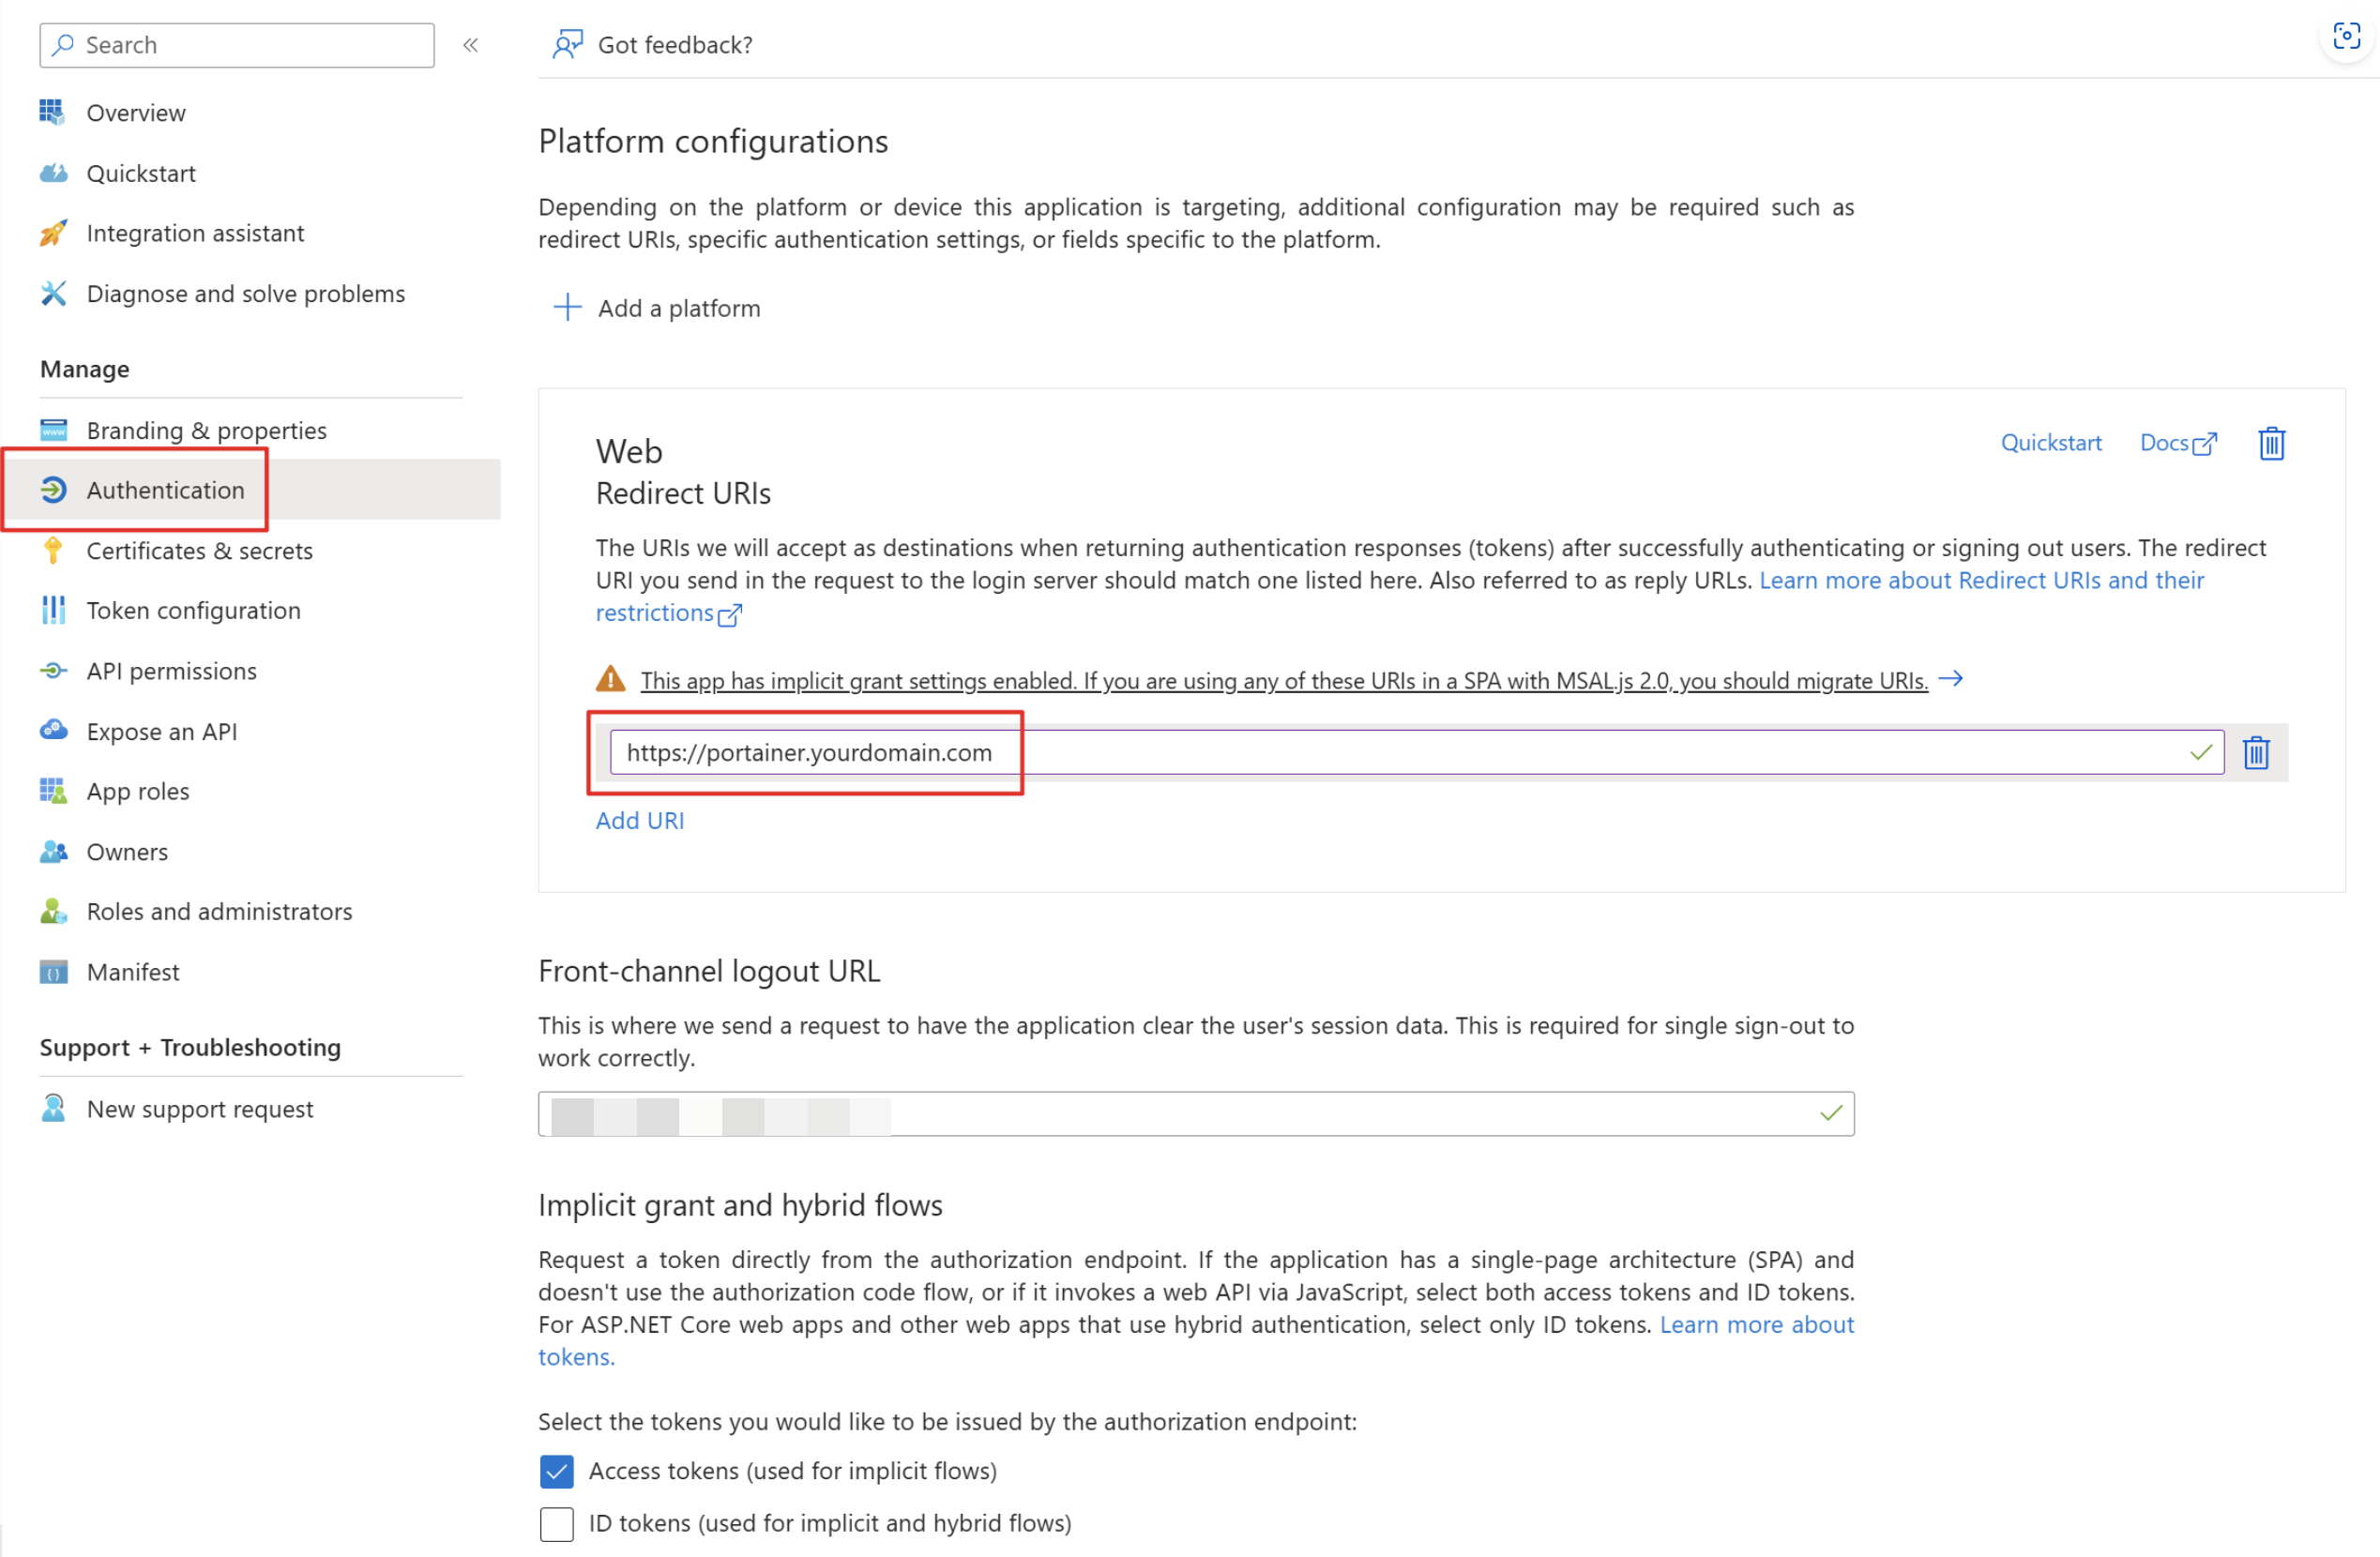
First, an app registration including client secret must be created in Microsoft Entra ID. All settings can be left at the default values. Important settings are the Redirect URIs under the Authentication tab. Set these URIs to your external or internal domain on which Portainer is available. These URIs will be used for Microsoft Entra ID to know where to redirect the user in case of successful logins.
- Authentication Type: Web
- Redirect URIs: https://portainer.yourdomain.com
Add the corresponding permissions for OpenID Connect as delegated permissions and grant admin consent for your tenant.
- Permissions: Delegated OpenId permissions (email, offline_access, openid, profile)
Create a client secret for the application and save the tenant ID, application ID and client secret in your password manager. You can find instructions for this information here: Get app details and grant permissions to app registration
Acquire Portainer License
To activate the SSO functionality, the Portainer Comunity Edition must be replaced by a Business Edition. Don't worry, it costs nothing. At least for a Homelab environment and installation with less than 3 environments. For business customer licensing in Portainer Business Edition is based on the number of nodes you are managing.
Create an account and follow the instructions on this page: Take 3 - Get your first 3 nodes free (portainer.io)
Upgrade Portainer instance
After you have received the license key via email you can start upgrading your Portainer CE to a Portainer BE instance. Make sure to create a backup before you upgrade the instance.
When running portainer inside a single docker container, it is no simpler than changing the image from "portainer/portainer-ce" to "portainer/portainer-ee" and restart the stack or containers. You can find more in depth guides and version specific upgrade manuals here: Docker Standalone | Portainer Documentation
Check activation status
After installing the license, this can be checked in the web interface. To do this, navigate to “Licenses” and check whether your license is installed and the limitation to 3 nodes is displayed. Then you are ready to add external authentication providers such as Microsoft Entra ID. Go to the next step.
Setup Microsoft Entra ID login provider
For the setup, log into the web interface with an administrator account. You can then select the “OAuth” option under Settings -> Authentication -> Authentication method. The following settings enable automatic user provision or a default group. Configure this as it suits you. Attention: It is recommended that the option “hide internal authentication prompt” is not activated so that the values can still be adjusted in the event of a misconfiguration of the OAuth provider settings. If this is activated, you can lock yourself out and have to rebuild the Portainer instance.
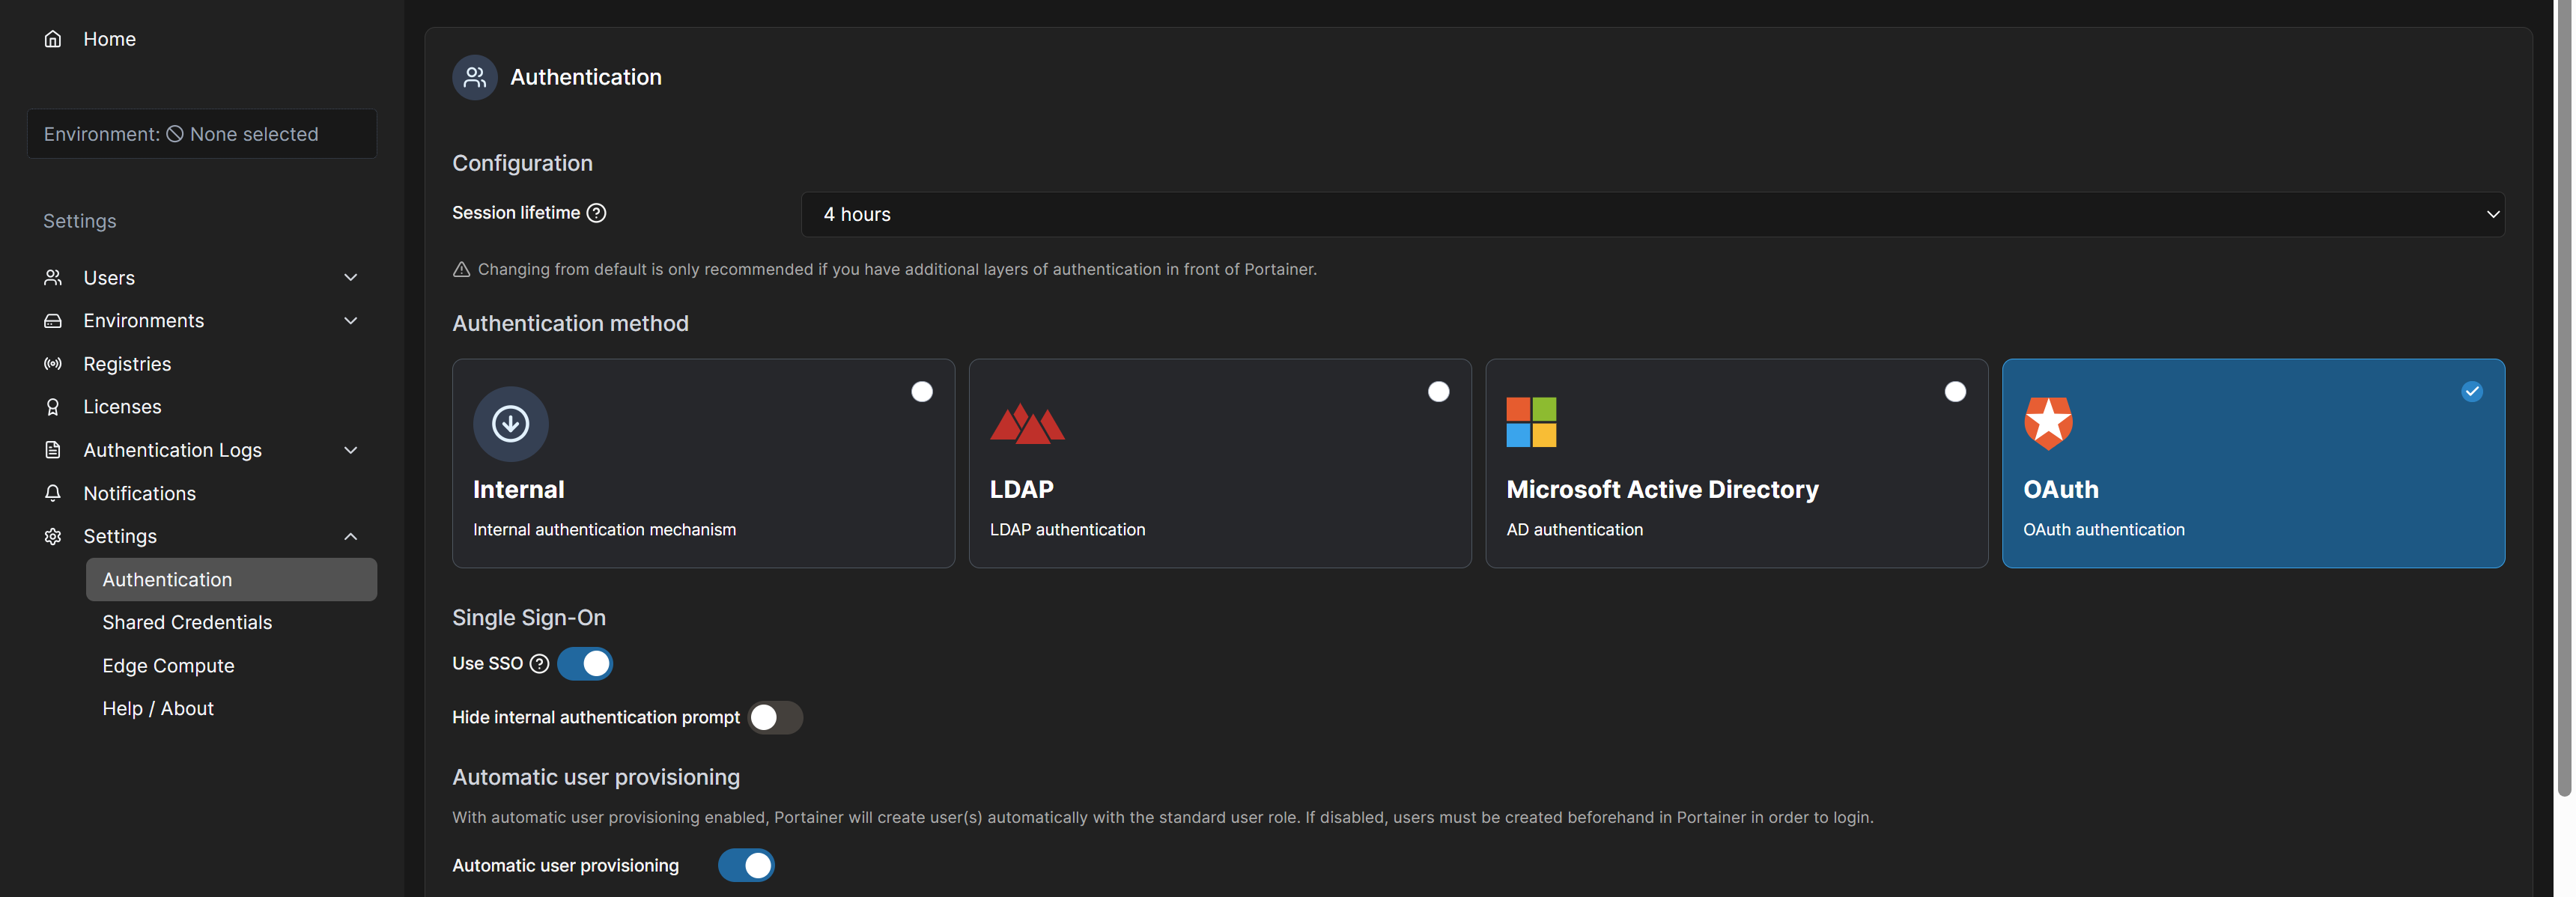
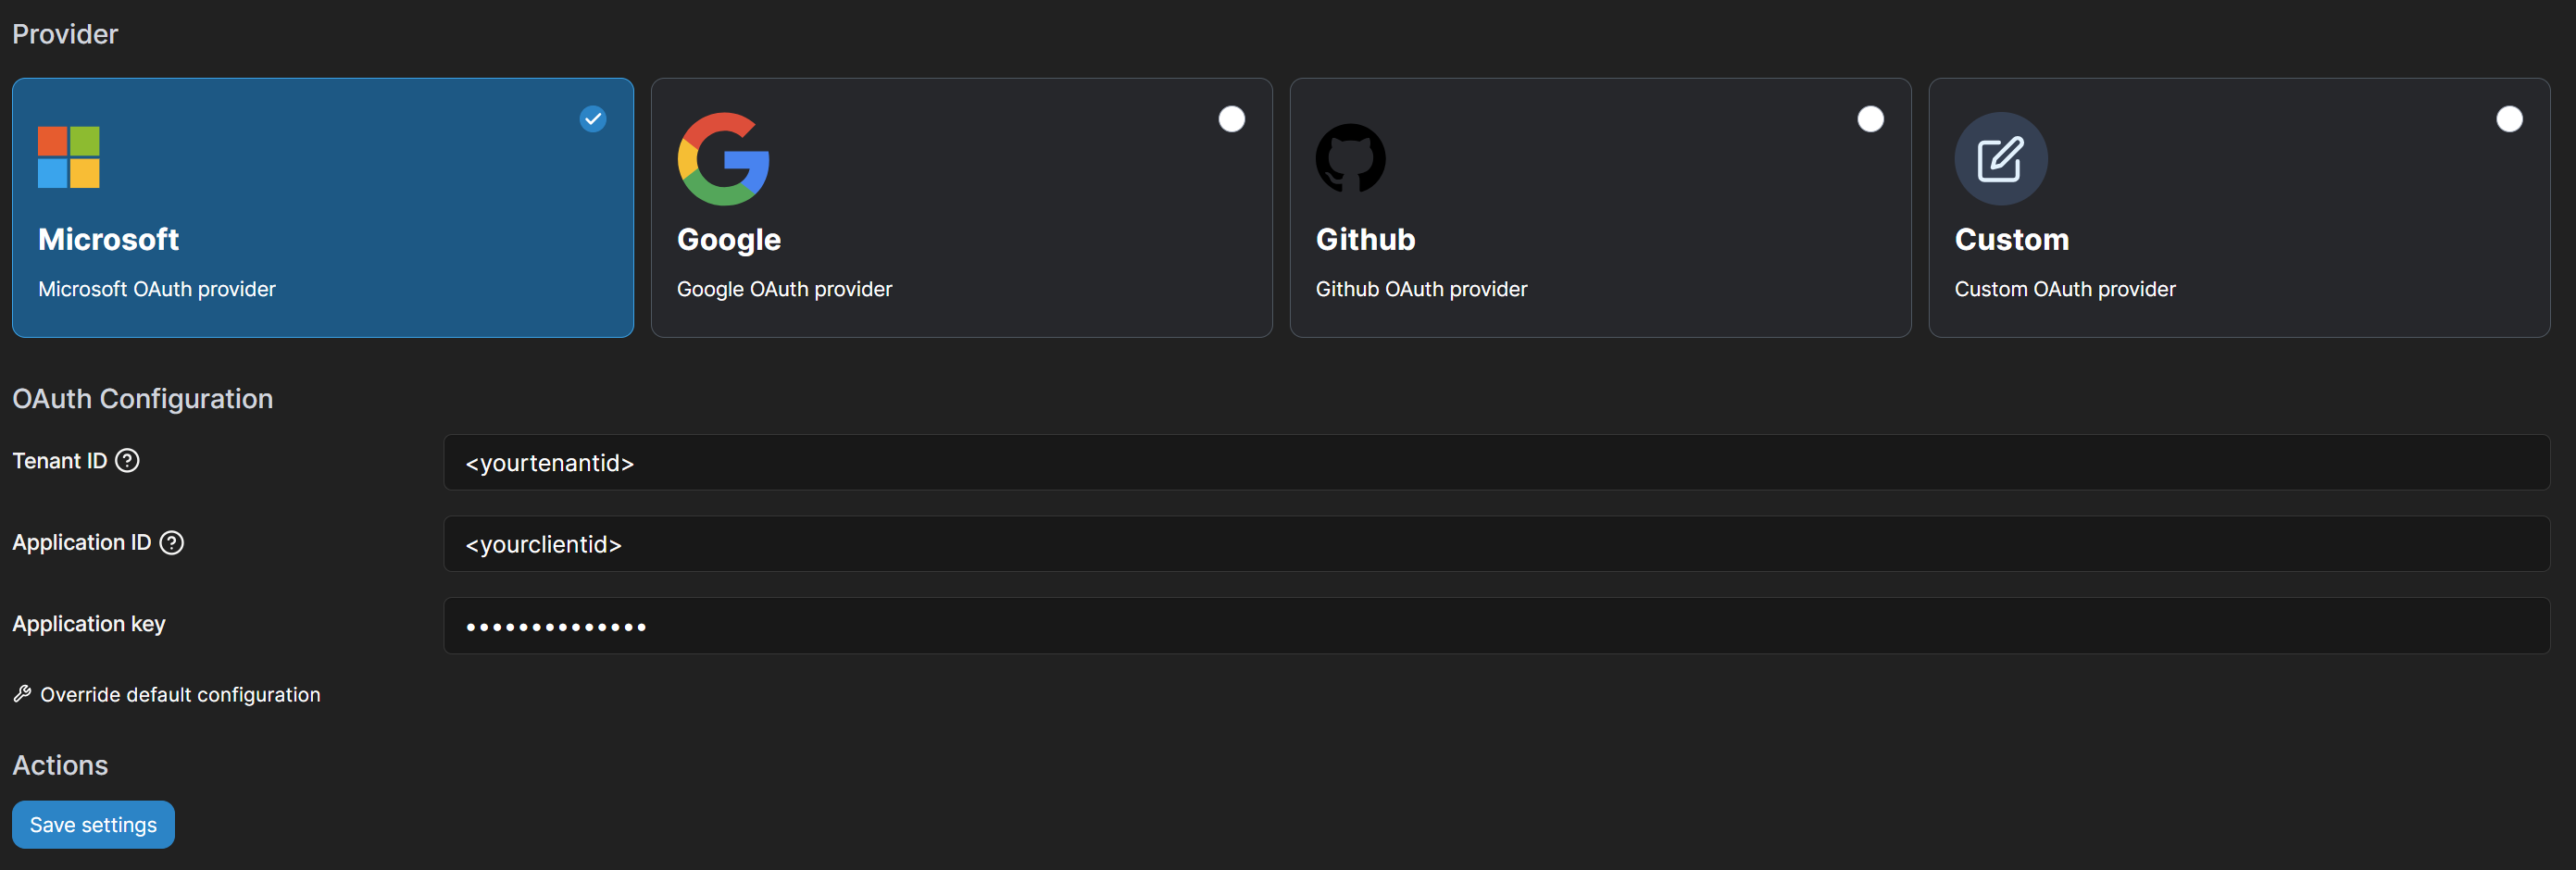
You can then select the "Microsoft OAuth provider" under “Provider” and fill in the TenantID, ClientID and Client Secret options with the corresponding values from the app registration. After saving the settings, you can control who can connect to the web interface of the Portainer instance via the app registration members.
Microsoft Entra ID SSO for Mealie
Prerequisites: Ability to create an app registration with delegated rights and access to the Mealie Docker volume or startup method. Mealie should be installed correctly.
Mealie makes recipe management and planning extremely easy. The Mealie software offers an OpenID interface, which means that Microsoft Entra ID can easily be used as an identity provider and permission manager.
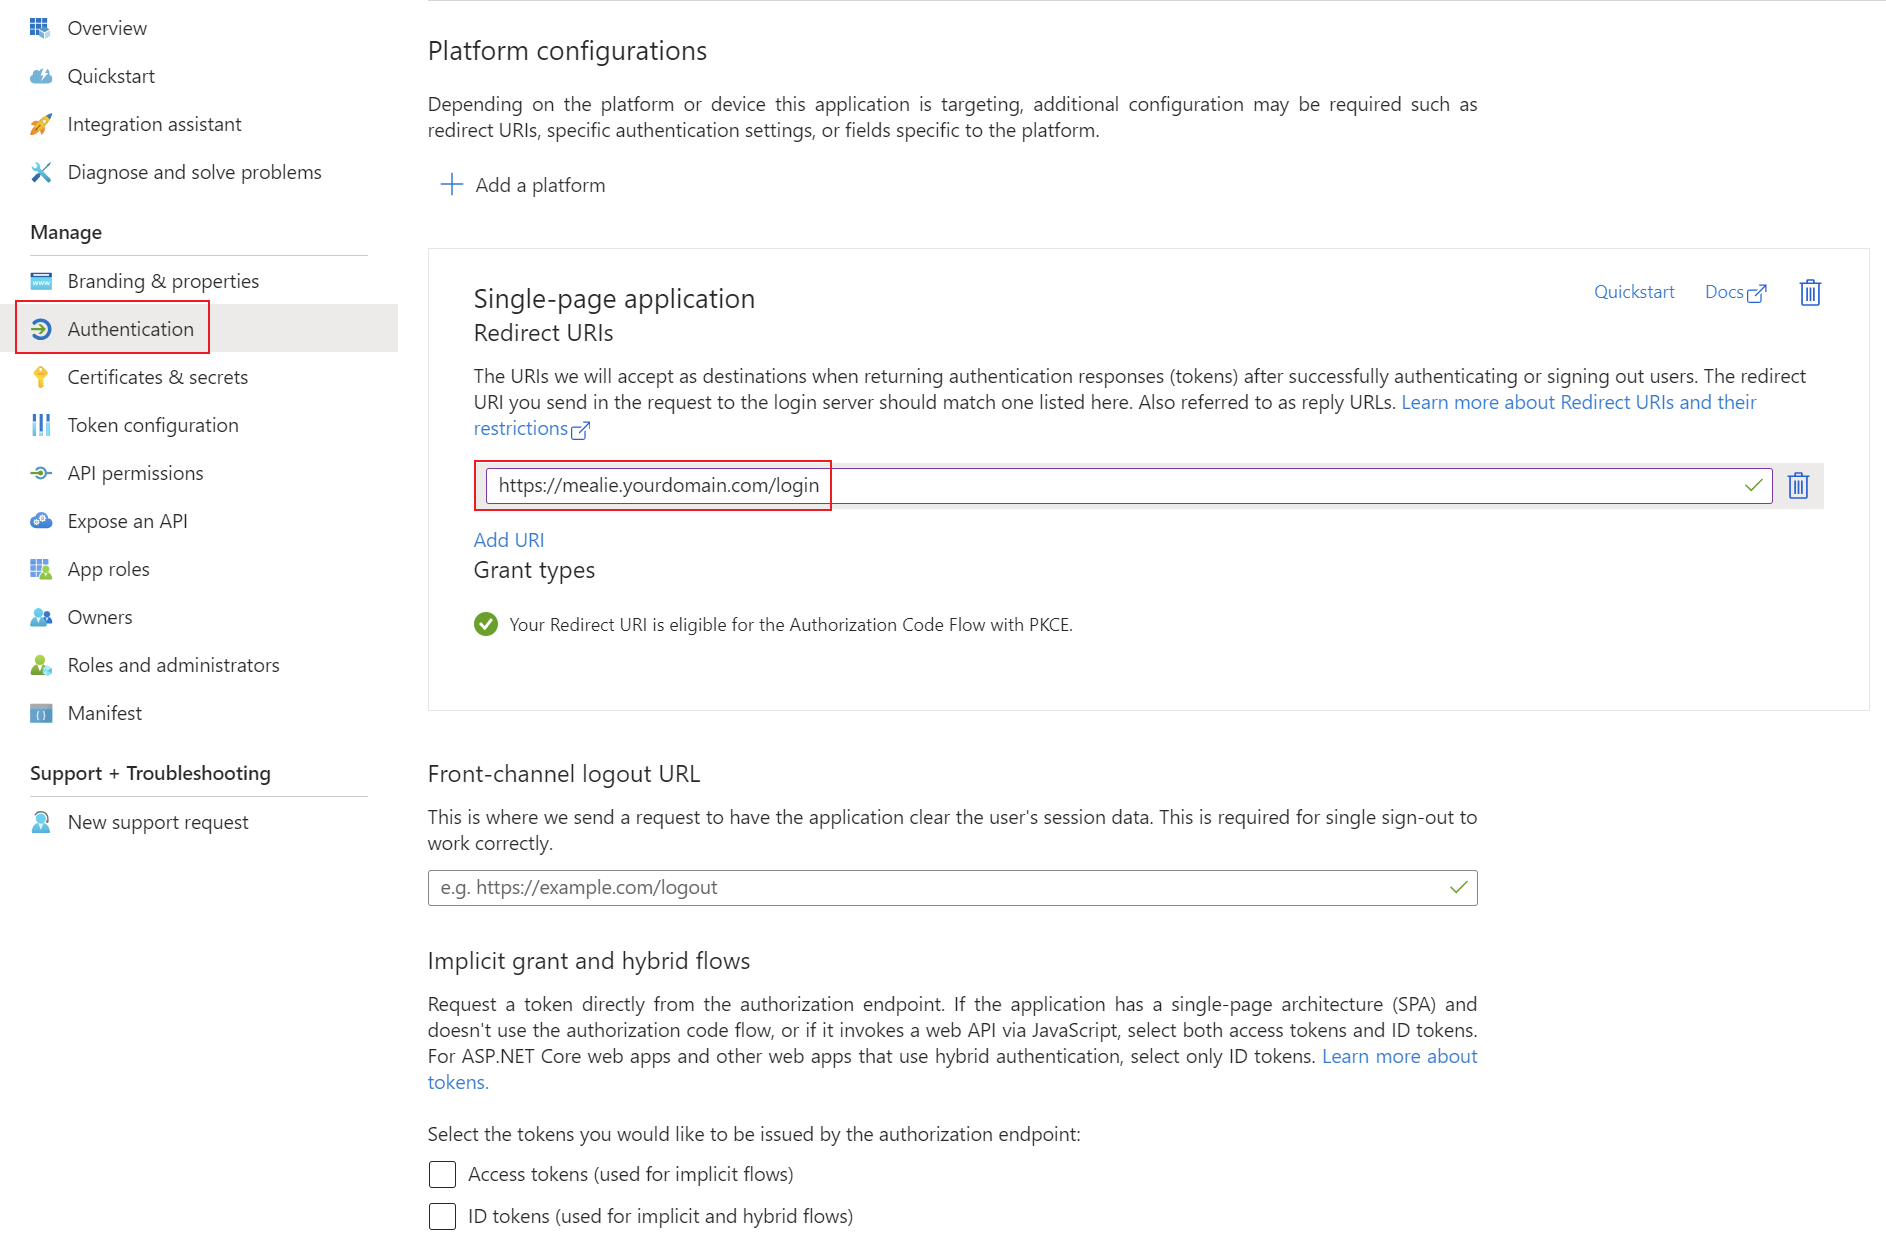
Create App Registration
First, an app registration including client secret must be created in Microsoft Entra ID. All settings can be left at the default values. Important settings are the Redirect URIs under the Authentication tab. Set these URIs to your external or internal domain on which Mealie is available. These URIs will be used for Microsoft Entra ID to know where to redirect the user in case of successful logins.
- Type: Single-page application
- Redirect URIs: https://mealie.yourdomain.com/login
Add the corresponding permissions for OpenID Connect as delegated permissions and grant admin consent for your tenant.
- Permissions: Delegated OpenId permissions (email, offline_access, openid, profile)
Create a client secret for the application and save the tenant ID, application ID and client secret in your password manager. You can find instructions for this information here: Get app details and grant permissions to app registration
Setup Microsoft Entra ID login provider
With Mealie, the Microsoft Entra ID configurations can be set up using environment variables. Installation using Docker is mandatory for these instructions. The following environment variables enable the configuration of the OpenID integration. You can find more information on all of Mealie's environment variables here: Backend Configuration - Mealie
The relevant environment variables for OpenID are as follows:
- OIDC_AUTH_ENABLED: Enables authentication via OpenID Connect if set to true.
- OIDC_SIGNUP_ENABLED: Enables new users to be created when signing in for the first time with OIDC if set to true.
- OIDC_CONFIGURATION_URL: This is the URL to the configuration of the provider. Using Microsoft Entra ID this probably: https://login.microsoftonline.com//v2.0/.well-known/openid-configuration
- OIDC_CLIENT_ID: This is the client id of your App Registration in Microsoft Entra ID.
- OIDC_CLIENT_SECRET: Here you have to provide the Client Secret from the App Registration.
- OIDC_PROVIDER_NAME: This is the display name for the button on the sign in screen.
Side note: As this type of configuration involves environment variables, these contents can also be transferred via the volume as an .env file, specified with a simple startup command or specified in another declarative context (Kubernetes manifest, Terraform, etc.).
Docker compose example
This Docker Compose file shows a possible configuration for Mealie that authenticates using Microsoft Entra ID. In addition, a mail server is also specified for outgoing SMTP mail traffic.
Customize this content with your specifications and save the content in a normal docker-compose.yaml file. As this is Docker Compose, the application can be started easily with the following command (in detach mode -> -d):
docker compose up -dversion: "3.7"
services:
mealie:
image: ghcr.io/mealie-recipes/mealie:latest
container_name: <yourcontainername>
ports:
- "8600:<yourpublicport>"
volumes:
- <yourpersistentpath>:/app/data/
environment:
- ALLOW_SIGNUP=true
- OIDC_AUTH_ENABLED=true
- OIDC_SIGNUP_ENABLED=true
- OIDC_CONFIGURATION_URL=https://login.microsoftonline.com/<yourtenantid>/v2.0/.well-known/openid-configuration
- OIDC_CLIENT_ID=<yourclientid>
- OIDC_CLIENT_SECRET=<yourclientsecret>
- OIDC_PROVIDER_NAME=Microsoft Entra ID
- PUID=1000
- PGID=1000
- TZ=<yourtimezone>
- MAX_WORKERS=1
- WEB_CONCURRENCY=1
- BASE_URL=https://<yourmealiedomain>
- SMTP_HOST=<yoursmtpmailhost>
- SMTP_PORT=587
- SMTP_FROM_EMAIL=<yoursmtpmail>
- SMTP_USER=<yoursmtpmailuser>
- SMTP_PASSWORD=<yoursmtpmailpassword>
- SMTP_FROM_NAME=<yourmailname>
restart: unless-stoppedMicrosoft Entra ID SSO for Bookstack
Prerequisites: Ability to create an app registration with delegated rights and access to the Bookstack Docker volume or startup method. Bookstack should be installed correctly.
Bookstack offers an OpenID interface, which means that Microsoft Entra ID can easily be used as an identity provider for managing access and permission within Bookstack. The functionalities are more limited than other integrations. However, simple functionalities such as automatic user creation and email verification can be customized.
This guide is a compilation of the main documentation of Bookstack: Third Party Authentication · BookStack (bookstackapp.com)
Create App Registration
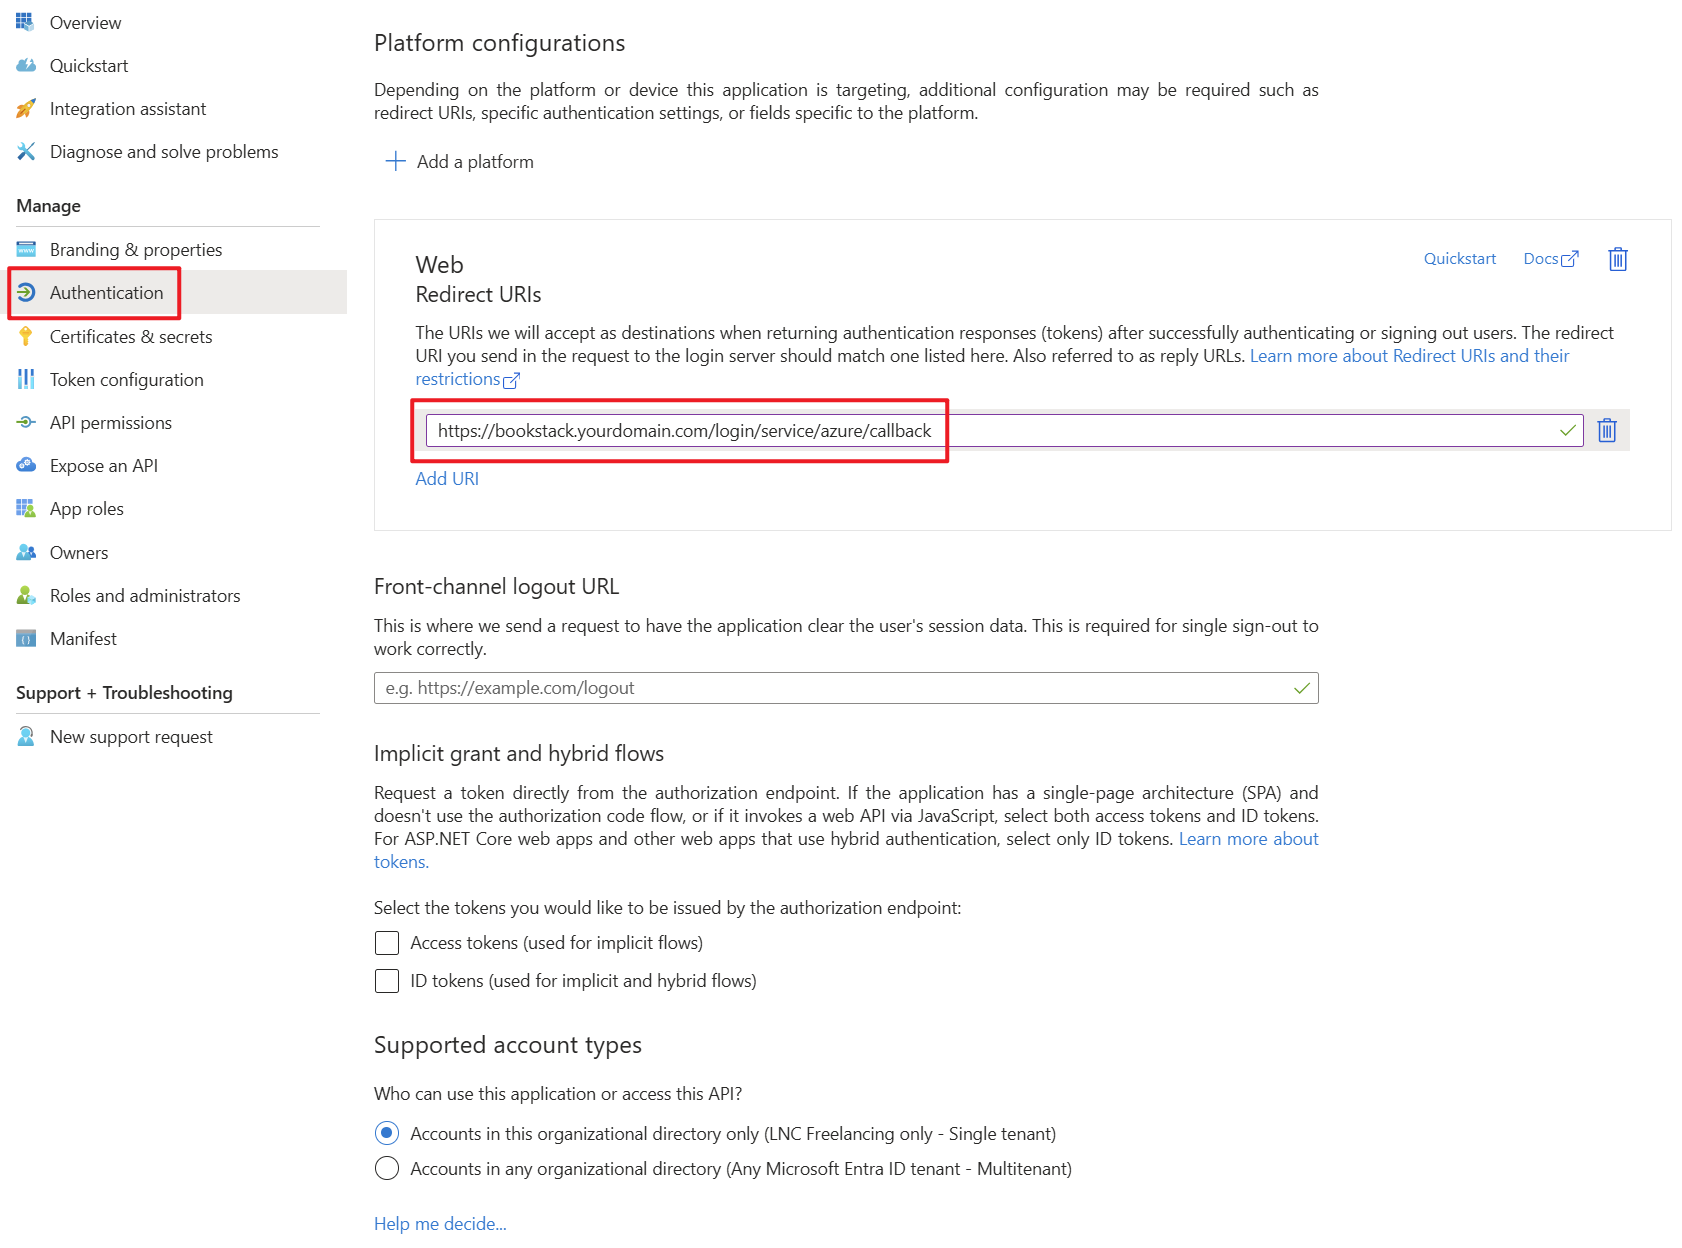
First, an app registration including client secret must be created in Microsoft Entra ID. All settings can be left at the default values. Important settings are the Redirect URIs under the Authentication tab. Set these URIs to your external or internal domain on which Bookstack is available. These URIs will be used for Microsoft Entra ID to know where to redirect the user in case of successful logins.
- Authentication Type: Web
- Redirect URIs: https://bookstack.yourdomain.com/login/service/azure/callback
Add the corresponding permissions for OpenID Connect as delegated permissions and grant admin consent for your tenant.
- Permissions: Delegated User permission (User.Read)
Create a client secret for the application and save the tenant ID, application ID and client secret in your password manager. You can find instructions for this information here: Get app details and grant permissions to app registration
Setup Microsoft Entra ID login provider
With Bookstack, the Microsoft Entra ID configurations can be set up using environment variables. Installation using Docker is mandatory for these instructions. The following environment variables enable the configuration of the OpenID integration.
The relevant environment variables for OpenID are as follows:
- AZURE_AUTO_REGISTER: If this setting is activated, user objects are automatically created when they authenticate for the first time via Microsoft Entra ID and the user does not yet exist in Bookstack.
- AZURE_AUTO_CONFIRM_EMAIL: If activated this will skip the “Confirm email” setting as all email addresses are considered verified by Microsoft Entra ID.
- AZURE_TENANT: Here you have to enter the Tenant ID of your Microsoft Entra ID Tenant.
- AZURE_APP_ID: This is the client id of your App Registration in Microsoft Entra ID.
- AZURE_APP_SECRET: Here you have to provide the Client Secret from the App Registration.
Side note: As this type of configuration involves environment variables, these contents can also be transferred via the volume as an .env file, specified with a simple startup command or specified in another declarative context (Kubernetes manifest, Terraform, etc.).
Docker compose example
This Docker Compose file shows a possible configuration for Bookstack that authenticates using Microsoft Entra ID. In addition, the database container and mail settings are also specified.
Customize this content with your specifications and save the content in a normal docker-compose.yaml file. As this is Docker Compose, the application can be started easily with the following command (in detach mode -> -d):
docker compose up -dversion: "3"
services:
<yourbookstackcontainername>:
image: lscr.io/linuxserver/bookstack
container_name: <yourbookstackcontainername>
environment:
- PUID=1000
- PGID=1000
- APP_URL=https://<yourbookstackdomain>
- DB_HOST=<yourmariadbcontainername>
- DB_USER=<yourdbuser>
- DB_PASS=<yourdbpassword>
- DB_DATABASE=<yourdbname>
- MAIL_HOST=<yourmailserver>
- MAIL_PORT=587
- MAIL_FROM_NAME=<yourmailname>
- MAIL_FROM=<yoursmtpmail>
- MAIL_USERNAME=<yoursmtpmailuser>
- MAIL_PASSWORD=<yoursmtpmailpassword>
- AZURE_APP_ID=<yourclientid>
- AZURE_APP_SECRET=<yourclientsecret>
- AZURE_TENANT=<yourtenantid>
- AZURE_AUTO_REGISTER=true
- AZURE_AUTO_CONFIRM_EMAIL=true
volumes:
- <yourpersistentpathforbookstack>:/config
ports:
- 6875:80
restart: unless-stopped
depends_on:
- <yourmariadbcontainername>
<yourmariadbcontainername>:
image: lscr.io/linuxserver/mariadb
container_name: <yourmariadbcontainername>
environment:
- PUID=1000
- PGID=1000
- MYSQL_ROOT_PASSWORD=<yourdbrootpassword>
- TZ=<yourtimezone>
- MYSQL_DATABASE=<yourdbname>
- MYSQL_USER=<yourdbuser>
- MYSQL_PASSWORD=<yourdbpassword>
volumes:
- <yourpersistentpathformariadb>:/config
restart: unless-stoppedMicrosoft Entra ID SSO for Gitlab
Prerequisites: Ability to create an app registration with delegated standard rights and access to the Gitlab Docker volume. Gitlab should be installed and administrator access to the web interface should be available.
This guide describes how a Gitlab Docker instance can be equipped with all the benefits of Single Sign On (SSO) using Microsoft Entra ID. Gitlab offers options to make granular settings for the login behaviour.
Things to consider & limitations
In order to be able to log in to the GIT CLI using OAuth, it is essential to work through the following instructions. Since your own Gitlab instance does not yet have an application with which the CLI can authenticate itself. After you have completed this setup, you must note the following: OAuth SSO in CLI using... | LNC DOCS (lucanoahcaprez.ch)
Create App Registration
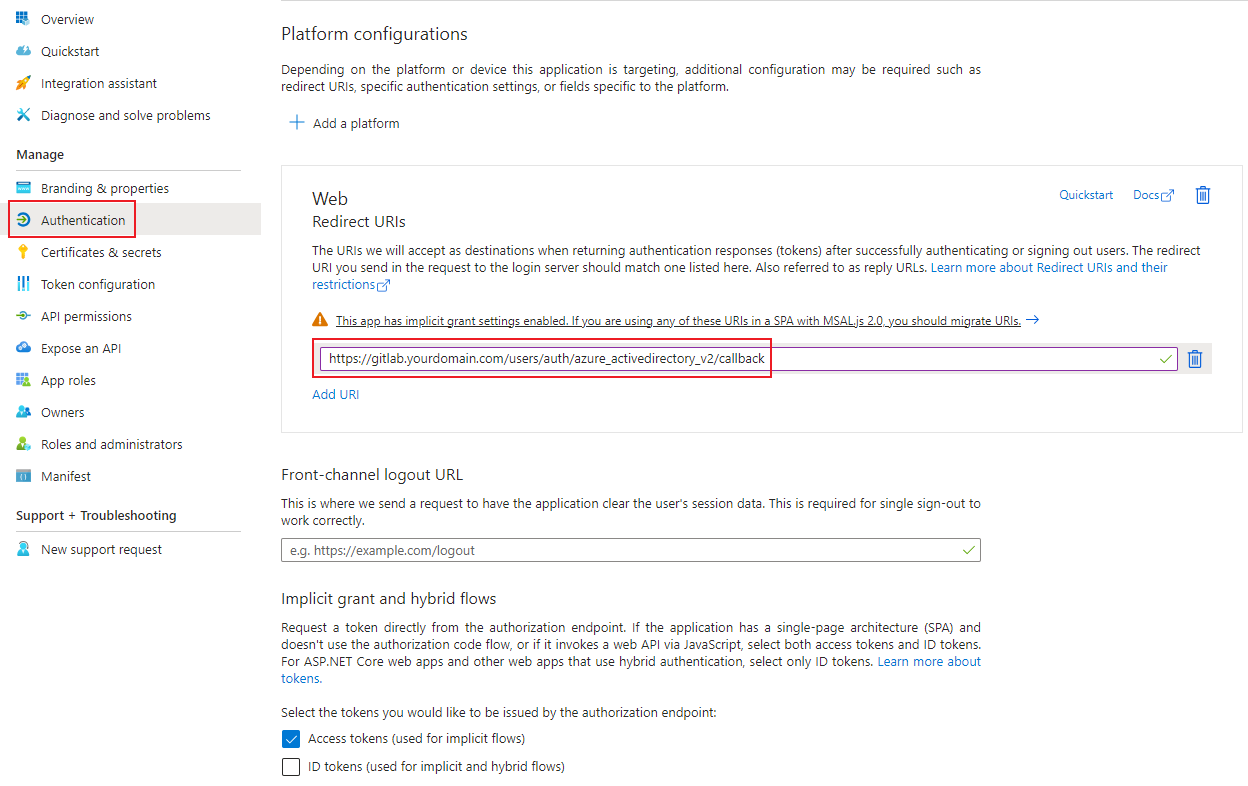
First, an app registration including client secret must be created in Microsoft Entra ID. All settings can be left at the default values. Important settings are the Redirect URIs under the Authentication tab. Set these URIs to your external or internal domain on which Gitlab is available. These URIs will be used for Microsoft Entra ID to know where to redirect the user in case of successful logins.
- Authentication Type: Web
- Redirect URIs: https://gitlab.yourdomain.com/users/auth/azure_activedirectory_v2/callback
Add the corresponding permissions for OpenID Connect as delegated permissions and grant admin consent for your tenant.
- Permissions: Delegated OpenId permissions (email, offline_access, openid, profile)

Create a client secret for the application and save the tenant ID, application ID and client secret in your password manager. You can find instructions for this information here: Get app details and grant permissions to app registration
Setup Microsoft Entra ID login provider
This step requires the authentication details TenantID, ClientID, Client Secret from the first step.
With Gitlab, the Microsoft Entra ID configurations can be set up using the GITLAB_OMNIBUS_CONFIG environment variable. The following part of the variable enables the configuration of the OpenID integration.
The relevant environment variables for OpenID are as follows:
- gitlab_rails['omniauth_enabled']: This boolean represents wheter OAuth is enabled or not.
- gitlab_rails['omniauth_allow_single_sign_on']: The providers are specified here. All providers that are to be used in parallel can be specified here.
- gitlab_rails['omniauth_block_auto_created_users']: If this setting is set to true, auto-created user must be admin approved.
- gitlab_rails['omniauth_providers']: This is the main part of the configuration. Because it is an object that is assigned here, these sub-levels are defined:
- name: This is the display name for the button on the sign in screen.
- label: This is the display name for the button on the sign in screen.
- args: Here you will define the App Registration credentials from the previous step.
- client_id: This is the client id of your App Registration in Microsoft Entra ID.
- client_secret: Here you have to provide the Client Secret from the App Registration.
- tenant_id: Here you have to enter the Tenant ID of your Microsoft Entra ID Tenant.
Side note: As this type of configuration involves the omnibus variable, these contents can also be transferred via the volume as the gitlab.rb file, specified with a simple startup command or specified in another declarative context (Kubernetes manifest, Terraform, etc.).
Docker compose example
This Docker Compose file shows a possible configuration for Gitlab that authenticates using Microsoft Entra ID. In addition mail settings are also specified.
Customize this content with your specifications and save the content in a normal docker-compose.yaml file. As this is Docker Compose, the application can be started easily with the following command (in detach mode -> -d):
docker compose up -dversion: '3.6'
services:
web:
container_name: <yourcontainername>
image: 'gitlab/gitlab-ee:latest'
restart: unless-stopped
hostname: '<yourgitlabdomain>'
environment:
GITLAB_OMNIBUS_CONFIG: |
external_url 'https://<yourgitlabdomain>'
gitlab_rails['gitlab_shell_ssh_port'] = <yoursshshellport>
gitlab_rails['smtp_enable'] = true
gitlab_rails['smtp_address'] = "<yourmailserver>"
gitlab_rails['smtp_port'] = 587
gitlab_rails['smtp_user_name'] = "<yoursmtpmailuser>"
gitlab_rails['smtp_password'] = "<yoursmtpmailpassword>/"
gitlab_rails['smtp_domain'] = "<yourgitlabdomain>"
gitlab_rails['smtp_authentication'] = "login"
gitlab_rails['smtp_enable_starttls_auto'] = true
gitlab_rails['omniauth_enabled'] = true
gitlab_rails['omniauth_allow_single_sign_on'] = ['azure_activedirectory_v2']
gitlab_rails['omniauth_block_auto_created_users'] = false
gitlab_rails['omniauth_providers'] = [
{
"name" => "azure_activedirectory_v2",
"label" => "Microsoft Entra ID",
"args" => {
"client_id" => "<yourclientid>",
"client_secret" => "<yourclientsecret>",
"tenant_id" => "<yourtenantid>",
}
}
]
ports:
- '<yourhttpport>:80'
- '<yourhttpsport>:443'
- '<yoursshport>:22'
volumes:
- <yourpersistentpath>/config:/etc/gitlab
- <yourpersistentpath>/logs:/var/log/gitlab
- <yourpersistentpath>/data:/var/opt/gitlab
shm_size: '256m'