Single sign on (SSO) with third party applications
Microsoft Entra ID is the authentication solution for Microsoft Cloud products. Using various standards such as OAuth 2.0 or SAML, Microsoft Entra ID can be used as a central management platform for third party solutions, whereby granular access to apps, groups, authorizations and much more can be set. This allows external applications without their own user administration to offer a secure and nice user experience. Unfortunately, the integration of these standards is quite different for each application and therefore sometimes requires in-depth knowledge of the application environment.
- Microsoft Entra ID SSO for Grafana
- Microsoft Entra ID SSO for Proxmox
- Microsoft Entra ID SSO for Portainer
- Microsoft Entra ID SSO for Mealie
- Microsoft Entra ID SSO for Bookstack
- Microsoft Entra ID SSO for Gitlab
Microsoft Entra ID SSO for Grafana
Prerequisites: Ability to create an app registration with delegated standard rights and access to the Grafana Docker volume. Grafana should be installed and administrator access to the web interface should be available.
These instructions describe how a Grafana Docker instance can be equipped with all the advantages of Single Sign On (SSO) using Microsoft Entra ID. Since there are different types of SSO, it is important to know that Grafana has many possibilities and offers granular, requirement-specific implementation options. For example, this means that automatic sign-up, role and user mapping, authentication scope and much more can be set.
Create App Registration
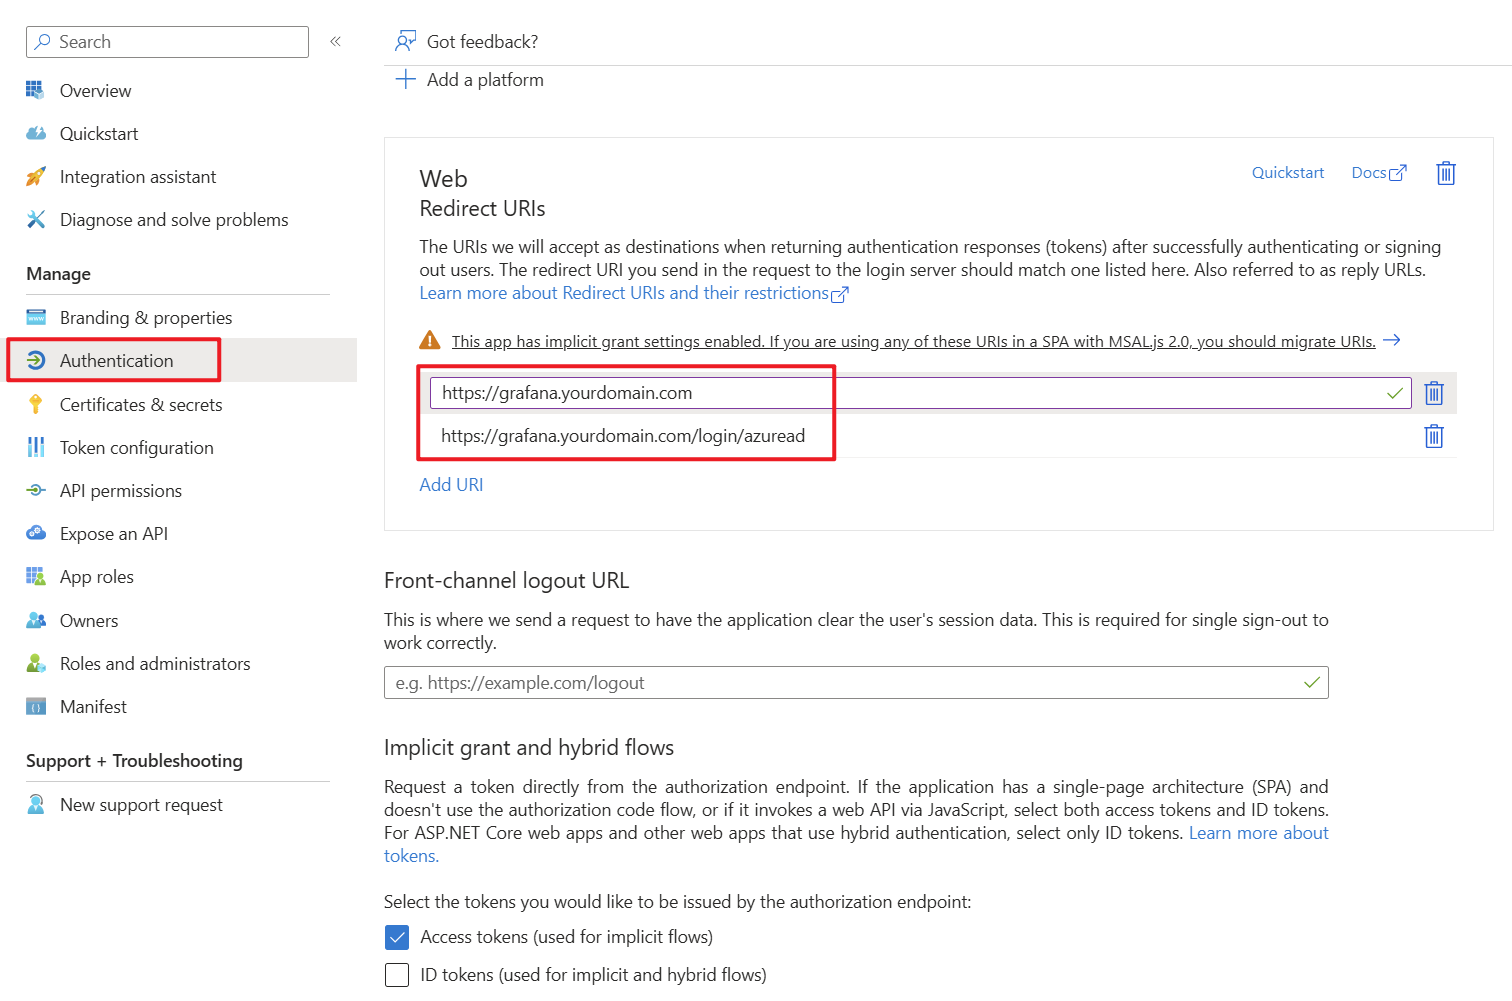
First, an app registration including client secret must be created in Microsoft Entra ID. All settings can be left at the default values. Important settings are the Redirect URIs under the Authentication tab. Set these URIs to your external or internal domain on which Grafana is available. These URIs will be used for Microsoft Entra ID to know where to redirect the user in case of successful logins.
- Authentication Type: Web
- Redirect URIs: https://grafana.yourdomain.com/ & https://grafana.yourdomain.com/login/azuread
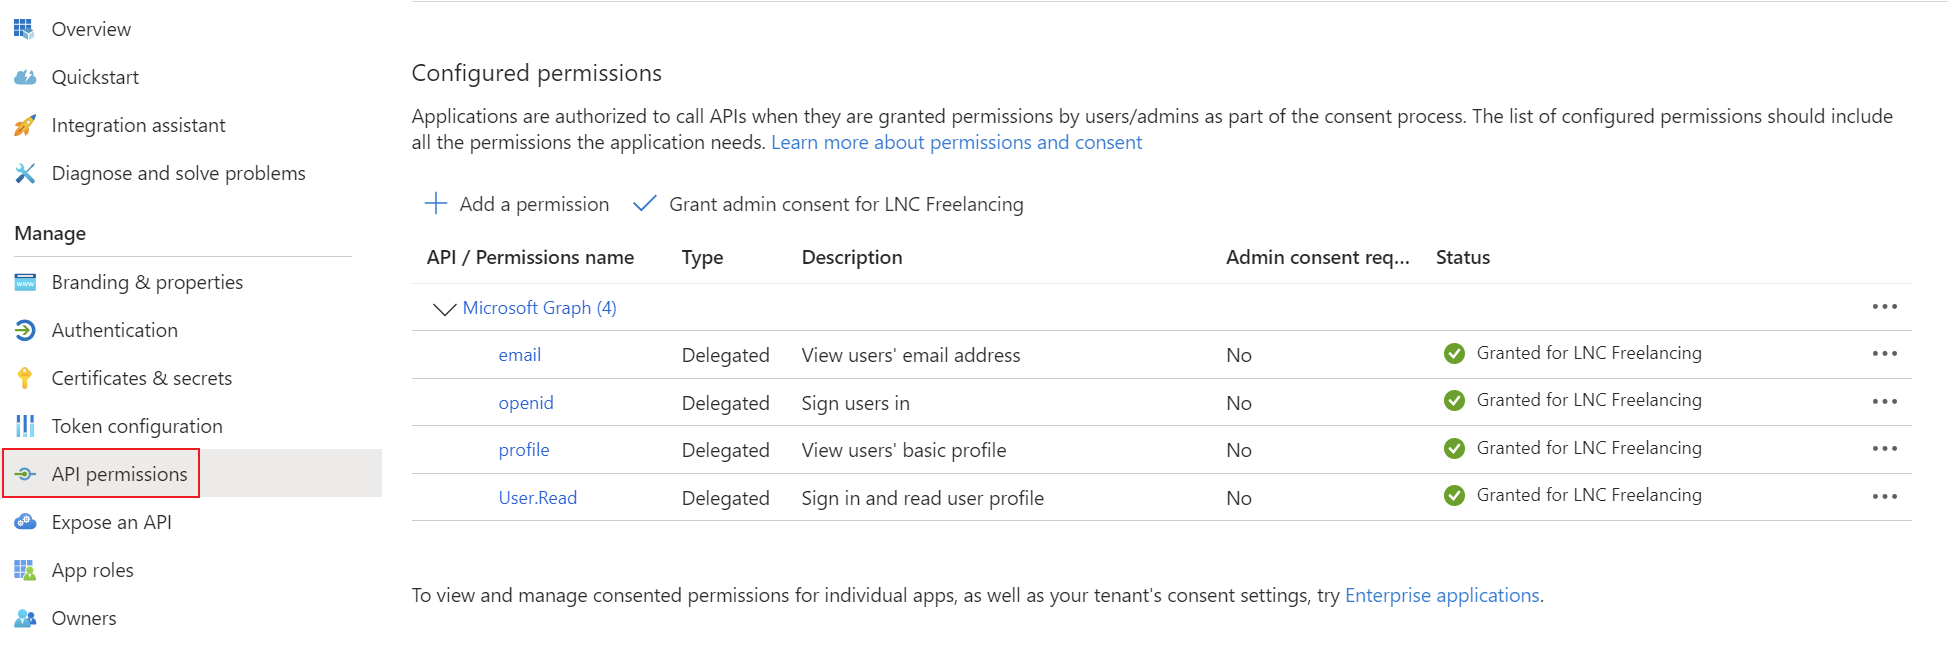
Add the corresponding permissions for OpenID Connect as delegated permissions and grant admin consent for your tenant.
- Permissions: Delegated OpenId permissions (email, offline_access, openid, profile)
Create a client secret for the application and save the tenant ID, application ID and client secret in your password manager. You can find instructions for this information here: Get app details and grant permissions to app registration
Enable authentication login provider
To equip Grafana with SSO options, the SSO API must be activated in the configuration file. To do this, the following file “/etc/grafana/grafana.ini” must be adapted. This file is normally saved in a persistent location. Create the document if it does not already exist and add the following configuration line:
[feature_toggles]
ssoSettingsApi = true
You should then restart the Docker container or the application.
Check whether configuration was successful
If everything is set up correctly, you can log in with the administrator account in the webgui of your Grafana installation.
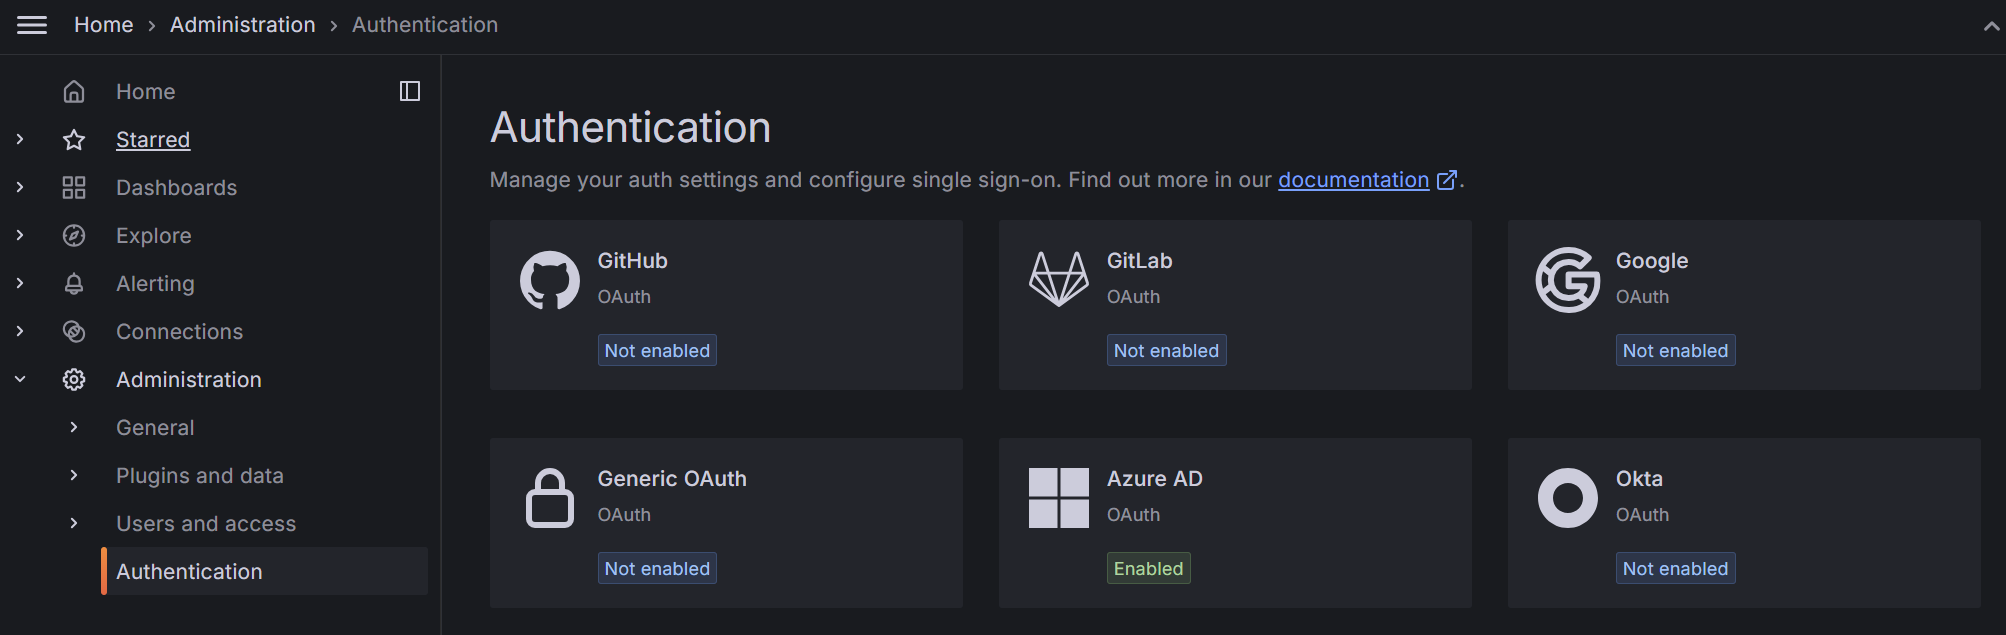
You should then be able to see the OAuth providers supported by Grafana in the “Authentication” tab.
Setup Microsoft Entra ID provider
This step requires the authentication details TenantID, ClientID, Client Secret from the first step.
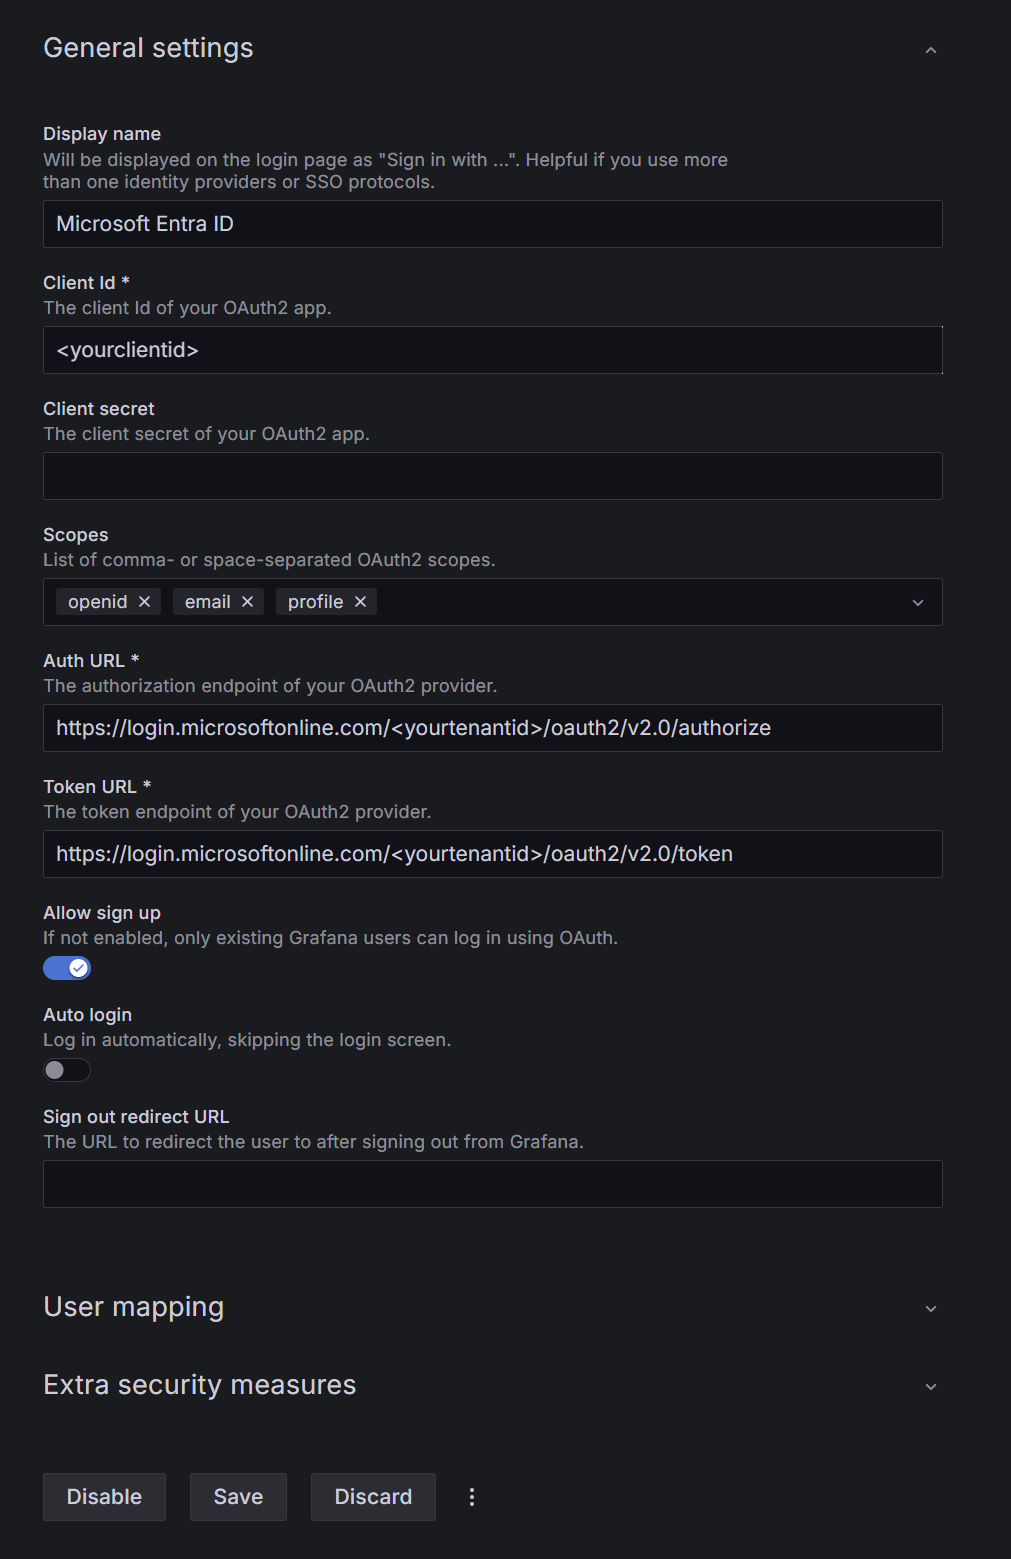
In the Grafana web interface select "Authentication" -> "Azure AD". There you can enter the credentials from Microsoft Entra ID. Enter the information as described here:
- Display Name: Enter a name that will be displayed to the end user as a button when logging in.
- Client id: Enter your ClientID from the App Registration of your Microsoft Entra ID.
- Client secret: Here you have to enter the Client Secret as passphrase.
- Scopes: This allows you to receive multiple parameters from the Microsoft Entra ID user object. The Access Token is requested with these scopes at login. The default values are usually sufficient.
- Auth URL: Enter the following URL and fill your tenant id:
https://login.microsoftonline.com/<yourtenantid>/oauth2/v2.0/authorize - Token URL: Enter the following URL and fill your tenant id:
https://login.microsoftonline.com/<yourtenantid>/oauth2/v2.0/token - Allow sign up: If this is enabled all user who have permission to sign in to your App Registration, are automatically signed up as user objects in Grafana. As you can still manage permissions within the App Registration this is usually recommended.
- Auto login: This logs your users automatically into Grafana if they have an Access Token for Microsoft Entra ID.
After these settings are properly configured your users should be able to sign into Grafana. For more granular settings and things like role mapping or default Grafana groups, change the settings under "User mapping" and "Extra security measures".
Microsoft Entra ID SSO for Proxmox
Prerequisites: Ability to create an app registration with delegated standard rights. Proxmox should be installed and access to the Datacenters Realms section should be possible.
Proxmox allows various external authentication services via protocols such as Active Directory, LDAP or OpenID Connect. We will use the latter for the Microsoft Entra ID connection and SSO functionality.
Limitations
Proxmox allows the automatic creation of user objects, but is otherwise relatively limited compared to other applications, as it does not use the OAUTH 2.0 standard but only handles logins via Open ID Connect. These certain limitations must be taken into account when introducing this setup.
In addition, logins will only be possible for the Webgui. The login on the individual cluster nodes is still regulated via the Linux authentication of the individual hosts. This means that no console connections can be made to the host shells with the Microsoft Entra ID user objects.
Create App Registration
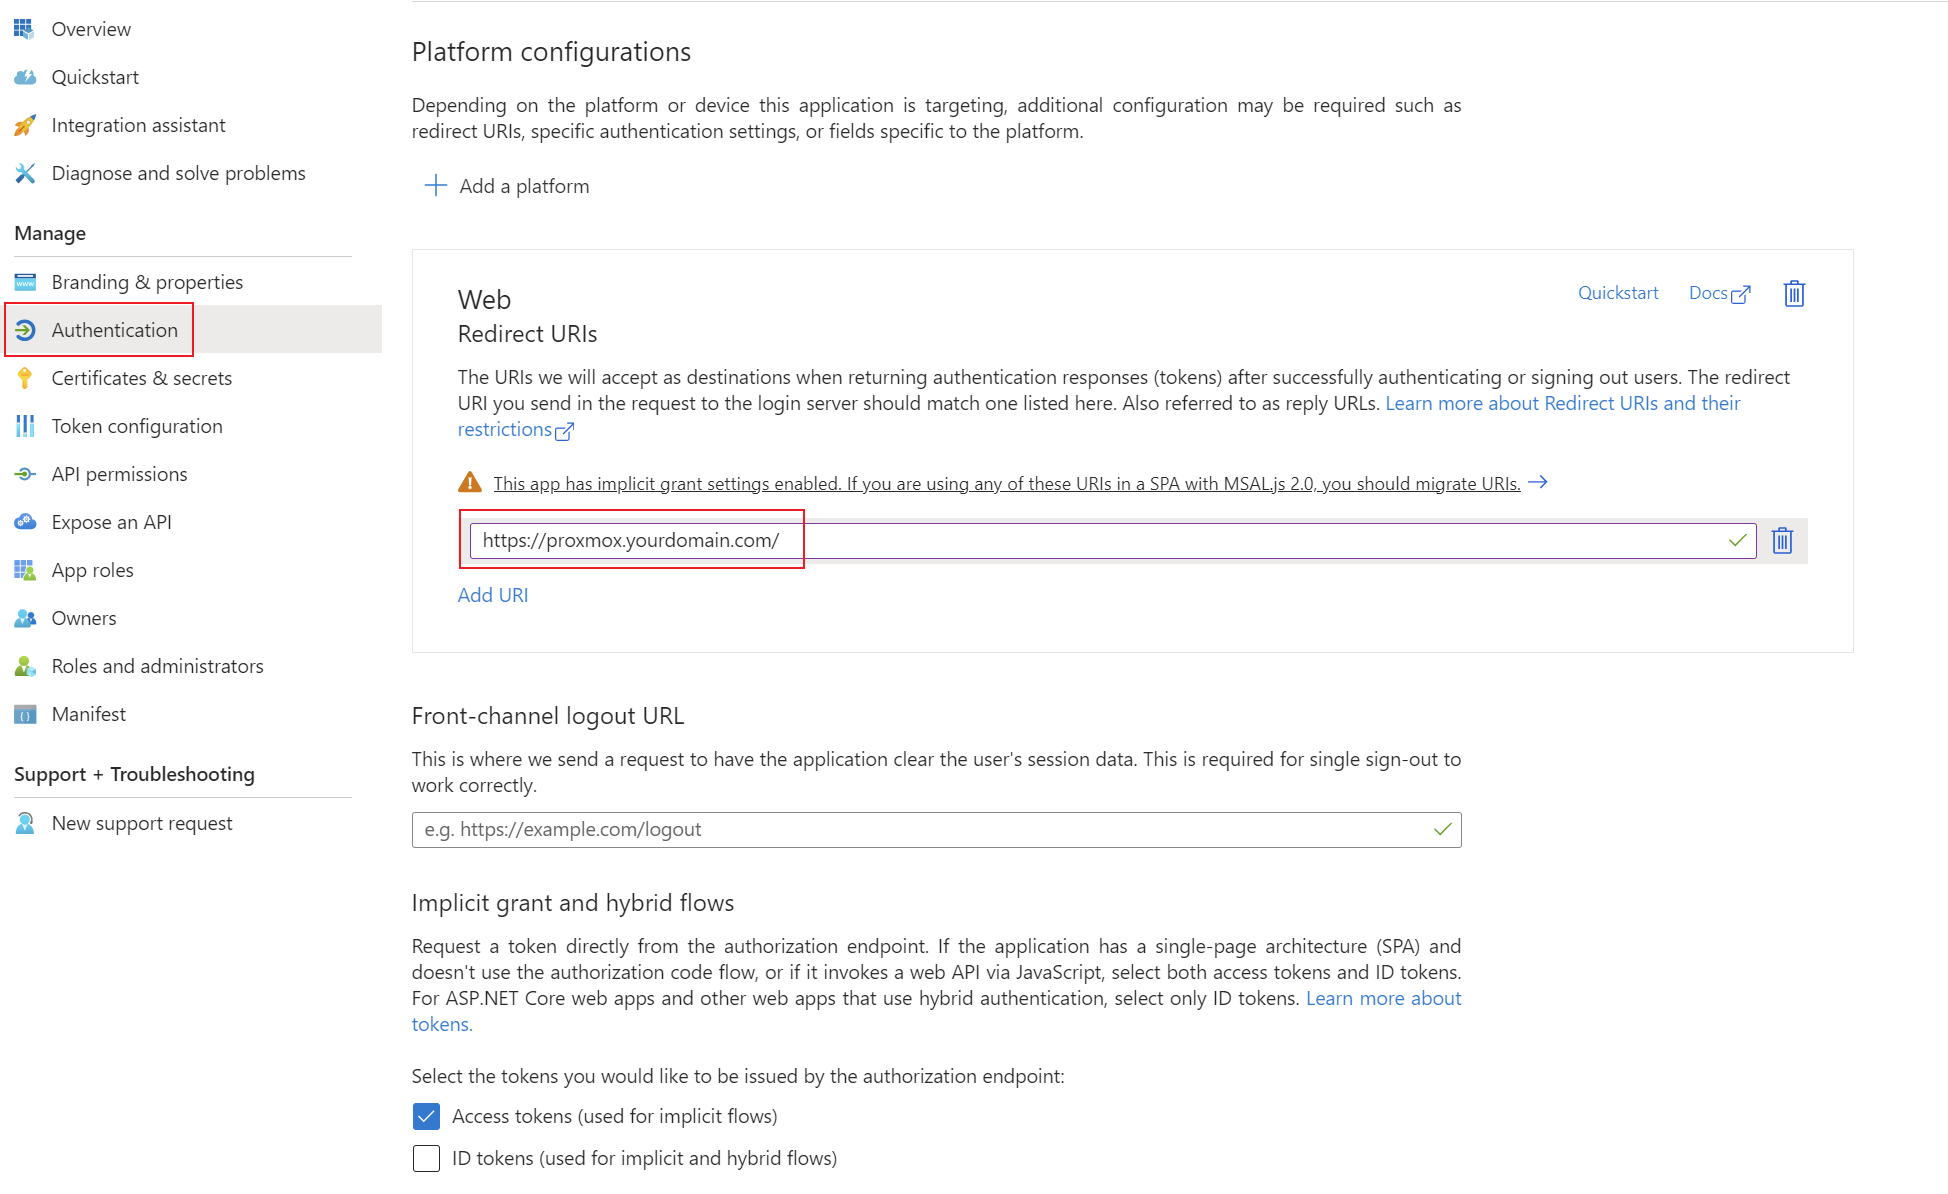
First, an app registration including client secret must be created in Microsoft Entra ID. All settings can be left at the default values. Important settings are the Redirect URIs under the Authentication tab. Set these URIs to your external or internal domain on which Proxmox is available. These URIs will be used for Microsoft Entra ID to know where to redirect the user in case of successful logins.
- Authentication Type: Web
- Redirect URIs: https://proxmox.yourdomain.com/
Add the corresponding permissions for OpenID Connect as delegated permissions and grant admin consent for your tenant.
- Permissions: Delegated OpenId permissions (email, offline_access, openid, profile)
Create a client secret for the application and save the tenant ID, application ID and client secret in your password manager. You can find instructions for this information here: Get app details and grant permissions to app registration
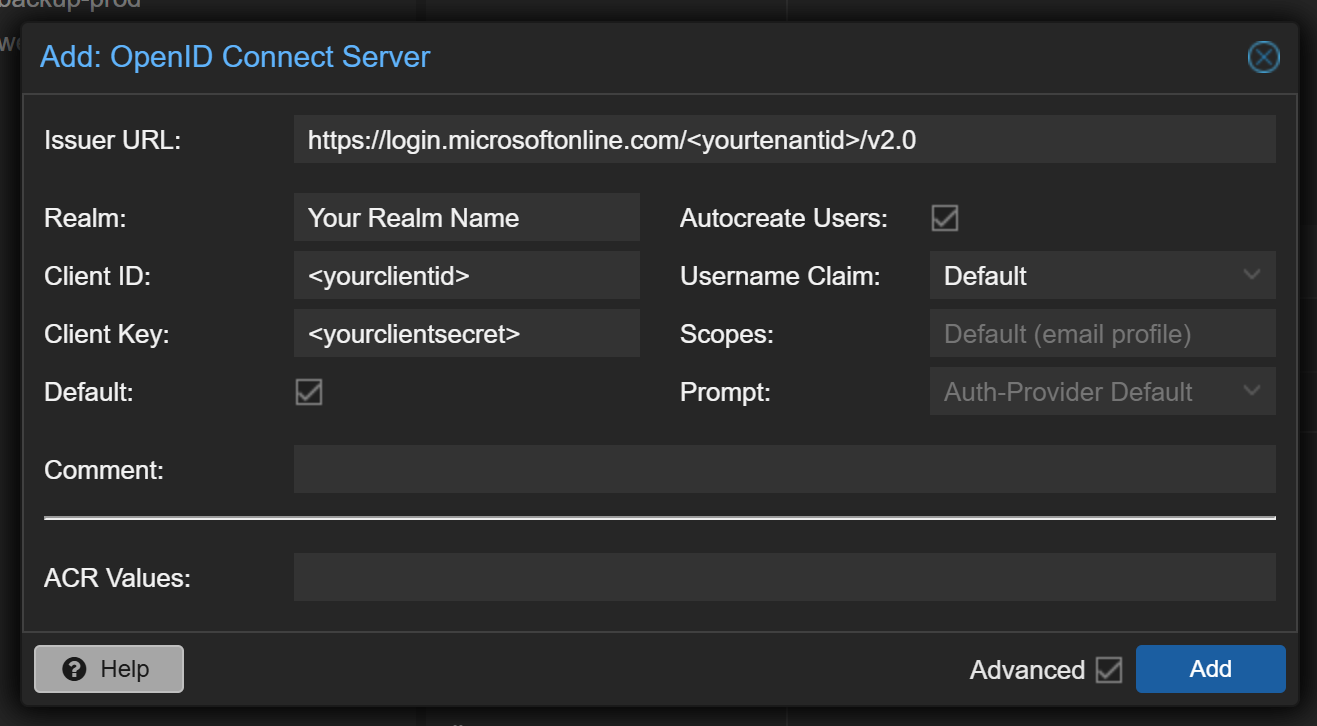
Setup Microsoft Entra ID in Proxmox Realm
This step requires the authentication details TenantID, ClientID, Client Secret from the first step.
In the Proxmox web interface select "Datacenter" -> "Realms" -> "Add" -> "OpenID Connect Server". There you can enter the credentials from Microsoft Entra ID. Enter the information as described here:
- Issuer URL: https://login.microsoftonline.com/<yourtenantid>/v2.0
- Realm: This is the id of the installed authentication provider. The name must be lower case and without special characters.
- Client ID: Enter your ClientID from the App Registration of your Microsoft Entra ID.
- Client Key: Here you have to enter the Client Secret.
- Default: If this box is checked, the default auth provider on the sign in screen will be this method.
- Autocreate Users: If this is enabled all user who have permission to sign in to your App Registration, are automatically signed up as user objects in Proxmox. As you can still manage permissions within the App Registration this is usually recommended.
- Scopes: This allows you to receive multiple parameters from the Microsoft Entra ID user object. The Access Token is requested with these scopes at login. The default values are usually sufficient.
- Prompt: This setting defines which action Proxmox should perform when users log in. The default options are sufficient for the Microsoft Entra ID login.
- Comment: Enter a name that will be displayed to the end user on the login screen in the auth provider selection.
After these settings are properly configured your users should be able to sign into Proxmox web interface. After sign in the default grouping, role and permissions mechanisms from Proxmox take place.
Microsoft Entra ID SSO for Portainer
Prerequisites: Ability to create an app registration with delegated standard rights. Portainer should be installed and administrator access to the web interface should be available.
This guide will take you through the various stages of installing SSO using Microsoft Entra ID. Unfortunately, it is not possible to add the SSO functions in the Portainer Community Edition (CE). Accordingly, we have to purchase a free license of the Business Edition (BE) and upgrade the Portainer instance. You will then be able to manage the logins and authorizations for the web interface via Microsoft Entra ID. Functions such as automatic user provisioning or default permissions are also supported by Portainer.
Create App Registration
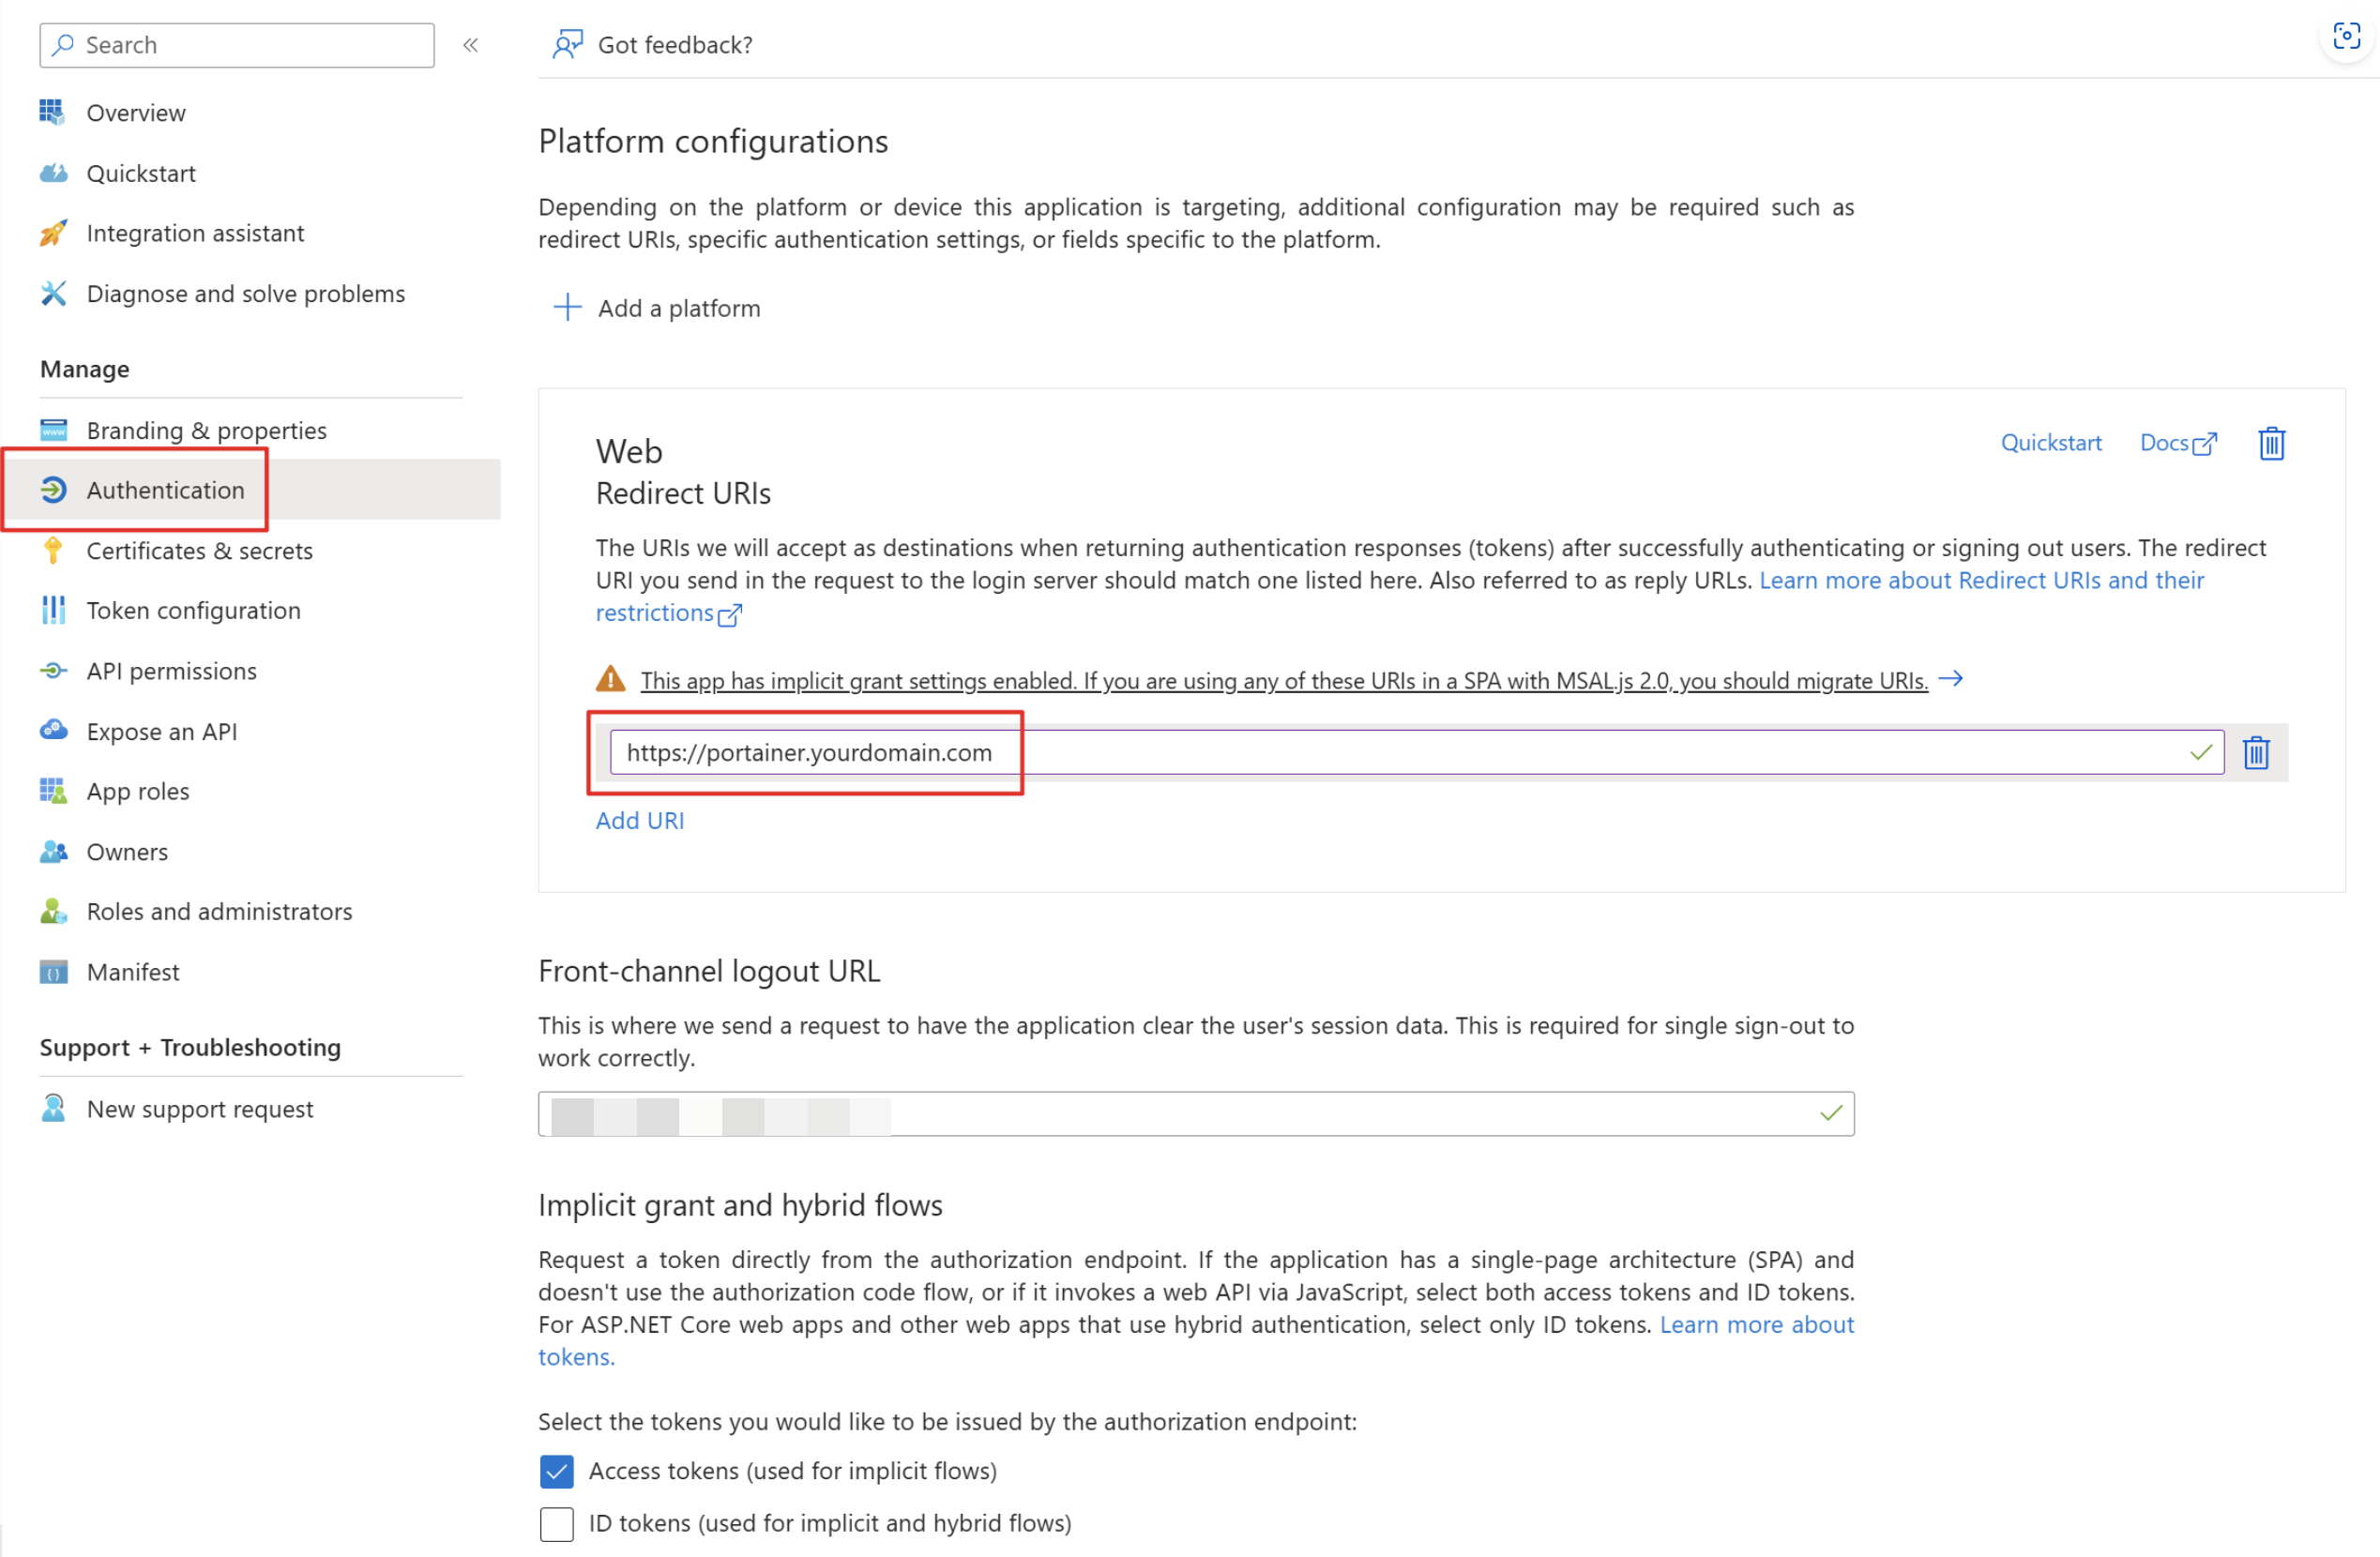
First, an app registration including client secret must be created in Microsoft Entra ID. All settings can be left at the default values. Important settings are the Redirect URIs under the Authentication tab. Set these URIs to your external or internal domain on which Portainer is available. These URIs will be used for Microsoft Entra ID to know where to redirect the user in case of successful logins.
- Authentication Type: Web
- Redirect URIs: https://portainer.yourdomain.com
Add the corresponding permissions for OpenID Connect as delegated permissions and grant admin consent for your tenant.
- Permissions: Delegated OpenId permissions (email, offline_access, openid, profile)
Create a client secret for the application and save the tenant ID, application ID and client secret in your password manager. You can find instructions for this information here: Get app details and grant permissions to app registration
Acquire Portainer License
To activate the SSO functionality, the Portainer Comunity Edition must be replaced by a Business Edition. Don't worry, it costs nothing. At least for a Homelab environment and installation with less than 3 environments. For business customer licensing in Portainer Business Edition is based on the number of nodes you are managing.
Create an account and follow the instructions on this page: Take 3 - Get your first 3 nodes free (portainer.io)
Upgrade Portainer instance
After you have received the license key via email you can start upgrading your Portainer CE to a Portainer BE instance. Make sure to create a backup before you upgrade the instance.
When running portainer inside a single docker container, it is no simpler than changing the image from "portainer/portainer-ce" to "portainer/portainer-ee" and restart the stack or containers. You can find more in depth guides and version specific upgrade manuals here: Docker Standalone | Portainer Documentation
Check activation status
After installing the license, this can be checked in the web interface. To do this, navigate to “Licenses” and check whether your license is installed and the limitation to 3 nodes is displayed. Then you are ready to add external authentication providers such as Microsoft Entra ID. Go to the next step.
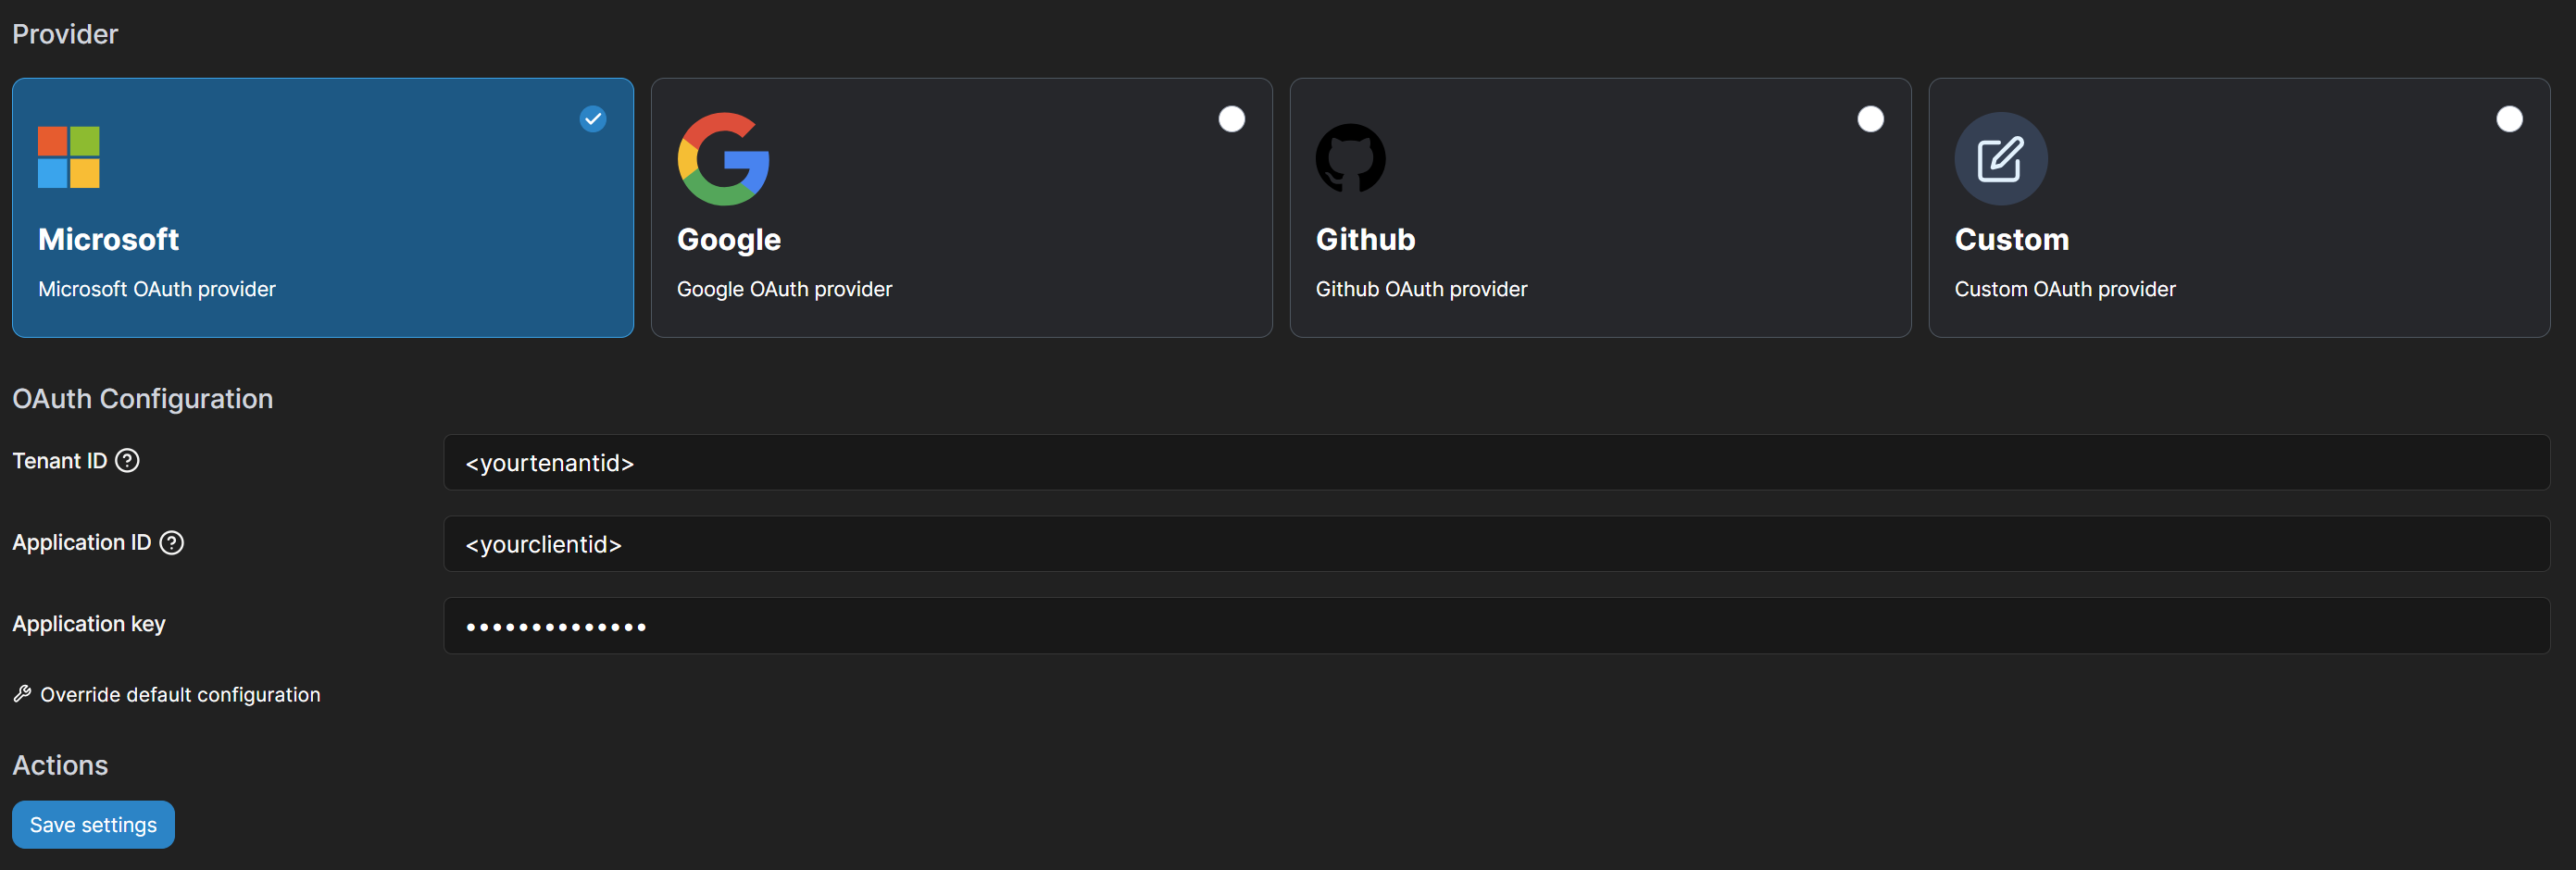
Setup Microsoft Entra ID login provider
For the setup, log into the web interface with an administrator account. You can then select the “OAuth” option under Settings -> Authentication -> Authentication method. The following settings enable automatic user provision or a default group. Configure this as it suits you. Attention: It is recommended that the option “hide internal authentication prompt” is not activated so that the values can still be adjusted in the event of a misconfiguration of the OAuth provider settings. If this is activated, you can lock yourself out and have to rebuild the Portainer instance.
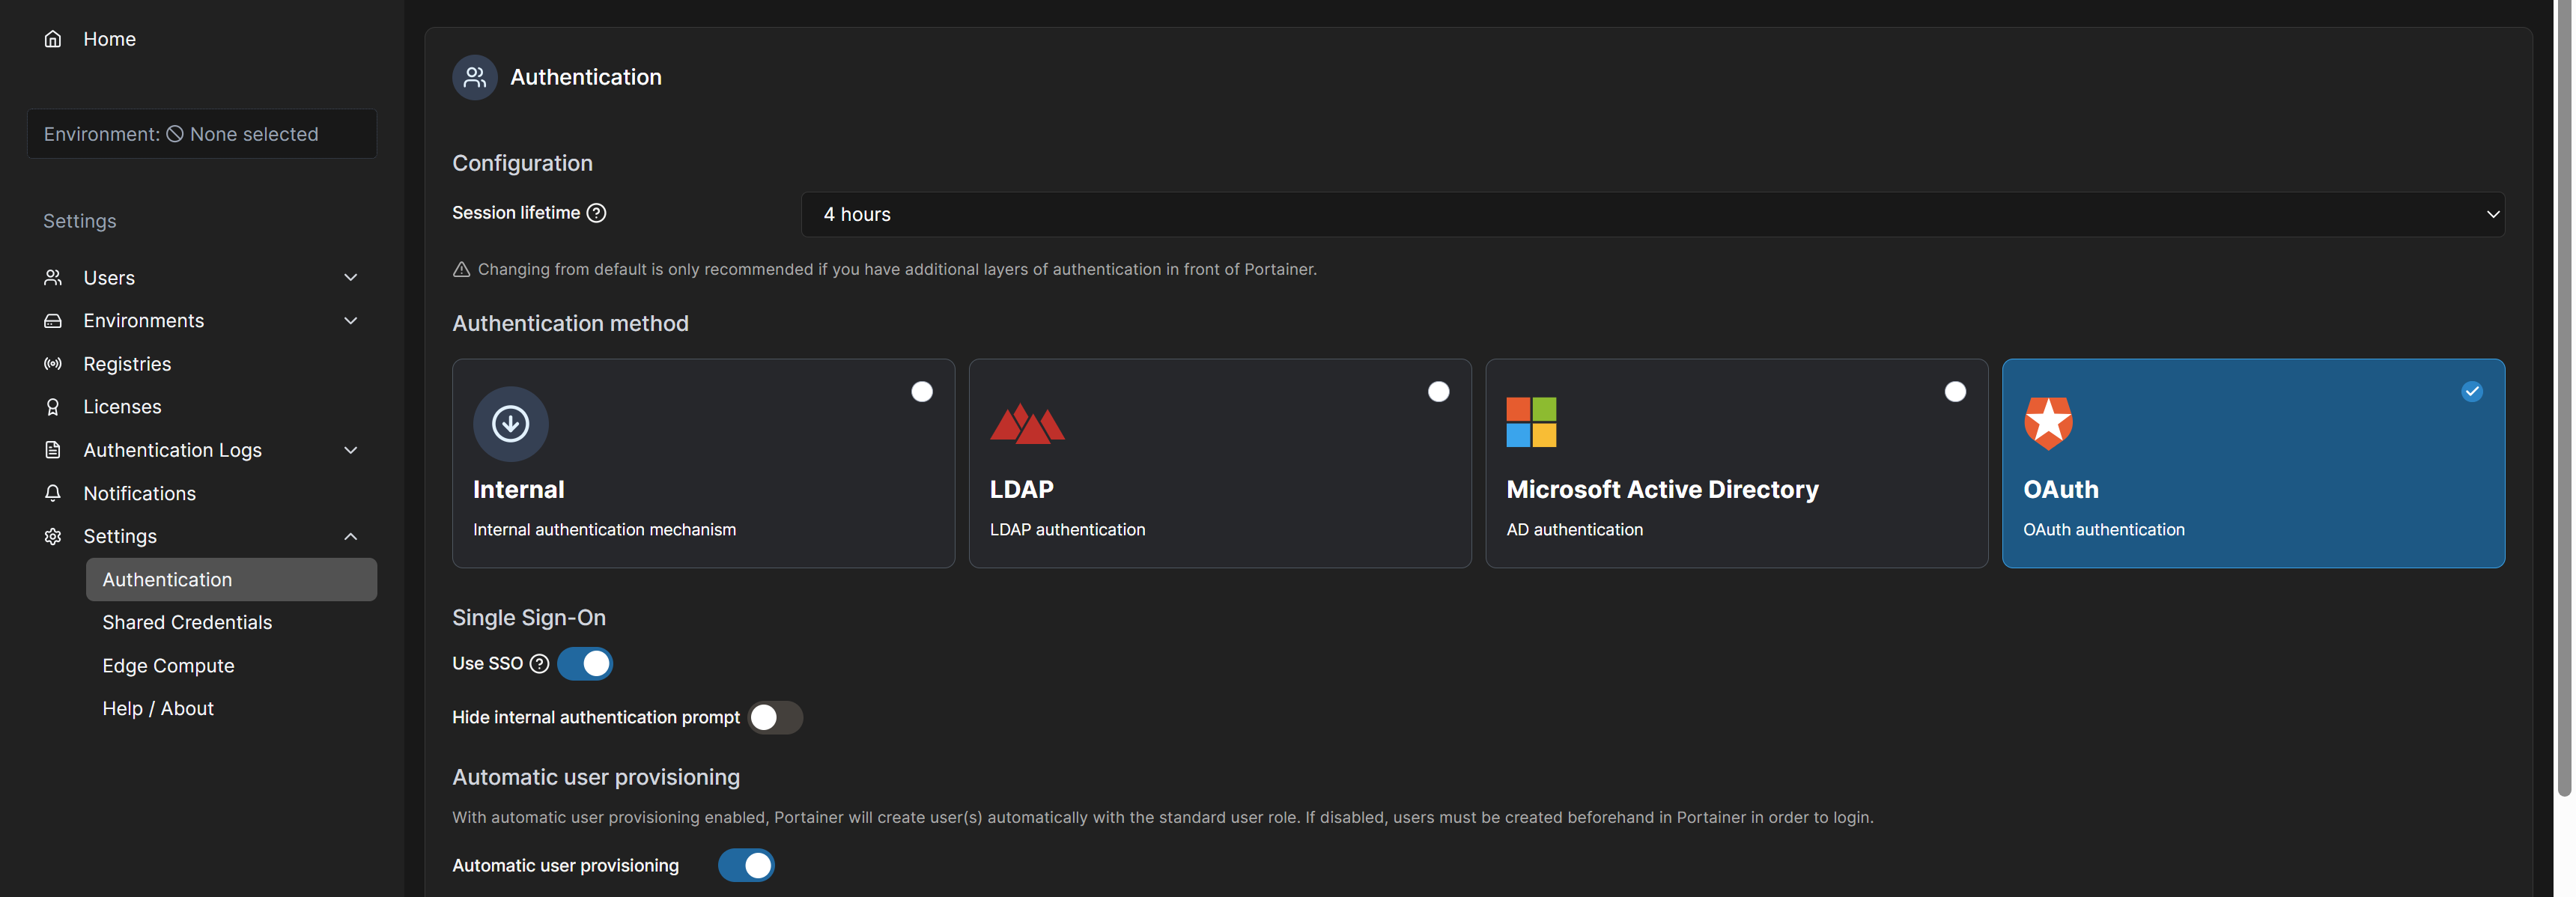
You can then select the "Microsoft OAuth provider" under “Provider” and fill in the TenantID, ClientID and Client Secret options with the corresponding values from the app registration. After saving the settings, you can control who can connect to the web interface of the Portainer instance via the app registration members.
Microsoft Entra ID SSO for Mealie
Prerequisites: Ability to create an app registration with delegated rights and access to the Mealie Docker volume or startup method. Mealie should be installed correctly.
Mealie makes recipe management and planning extremely easy. The Mealie software offers an OpenID interface, which means that Microsoft Entra ID can easily be used as an identity provider and permission manager.
Create App Registration
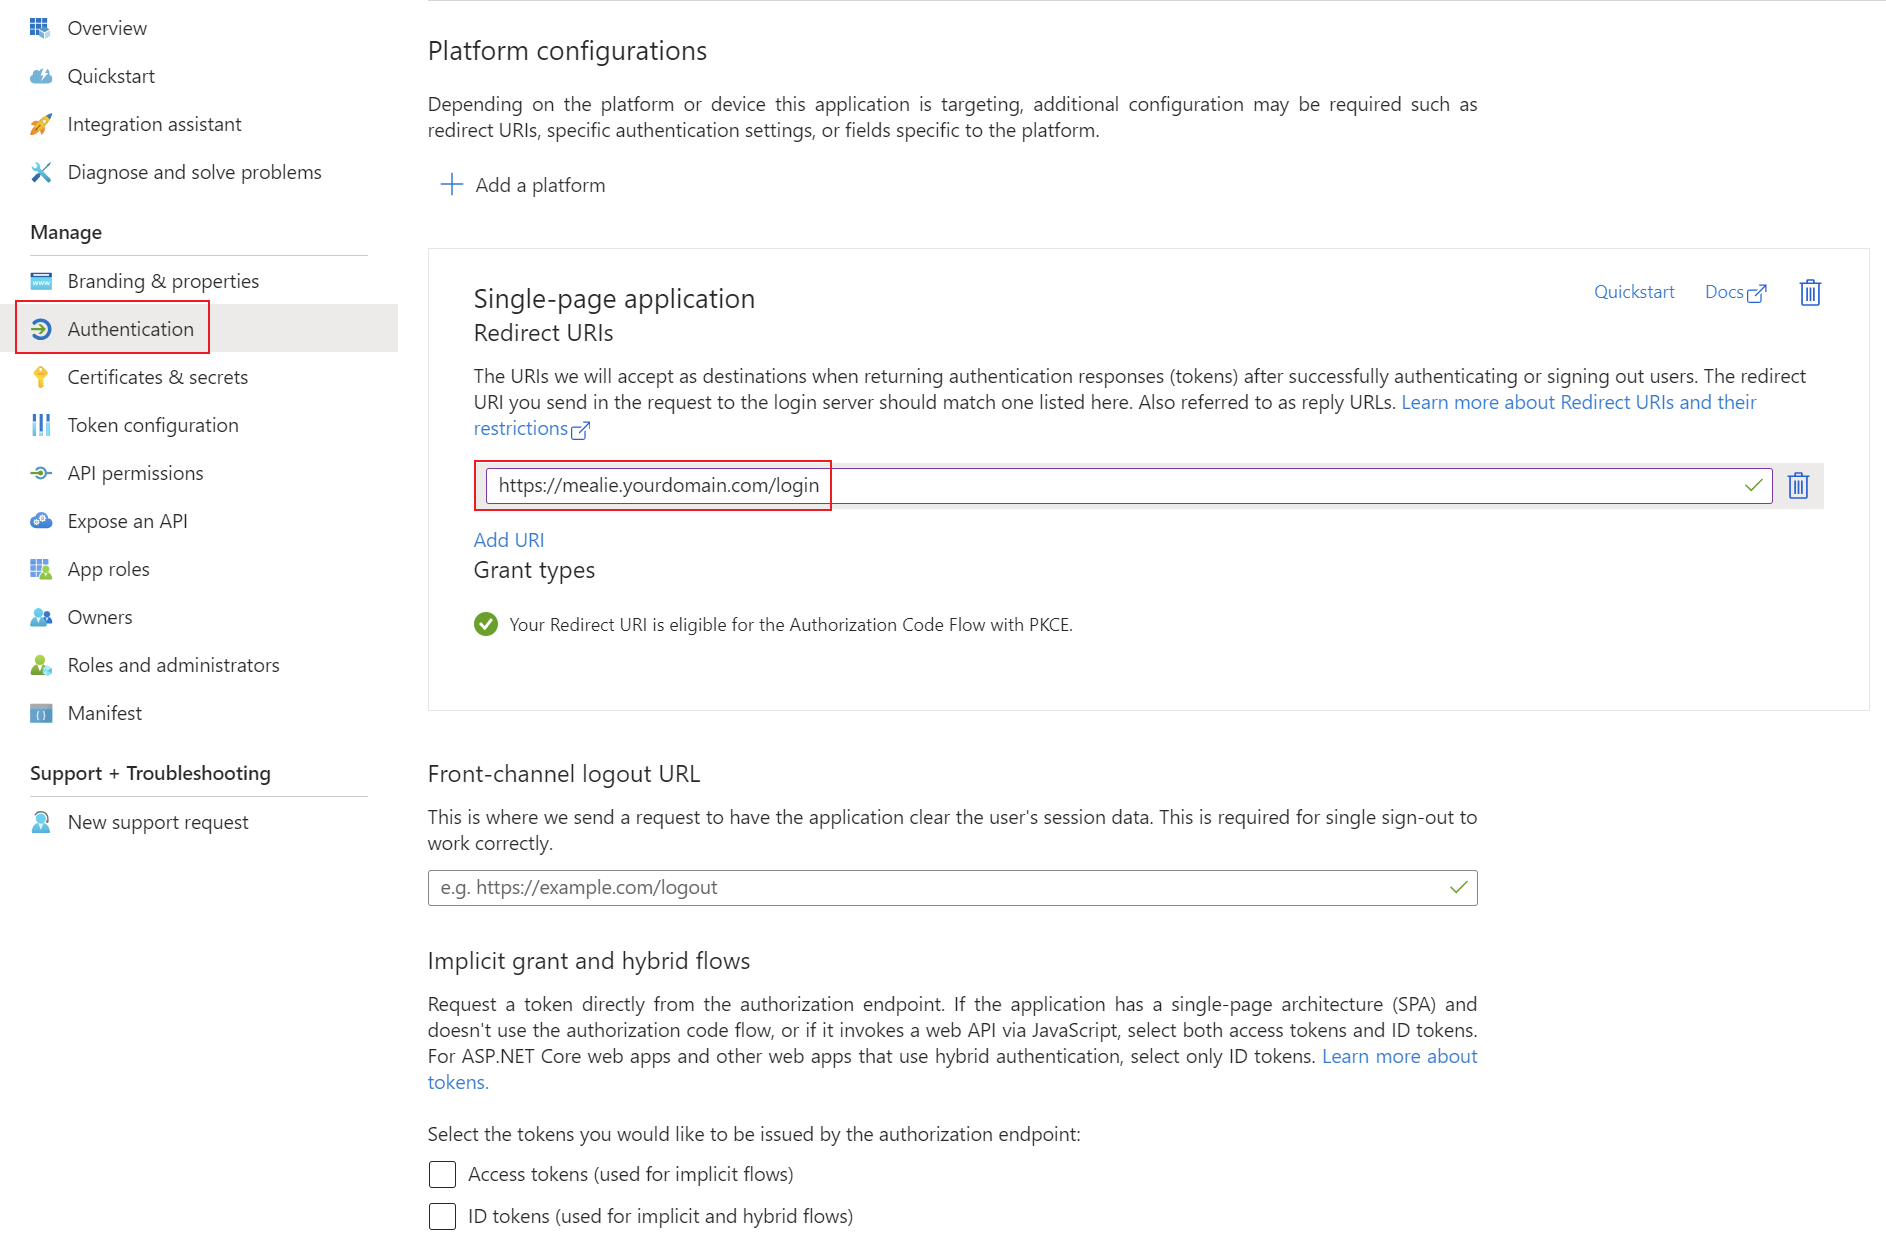
First, an app registration including client secret must be created in Microsoft Entra ID. All settings can be left at the default values. Important settings are the Redirect URIs under the Authentication tab. Set these URIs to your external or internal domain on which Mealie is available. These URIs will be used for Microsoft Entra ID to know where to redirect the user in case of successful logins.
- Type: Single-page application
- Redirect URIs: https://mealie.yourdomain.com/login
Add the corresponding permissions for OpenID Connect as delegated permissions and grant admin consent for your tenant.
- Permissions: Delegated OpenId permissions (email, offline_access, openid, profile)
Create a client secret for the application and save the tenant ID, application ID and client secret in your password manager. You can find instructions for this information here: Get app details and grant permissions to app registration
Setup Microsoft Entra ID login provider
With Mealie, the Microsoft Entra ID configurations can be set up using environment variables. Installation using Docker is mandatory for these instructions. The following environment variables enable the configuration of the OpenID integration. You can find more information on all of Mealie's environment variables here: Backend Configuration - Mealie
The relevant environment variables for OpenID are as follows:
- OIDC_AUTH_ENABLED: Enables authentication via OpenID Connect if set to true.
- OIDC_SIGNUP_ENABLED: Enables new users to be created when signing in for the first time with OIDC if set to true.
- OIDC_CONFIGURATION_URL: This is the URL to the configuration of the provider. Using Microsoft Entra ID this probably: https://login.microsoftonline.com//v2.0/.well-known/openid-configuration
- OIDC_CLIENT_ID: This is the client id of your App Registration in Microsoft Entra ID.
- OIDC_CLIENT_SECRET: Here you have to provide the Client Secret from the App Registration.
- OIDC_PROVIDER_NAME: This is the display name for the button on the sign in screen.
Side note: As this type of configuration involves environment variables, these contents can also be transferred via the volume as an .env file, specified with a simple startup command or specified in another declarative context (Kubernetes manifest, Terraform, etc.).
Docker compose example
This Docker Compose file shows a possible configuration for Mealie that authenticates using Microsoft Entra ID. In addition, a mail server is also specified for outgoing SMTP mail traffic.
Customize this content with your specifications and save the content in a normal docker-compose.yaml file. As this is Docker Compose, the application can be started easily with the following command (in detach mode -> -d):
docker compose up -dversion: "3.7"
services:
mealie:
image: ghcr.io/mealie-recipes/mealie:latest
container_name: <yourcontainername>
ports:
- "8600:<yourpublicport>"
volumes:
- <yourpersistentpath>:/app/data/
environment:
- ALLOW_SIGNUP=true
- OIDC_AUTH_ENABLED=true
- OIDC_SIGNUP_ENABLED=true
- OIDC_CONFIGURATION_URL=https://login.microsoftonline.com/<yourtenantid>/v2.0/.well-known/openid-configuration
- OIDC_CLIENT_ID=<yourclientid>
- OIDC_CLIENT_SECRET=<yourclientsecret>
- OIDC_PROVIDER_NAME=Microsoft Entra ID
- PUID=1000
- PGID=1000
- TZ=<yourtimezone>
- MAX_WORKERS=1
- WEB_CONCURRENCY=1
- BASE_URL=https://<yourmealiedomain>
- SMTP_HOST=<yoursmtpmailhost>
- SMTP_PORT=587
- SMTP_FROM_EMAIL=<yoursmtpmail>
- SMTP_USER=<yoursmtpmailuser>
- SMTP_PASSWORD=<yoursmtpmailpassword>
- SMTP_FROM_NAME=<yourmailname>
restart: unless-stoppedMicrosoft Entra ID SSO for Bookstack
Prerequisites: Ability to create an app registration with delegated rights and access to the Bookstack Docker volume or startup method. Bookstack should be installed correctly.
Bookstack offers an OpenID interface, which means that Microsoft Entra ID can easily be used as an identity provider for managing access and permission within Bookstack. The functionalities are more limited than other integrations. However, simple functionalities such as automatic user creation and email verification can be customized.
This guide is a compilation of the main documentation of Bookstack: Third Party Authentication · BookStack (bookstackapp.com)
Create App Registration
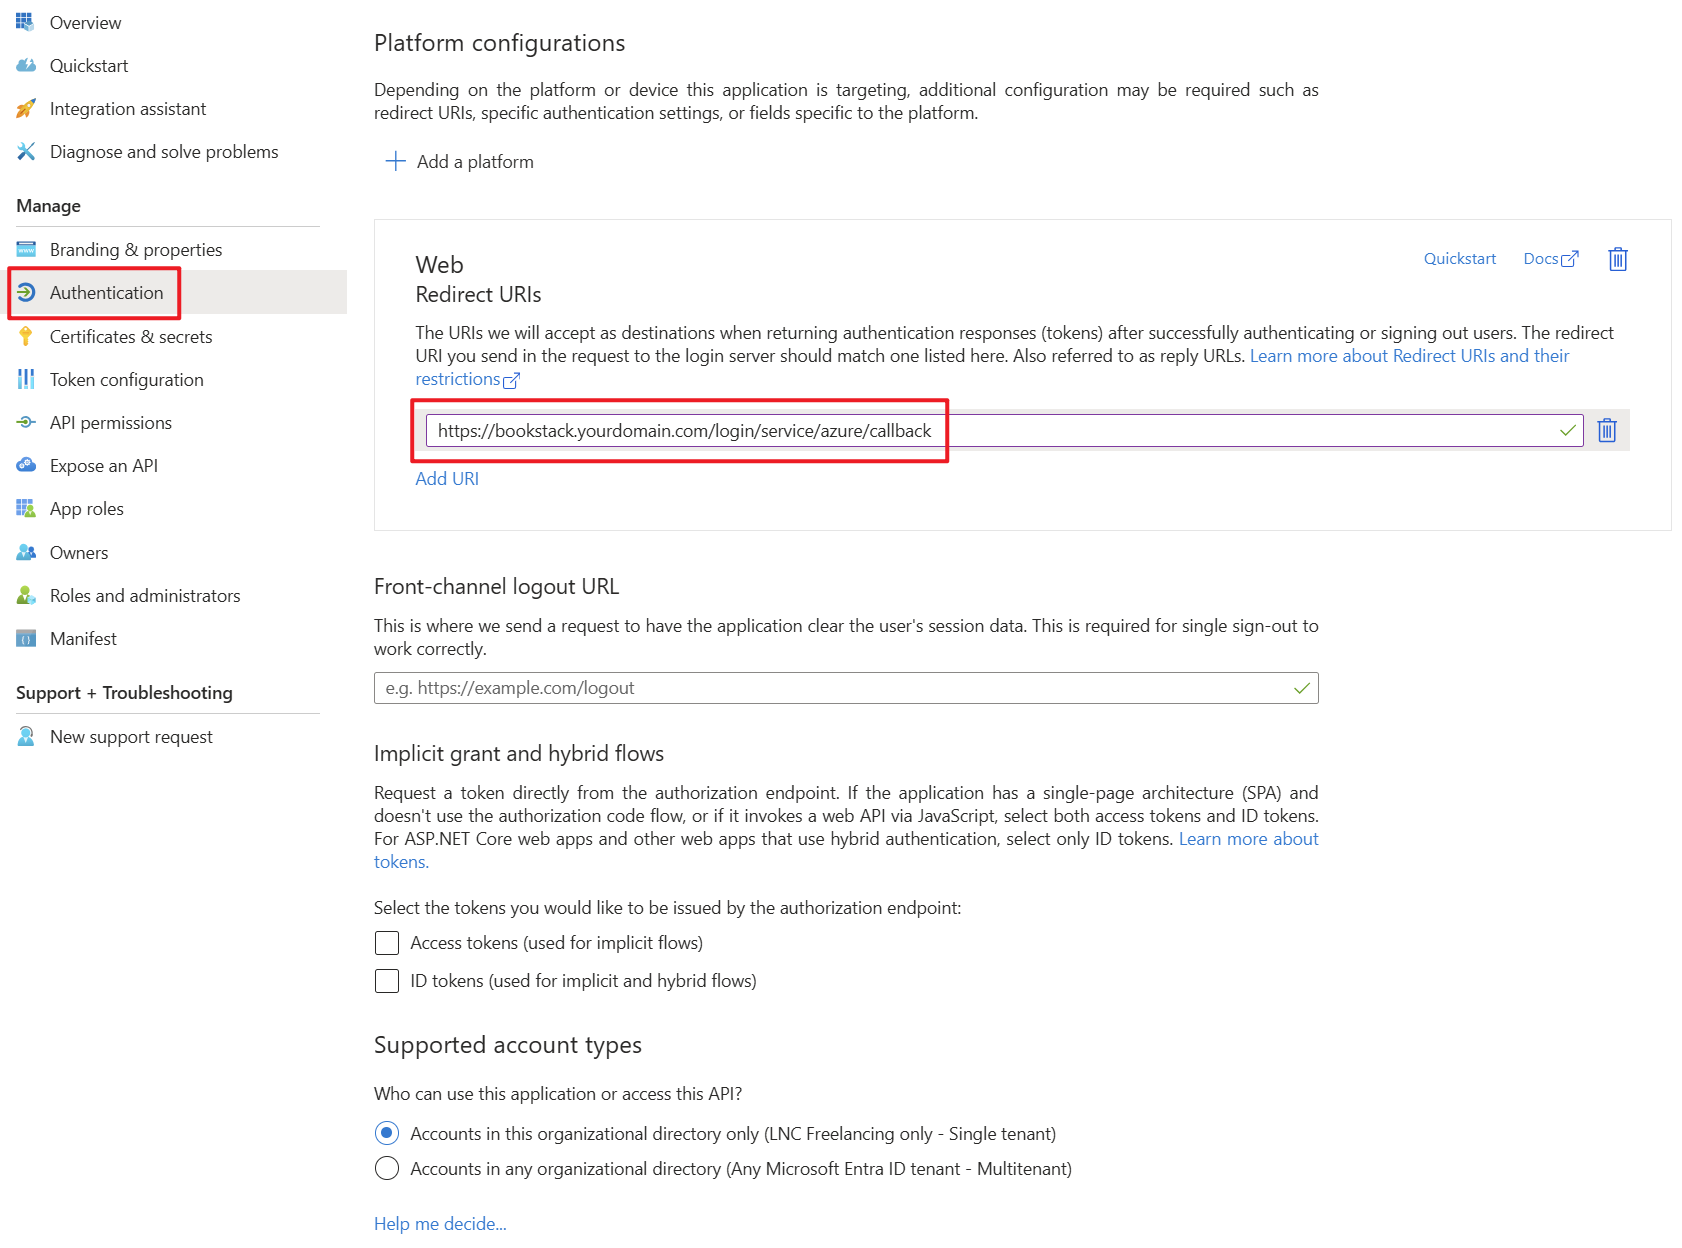
First, an app registration including client secret must be created in Microsoft Entra ID. All settings can be left at the default values. Important settings are the Redirect URIs under the Authentication tab. Set these URIs to your external or internal domain on which Bookstack is available. These URIs will be used for Microsoft Entra ID to know where to redirect the user in case of successful logins.
- Authentication Type: Web
- Redirect URIs: https://bookstack.yourdomain.com/login/service/azure/callback
Add the corresponding permissions for OpenID Connect as delegated permissions and grant admin consent for your tenant.
- Permissions: Delegated User permission (User.Read)
Create a client secret for the application and save the tenant ID, application ID and client secret in your password manager. You can find instructions for this information here: Get app details and grant permissions to app registration
Setup Microsoft Entra ID login provider
With Bookstack, the Microsoft Entra ID configurations can be set up using environment variables. Installation using Docker is mandatory for these instructions. The following environment variables enable the configuration of the OpenID integration.
The relevant environment variables for OpenID are as follows:
- AZURE_AUTO_REGISTER: If this setting is activated, user objects are automatically created when they authenticate for the first time via Microsoft Entra ID and the user does not yet exist in Bookstack.
- AZURE_AUTO_CONFIRM_EMAIL: If activated this will skip the “Confirm email” setting as all email addresses are considered verified by Microsoft Entra ID.
- AZURE_TENANT: Here you have to enter the Tenant ID of your Microsoft Entra ID Tenant.
- AZURE_APP_ID: This is the client id of your App Registration in Microsoft Entra ID.
- AZURE_APP_SECRET: Here you have to provide the Client Secret from the App Registration.
Side note: As this type of configuration involves environment variables, these contents can also be transferred via the volume as an .env file, specified with a simple startup command or specified in another declarative context (Kubernetes manifest, Terraform, etc.).
Docker compose example
This Docker Compose file shows a possible configuration for Bookstack that authenticates using Microsoft Entra ID. In addition, the database container and mail settings are also specified.
Customize this content with your specifications and save the content in a normal docker-compose.yaml file. As this is Docker Compose, the application can be started easily with the following command (in detach mode -> -d):
docker compose up -dversion: "3"
services:
<yourbookstackcontainername>:
image: lscr.io/linuxserver/bookstack
container_name: <yourbookstackcontainername>
environment:
- PUID=1000
- PGID=1000
- APP_URL=https://<yourbookstackdomain>
- DB_HOST=<yourmariadbcontainername>
- DB_USER=<yourdbuser>
- DB_PASS=<yourdbpassword>
- DB_DATABASE=<yourdbname>
- MAIL_HOST=<yourmailserver>
- MAIL_PORT=587
- MAIL_FROM_NAME=<yourmailname>
- MAIL_FROM=<yoursmtpmail>
- MAIL_USERNAME=<yoursmtpmailuser>
- MAIL_PASSWORD=<yoursmtpmailpassword>
- AZURE_APP_ID=<yourclientid>
- AZURE_APP_SECRET=<yourclientsecret>
- AZURE_TENANT=<yourtenantid>
- AZURE_AUTO_REGISTER=true
- AZURE_AUTO_CONFIRM_EMAIL=true
volumes:
- <yourpersistentpathforbookstack>:/config
ports:
- 6875:80
restart: unless-stopped
depends_on:
- <yourmariadbcontainername>
<yourmariadbcontainername>:
image: lscr.io/linuxserver/mariadb
container_name: <yourmariadbcontainername>
environment:
- PUID=1000
- PGID=1000
- MYSQL_ROOT_PASSWORD=<yourdbrootpassword>
- TZ=<yourtimezone>
- MYSQL_DATABASE=<yourdbname>
- MYSQL_USER=<yourdbuser>
- MYSQL_PASSWORD=<yourdbpassword>
volumes:
- <yourpersistentpathformariadb>:/config
restart: unless-stoppedMicrosoft Entra ID SSO for Gitlab
Prerequisites: Ability to create an app registration with delegated standard rights and access to the Gitlab Docker volume. Gitlab should be installed and administrator access to the web interface should be available.
This guide describes how a Gitlab Docker instance can be equipped with all the benefits of Single Sign On (SSO) using Microsoft Entra ID. Gitlab offers options to make granular settings for the login behaviour.
Things to consider & limitations
In order to be able to log in to the GIT CLI using OAuth, it is essential to work through the following instructions. Since your own Gitlab instance does not yet have an application with which the CLI can authenticate itself. After you have completed this setup, you must note the following: OAuth SSO in CLI using... | LNC DOCS (lucanoahcaprez.ch)
Create App Registration
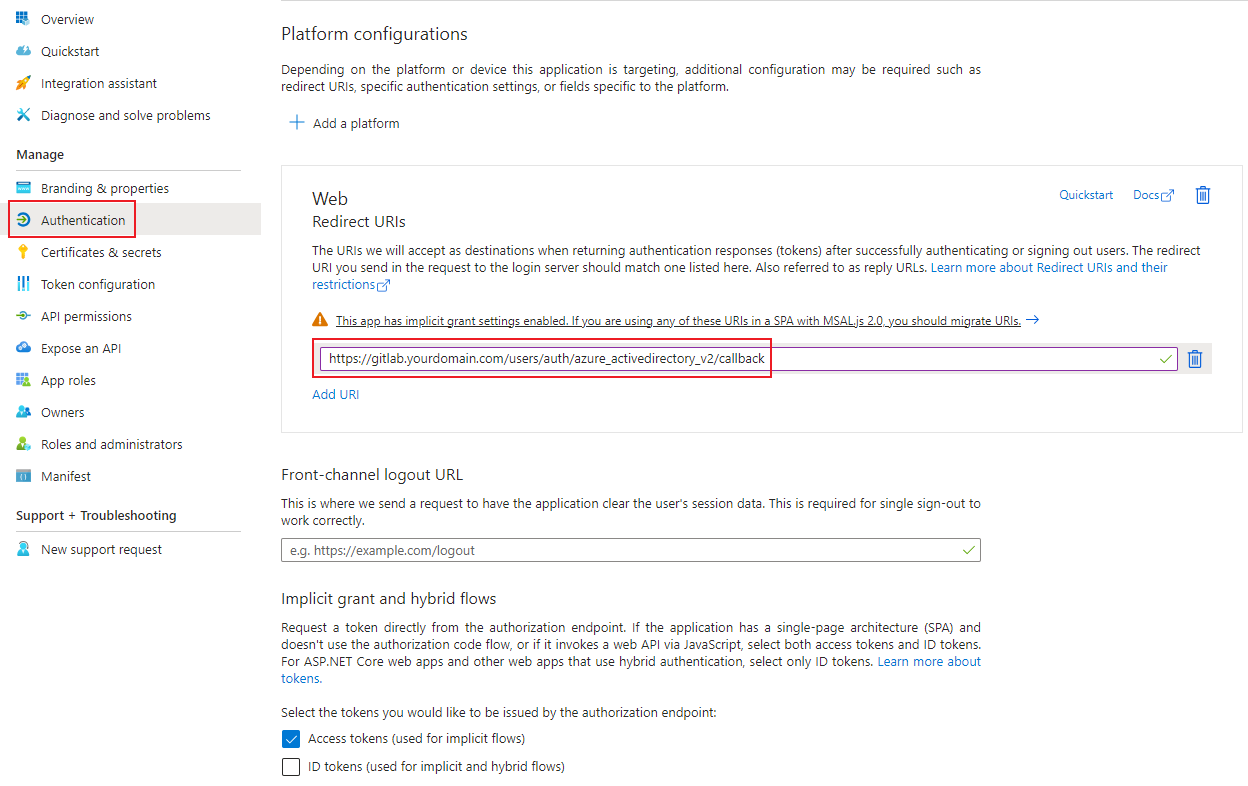
First, an app registration including client secret must be created in Microsoft Entra ID. All settings can be left at the default values. Important settings are the Redirect URIs under the Authentication tab. Set these URIs to your external or internal domain on which Gitlab is available. These URIs will be used for Microsoft Entra ID to know where to redirect the user in case of successful logins.
- Authentication Type: Web
- Redirect URIs: https://gitlab.yourdomain.com/users/auth/azure_activedirectory_v2/callback
Add the corresponding permissions for OpenID Connect as delegated permissions and grant admin consent for your tenant.
- Permissions: Delegated OpenId permissions (email, offline_access, openid, profile)

Create a client secret for the application and save the tenant ID, application ID and client secret in your password manager. You can find instructions for this information here: Get app details and grant permissions to app registration
Setup Microsoft Entra ID login provider
This step requires the authentication details TenantID, ClientID, Client Secret from the first step.
With Gitlab, the Microsoft Entra ID configurations can be set up using the GITLAB_OMNIBUS_CONFIG environment variable. The following part of the variable enables the configuration of the OpenID integration.
The relevant environment variables for OpenID are as follows:
- gitlab_rails['omniauth_enabled']: This boolean represents wheter OAuth is enabled or not.
- gitlab_rails['omniauth_allow_single_sign_on']: The providers are specified here. All providers that are to be used in parallel can be specified here.
- gitlab_rails['omniauth_block_auto_created_users']: If this setting is set to true, auto-created user must be admin approved.
- gitlab_rails['omniauth_providers']: This is the main part of the configuration. Because it is an object that is assigned here, these sub-levels are defined:
- name: This is the display name for the button on the sign in screen.
- label: This is the display name for the button on the sign in screen.
- args: Here you will define the App Registration credentials from the previous step.
- client_id: This is the client id of your App Registration in Microsoft Entra ID.
- client_secret: Here you have to provide the Client Secret from the App Registration.
- tenant_id: Here you have to enter the Tenant ID of your Microsoft Entra ID Tenant.
Side note: As this type of configuration involves the omnibus variable, these contents can also be transferred via the volume as the gitlab.rb file, specified with a simple startup command or specified in another declarative context (Kubernetes manifest, Terraform, etc.).
Docker compose example
This Docker Compose file shows a possible configuration for Gitlab that authenticates using Microsoft Entra ID. In addition mail settings are also specified.
Customize this content with your specifications and save the content in a normal docker-compose.yaml file. As this is Docker Compose, the application can be started easily with the following command (in detach mode -> -d):
docker compose up -dversion: '3.6'
services:
web:
container_name: <yourcontainername>
image: 'gitlab/gitlab-ee:latest'
restart: unless-stopped
hostname: '<yourgitlabdomain>'
environment:
GITLAB_OMNIBUS_CONFIG: |
external_url 'https://<yourgitlabdomain>'
gitlab_rails['gitlab_shell_ssh_port'] = <yoursshshellport>
gitlab_rails['smtp_enable'] = true
gitlab_rails['smtp_address'] = "<yourmailserver>"
gitlab_rails['smtp_port'] = 587
gitlab_rails['smtp_user_name'] = "<yoursmtpmailuser>"
gitlab_rails['smtp_password'] = "<yoursmtpmailpassword>/"
gitlab_rails['smtp_domain'] = "<yourgitlabdomain>"
gitlab_rails['smtp_authentication'] = "login"
gitlab_rails['smtp_enable_starttls_auto'] = true
gitlab_rails['omniauth_enabled'] = true
gitlab_rails['omniauth_allow_single_sign_on'] = ['azure_activedirectory_v2']
gitlab_rails['omniauth_block_auto_created_users'] = false
gitlab_rails['omniauth_providers'] = [
{
"name" => "azure_activedirectory_v2",
"label" => "Microsoft Entra ID",
"args" => {
"client_id" => "<yourclientid>",
"client_secret" => "<yourclientsecret>",
"tenant_id" => "<yourtenantid>",
}
}
]
ports:
- '<yourhttpport>:80'
- '<yourhttpsport>:443'
- '<yoursshport>:22'
volumes:
- <yourpersistentpath>/config:/etc/gitlab
- <yourpersistentpath>/logs:/var/log/gitlab
- <yourpersistentpath>/data:/var/opt/gitlab
shm_size: '256m'